Tutorial: Creating a Blog in Laravel from scratch – part 5 – Create Models and Routes.
Hi there and welcome to the next Laravel tutorial!
In this tutorial we will be learning how Models and Routes are created in Laravel to get closer to our goal of a simple functional blog.
If you are new here, head over to part 1 of the tutorials
In the previous tutorial we have learned how to use artisan to create migrations and to use Schema Builder in our migrations to create tables and fill in rows in the database.
Now using the knowledge that we have learned in part 3 of the tutorial we need to build models to relate the database tables to each other.
In Laravel models reside in your “application/models” folder and for clearer code I suggest you separate your models into files corresponding to your database tables. For our blog application we have created two tables by running our migrations,Posts and Users so now we just need to create two models, User and Post (please note singular, not plural),
create two empty files in your application/models folder:
user.php
post.php
put [sourcecode]<?php[/sourcecode] as the first line in of each of those files (you don’t have to close the php tag)
In our application the posts belong to a user and a user has many posts. Following Laravel’s documentation on Eloquent, we see that for each model we need to create a class with the same name as the database table, so let’s create the model that will go inside of user.php :
[sourcecode language=”php”]
class User extends Eloquent {
}
[/sourcecode]
now we need to specify the relationship of the user to the posts model, insert this inside the User class :
[sourcecode language=”php”]
public function posts()
{
return $this->has_many(‘Post’);
}
[/sourcecode]
That’s it! Save and close the file user.php, here is the complete source of user.php inside “models” folder :
[sourcecode language=”php”]
<?php
// application/models/user.php
// The model for Users.
// A user has many posts.
class User extends Eloquent {
public function posts()
{
return $this->has_many(‘Post’);
}
}
[/sourcecode]
We are done with the User model, simple, right?! Now let’s create our Post model :
The posts belong to a user. Following Laravel’s documentation on Eloquent, we create the model that will go inside of post.php :
[sourcecode language=”php”]
class Post extends Eloquent {
}
[/sourcecode]
now we need to specify the relationship of the post to the user model, insert this inside the Post class :
[sourcecode language=”php”]
public function user()
{
return $this->belongs_to(‘User’,’post_author’);
}
[/sourcecode]
A little sidenote, Laravel is so smart, if we had a column user_id in our posts table, we wouldn’t even have to specify that post_author is the foreign key in the posts table. See more about Laravel’s Eloquent relationsips here: http://laravel.com/docs/database/eloquent#relationships
Save and close the file post.php, here is the complete source of post.php inside “models” folder :
[sourcecode language=”php”]
<?php
// application/model/post.php
// The model for blog posts.
// the post belongs to a user and that relationship is identified by post_author in the Posts table
class Post extends Eloquent {
public function user()
{
return $this->belongs_to(‘User’,’post_author’);
}
}
[/sourcecode]
That’s it with the models, we have our Post and User models, relating the posts to the users, specifying that a user has many posts and each post belongs to a user. This is so easy!
Now onto the routes for our blog application!
I want to mention that all applications in Laravel could use Routes and Controllers in conjunction to make things happen (read: actions executed) but for this simple application using just routes will suffice.
Routes in Laravel can be valid for any HTTP verb (GET, POST, PUT, and DELETE), and in Laravel routes are very expressive, for example if you want to show a page (not to process a submitted form), you would use Route::get(‘name_of_the_route’), if you want to process a submitted form you would use Route::post(‘name_of_the_route’), etc. Read more about Routing on http://laravel.com/docs/routing#the-basics
In Laravel routes reside in “application/routes.php” file. That’s where we will put the code for all of our actions that the blog application will take. When thinking about which routes to create, we need to define how the application will function. In case of a simple blog, we need to :
- have index page with all blog posts listed. If the user seeing the index page is an admin we show a “Delete” Button under each post to be able to erase posts (user can only delete own posts, not someone else’s.)
- have a login page (show the login page with a form and act upon form submission)
- have a page to create new blog posts (show the page with a form having two fields for blog post title and body, and examine the form submittal)
- have a way to logout from admin interface.
Having that as a reference, let’s create a basic structure for our routes, this will be our skeleton for the routes :
[sourcecode language=”php”]
// show index page
Route::get(‘/’, function() {
});
// When a user is logged in he/she is taken to creating new post
Route::get(‘admin’, array(‘before’ => ‘auth’, ‘do’ => function() {
}));
Route::delete(‘post/(:num)’, array(‘before’ => ‘auth’, ‘do’ => function($id){
})) ;
// When the new post is submitted we handle that here
Route::post(‘admin’, array(‘before’ => ‘auth’, ‘do’ => function() {
}));
// Present the user with login form
Route::get(‘login’, function() {
});
// Process the login form
Route::post(‘login’, function() {
});
// Process Logout process
Route::get(‘logout’, function() {
});
[/sourcecode]
Now, let’s populate each of our routes with some meaningful actions.
We will be using Eloquent to retrieve data from our models and Blade templating engine to bind data to views. Also we will use Laravel’s built in Pagination to break the data up and show only 5 blog entries per page.
We need to retrieve all the posts of all users, order those posts from newest to oldest (descending) and use the paginate function to have only 5 entries per page. Then we bind the retrieved posts to the home view and display them.
Let’s insert the following code into our
Route::get(‘/’, function() { that will do just that:
[sourcecode language=”php”]
$posts = Post::with(‘user’)->order_by(‘updated_at’, ‘desc’)->paginate(5);
return View::make(‘home’)
->with(‘posts’, $posts);
[/sourcecode]
Ok, great, now we have our index page route set up, let’s create a route where the user can log in:
The route will just show us a login page (a form with two fields: username and password),
Insert the following one line of code into
Route::get(‘login’, function() {
[sourcecode language=”php”]
return View::make(‘login’);
[/sourcecode]
We can show the page but now we need to process it when the user submits the form from the login page. We will be using Laravel’s Auth class to attempt user’s authentication. Let’s process the form, if the user provides valid credentials, login and redirect to “create new blog post” page, otherwise show errors.
Insert this code into
Route::post(‘login’, function() {
[sourcecode language=”php”]
$userinfo = array(
‘username’ => Input::get(‘username’),
‘password’ => Input::get(‘password’)
);
if ( Auth::attempt($userinfo) )
{
return Redirect::to(‘admin’);
}
else
{
return Redirect::to(‘login’)
->with(‘login_errors’, true);
}
[/sourcecode]
Great, now the user will be able to login and be redirected to the page to create new blog posts. If we wanted the user to go to the home page after logging in, we would just replace the Redirect::to(‘login’) with Redirect::to(‘/’). Simple, isn’t it?
This will be our logout route, using Auth::logout() to log the user out and redirect to the home page:
[sourcecode language=”php”]
// Process Logout process
Route::get(‘logout’, function() {
Auth::logout();
return Redirect::to(‘/’);
});
[/sourcecode]
Our application will check if the user is logged in and will present a “new post” view binding the user’s data to our view (we will have a hidden field in that view that will identify the user’s blog entry).
Insert the following code into Route::get(‘admin’, array(‘before’ => ‘auth’, ‘do’ => function() {
[sourcecode language=”php”]
$user = Auth::user();
return View::make(‘new’)->with(‘user’, $user);
[/sourcecode]
Great, we can see the home page, login, logout and see the create new post page!
All that’s left to do is create a route to process new post submission and a route that deletes posts for the logged in user.
These two routes need some more explanation.
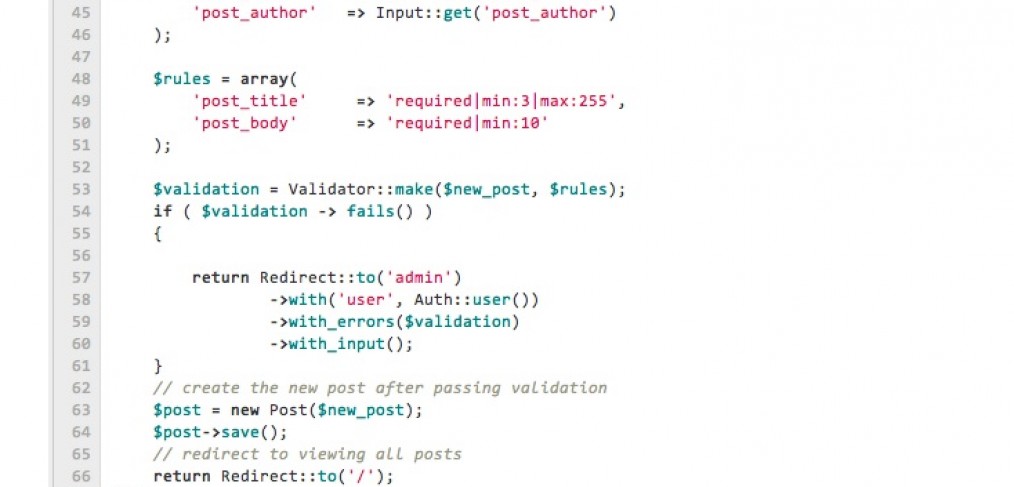
When the post is submitted, we need to get the input from each field of the form. Then we will use excellent Laravel’s Validation mechanism to let the user know if the title or the post body is empty and is longer than a few characters. If validation fails (the post is empty or too short) we will redirect the user to the same page displaying errors in the validation. Otherwise if all is ok, we will save the new post in the database and redirect the user to the index page showing all posts.
[sourcecode language=”php”]
Route::post(‘admin’, array(‘before’ => ‘auth’, ‘do’ => function() {
$new_post = array(
‘post_title’ => Input::get(‘post_title’),
‘post_body’ => Input::get(‘post_body’),
‘post_author’ => Input::get(‘post_author’)
);
$rules = array(
‘post_title’ => ‘required|min:3|max:255’,
‘post_body’ => ‘required|min:10’
);
$validation = Validator::make($new_post, $rules);
if ( $validation -> fails() )
{
return Redirect::to(‘admin’)
->with(‘user’, Auth::user())
->with_errors($validation)
->with_input();
}
// create the new post after passing validation
$post = new Post($new_post);
$post->save();
// redirect to viewing all posts
return Redirect::to(‘/’);
}));
[/sourcecode]
I was thinking of a simple way to manage the created posts and one way we could delete the existing posts from the administrators view is to submit a “DELETE” verb from a form, binding the id of the blog post under the currently logged in user.
I came up with the following code:
[sourcecode language=”php”]
Route::delete(‘post/(:num)’, array(‘before’ => ‘auth’, ‘do’ => function($id){
$delete_post = Post::with(‘user’)->find($id);
$delete_post -> delete();
return Redirect::to(‘/’)
->with(‘success_message’, true);
})) ;
[/sourcecode]
That is all there is to our routes for the blog application.
As a learning challenge I recommend you transform this application from routes-only to routes and controllers. Can you do it?
Here is the complete source code of the routes.php file :
[sourcecode language=”php”]
<?php
// Index page is a list of all posts
Route::get(‘/’, function() {
$posts = Post::with(‘user’)->order_by(‘updated_at’, ‘desc’)->paginate(5);
return View::make(‘home’)
->with(‘posts’, $posts);
});
// When a user is logged in he/she is taken to creating new post
Route::get(‘admin’, array(‘before’ => ‘auth’, ‘do’ => function() {
$user = Auth::user();
return View::make(‘new’)->with(‘user’, $user);
}));
Route::delete(‘post/(:num)’, array(‘before’ => ‘auth’, ‘do’ => function($id){
$delete_post = Post::with(‘user’)->find($id);
$delete_post -> delete();
return Redirect::to(‘/’)
->with(‘success_message’, true);
})) ;
// When the new post is submitted we handle that here
Route::post(‘admin’, array(‘before’ => ‘auth’, ‘do’ => function() {
$new_post = array(
‘post_title’ => Input::get(‘post_title’),
‘post_body’ => Input::get(‘post_body’),
‘post_author’ => Input::get(‘post_author’)
);
$rules = array(
‘post_title’ => ‘required|min:3|max:255’,
‘post_body’ => ‘required|min:10’
);
$validation = Validator::make($new_post, $rules);
if ( $validation -> fails() )
{
return Redirect::to(‘admin’)
->with(‘user’, Auth::user())
->with_errors($validation)
->with_input();
}
// create the new post after passing validation
$post = new Post($new_post);
$post->save();
// redirect to viewing all posts
return Redirect::to(‘/’);
}));
// Present the user with login form
Route::get(‘login’, function() {
return View::make(‘login’);
});
// Process the login form
Route::post(‘login’, function() {
$userinfo = array(
‘username’ => Input::get(‘username’),
‘password’ => Input::get(‘password’)
);
if ( Auth::attempt($userinfo) )
{
return Redirect::to(‘admin’);
}
else
{
return Redirect::to(‘login’)
->with(‘login_errors’, true);
}
});
// Process Logout process
Route::get(‘logout’, function() {
Auth::logout();
return Redirect::to(‘/’);
});
/*
|————————————————————————–
| Application 404 & 500 Error Handlers
|————————————————————————–
|
| To centralize and simplify 404 handling, Laravel uses an awesome event
| system to retrieve the response. Feel free to modify this function to
| your tastes and the needs of your application.
|
| Similarly, we use an event to handle the display of 500 level errors
| within the application. These errors are fired when there is an
| uncaught exception thrown in the application.
|
*/
Event::listen(‘404’, function()
{
return Response::error(‘404’);
});
Event::listen(‘500’, function()
{
return Response::error(‘500’);
});
/*
|————————————————————————–
| Route Filters
|————————————————————————–
|
| Filters provide a convenient method for attaching functionality to your
| routes. The built-in before and after filters are called before and
| after every request to your application, and you may even create
| other filters that can be attached to individual routes.
|
| Let’s walk through an example…
|
| First, define a filter:
|
| Route::filter(‘filter’, function()
| {
| return ‘Filtered!’;
| });
|
| Next, attach the filter to a route:
|
| Router::register(‘GET /’, array(‘before’ => ‘filter’, function()
| {
| return ‘Hello World!’;
| }));
|
*/
Route::filter(‘before’, function()
{
// Do stuff before every request to your application…
});
Route::filter(‘after’, function($response)
{
// Do stuff after every request to your application…
});
Route::filter(‘csrf’, function()
{
if (Request::forged()) return Response::error(‘500’);
});
Route::filter(‘auth’, function()
{
if (Auth::guest()) return Redirect::to(‘login’);
});
[/sourcecode]
In the next tutorial we will learn how to create our views for the blog application and we are close to completion of this simple application!
Subscribe to my Udemy Laravel course to learn even more about Laravel!


Creating a blog in #Laravel from scratch. Part 5: Create tables and migrations. http://t.co/SAQD0wxa #WebDev #HowTo
Thank you for sharing this! It’s pretty straightforward. I just started a simple CMS using this tutorial series.
Awesome!!! Let me know how the progress goes and I encourage you to post the result or at least some parts of it to Laravel forums : http://forums.laravel.com/
Yeah , really helpful and challenging kick start tutorial but i find one statement confusing .. would u mind
Route::get(‘admin’,array) on line 11 of routes.php
Really great!! through these tutorials I have started to learn Laravel.
Thanks a lot for your tutorial. I really enjoy it.
I have a fatalerror that can’t fix.
Symfony Component Debug Exception FatalErrorException
Class ‘Post’ not found
thanks.
have you tried doing composer dump-autoload ?
Hey Maks, I just to notify you that the code formatting for this blog is off. Interesting blog though and nice tutorials.
Thanks! I’ll look into re-formatting it. 🙂
Hello ! The tutorial is very good for beginner as me, but code command in the post is so hard to see. Can you format them, please.
Hey, nice article, but pretty difficult to read. Could you fix the sourcecode tags? They’re displaying as normal text.
Excellent comments ! Speaking of which , if others needs to merge PDF or PNG files , my husband found a tool here
http://goo.gl/QsCtiq