Laravel: my first framework. Chapter 4 – Views
The following content is the fourth chapter of my new e-book titled “Laravel: my first framework“. This writing is copyright by Maksim Surguy. Unauthorized copy and distribution of this material is prohibited.
Chapter 4. Views
This chapter covers
- Basics of views and templates
- Passing data to views
- Blade template engine
- View layouts
- HTML helpers
Most modern web applications have a user interface component to them. As the user goes to various pages of the application, he or she will see web pages that look different due to changes in content or changes in layout of the pages. For example a typical blog would have a page that lists all posts, pages that display an individual blog post and a page that shows an archive of all blog posts. A social network usually has some information feed, a profile page for each user, a page showing all private messages, etc. In modern web applications the user interfaces are becoming increasingly dynamic and complex. MVC frameworks like Laravel simplify creation of user interfaces by the use of “Views”, the V in MVC.
Laravel provides the developer with convenient separation between application’s data and the way the data is displayed in the browser, making the application’s presentation layer maintainable. In this chapter you will learn in detail about Laravel’s approach to templates and outputting data to the user. You will understand how to show the data from within the application and how to define the look of different parts of the application. You will meet Laravel’s powerful template engine called “Blade” and its methods of using conditional statements and loops. Then you will learn about Blade layouts and how they can help the developer eliminate repetition of code. You will also be introduced to Laravel’s shortcut methods of generating some of the HTML tags and form elements that will shorten the code that you need to produce to create good looking user interfaces.
4.1 Introducing views and templates
What are “views”? If you are not familiar with the concept of views, they are the presentation layer, the user interface of the web application. From small pages like a login page to blog layouts and even e-Commerce websites, views are used to build up the resulting page that the user will see in their browser when they click on a link or submit a form.
Consider an example of a Laravel-powered MVC application that displays a login page. The client’s browser sends a request to a “login” URL relative to application’s root. As this request is processed by the application running on the server, it is routed to a controller that might operate with application’s data (models) and load a template (view) containing HTML, Javascript, CSS, placeholders for data and/or other markup. This template is then compiled by Laravel filling the placeholders with actual data and returned back to the controller. The result of the application’s execution will be an HTML document that is then displayed in the user’s browser (figure 4.1).
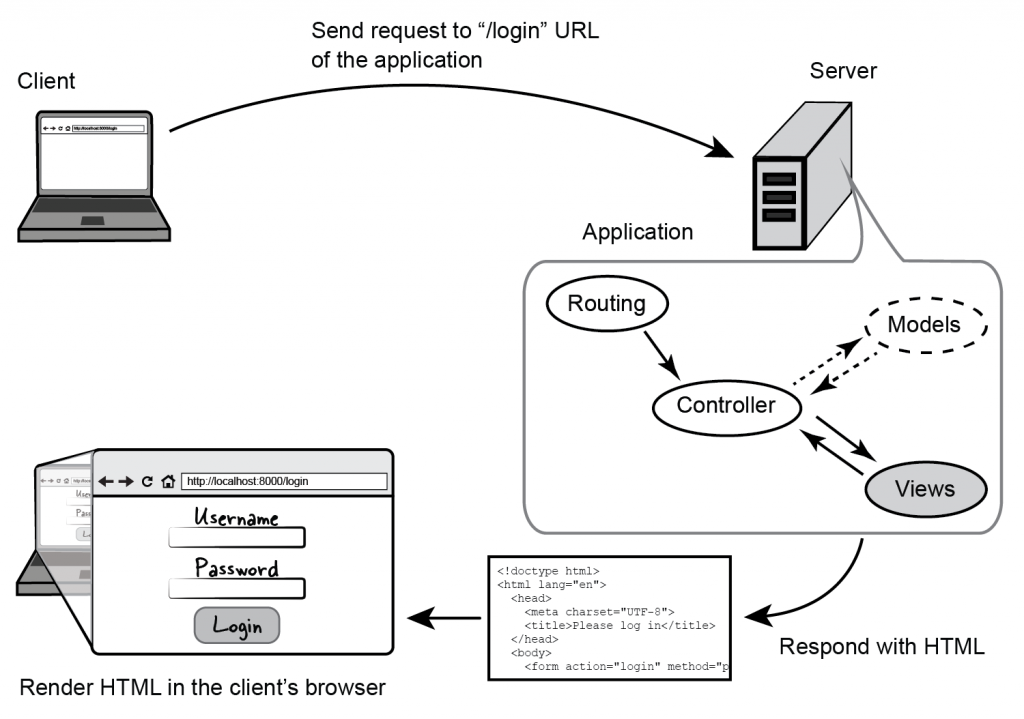
Figure 4.1 Flow of a client’s request to a Laravel MVC application
Views define visual representation of a web application and enable the user to interact with the application. Typically a view is the HTML response returned by the application to the browser initiating the request
At this point of the book you might not be familiar with controllers (they are covered in the next chapter). Views
could still be used in your application even without the use of controllers. In this case the views will be loaded directly from the routing, compiled by Laravel and the resulting HTML is then given to the user as a response to a request.Examples in this chapter will operate with views directly from the routing, not involving controllers.
Why use views? Keeping the presentation of the application separate from the application’s logic (routing and controllers) makes it easy for the developer to create and maintain user interfaces that application displays to the user. Laravel uses views to give the developer flexibility and maintainability when it comes to building the presentation layer of the application.
Methods that deal with views in Laravel are under “View” class. To understand which part the views play in a Laravel web application and how the concept of using views benefits you as a developer, let’s define the purpose of views.
4.1.1 Views – application’s response to a request
A view is the final step of client’s request to a web application. When the user is navigating to a URL in the application, there is an expectation that the application will respond by showing a requested page or by changing the content of the current page. One example of this expected behavior is when the user navigates to URL of a login page in your application and expects to see a login form in return. In section 3.1.3 of chapter 3 you have seen the route definition for this kind of flow, it is provided in listing 4.1 below. While this code is not done properly (returning HTML from application’s logic instead of using the concept of Views), the result of its execution would still be a login page that is presented to the user:
Listing 4.1 Route that displays the login form HTML without the use of view templates
Route::get('login', function()
{
  // The response of this route is an HTML document, a view
  return '<form action="login" method="post">
    Username: <input type="text" name="username"><br>
    Password: <input type="password" name="password">
    <input type="submit" value="Login">
    </form>';
});
The HTML of the login page that the user is presented with after navigating to the “login” URL relative to application’s root (figure 4.2) would be called “a view”:
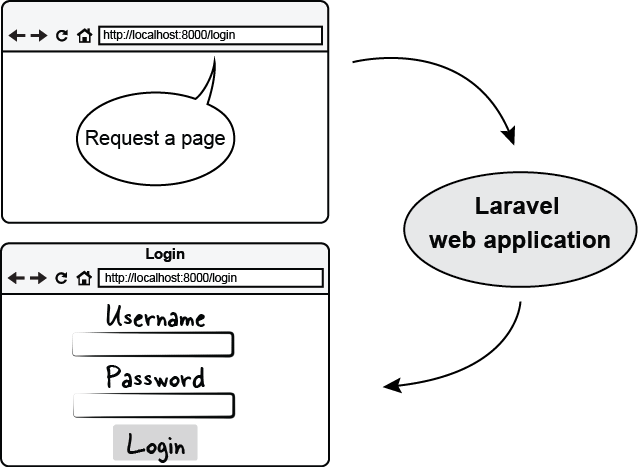
Figure 4.2 Login form view returned from the application as a response to a request
So, to show a page with a login form all that we did was return whatever HTML we wanted to see. Easy? Yes. But is it clean, maintainable and easy to work with? Probably not! Modern web pages have far more than two elements on a single page. Imagine if the page would have a navigation bar, a sidebar, a footer, and 15 form input fields instead of two? Add to that dynamic data that needs to be retrieved from a database and displayed on the page. The code that is needed to show all this output would quickly get messy and very difficult to modify.
Modern web application frameworks like Laravel solve this problem by the use of templates. Let’s look at how Laravel uses the concept of templates to simplify creation and maintenance of views.
4.1.2 Templates in Laravel, Blade
In Laravel you can store HTML (or a template that would be compiled into HTML behind the scenes) outside of the application’s logic, and just feed that template with the data that you retrieve from your application. Even better, you can create elements that are common to more than one page of the application – such as header, footer, sidebar and more – as separate templates that you could just reuse in any page to save amount of code that you need to duplicate.
Laravel uses its own template engine called “Blade”. This template engine is similar to other PHP template engines like Twig or Smarty but has its own syntax and shortcut methods. Using Blade makes it possible to combine many templates into a single HTML output (figure 4.3):
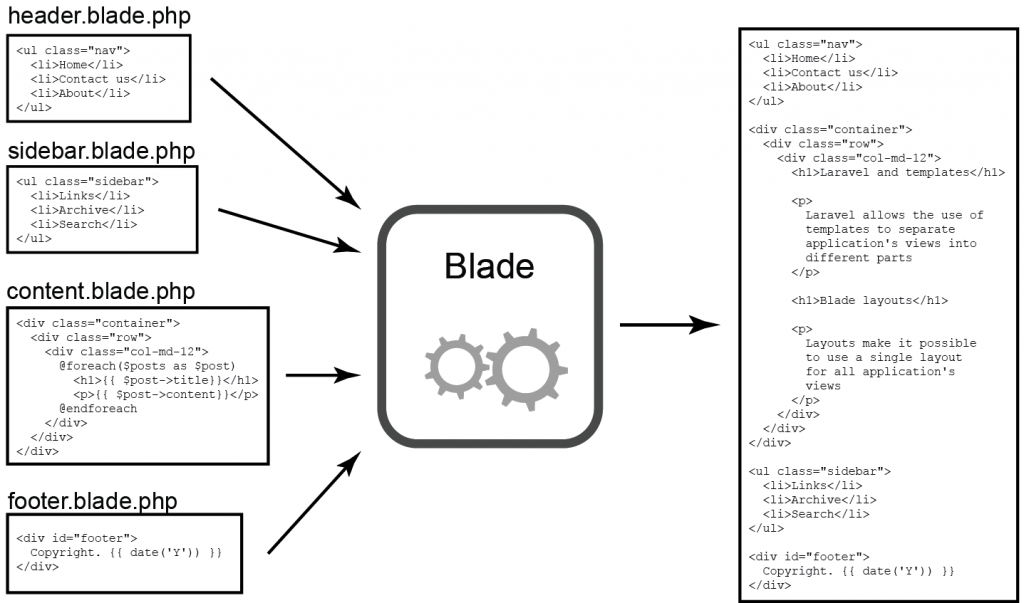
Figure 4.3 Blade template engine combines many templates into single HTML document
The days of mixing PHP code, database queries, HTML and application’s logic are over. The concept of views in Laravel solves the problem of mixing everything together by providing methods that separate the logic of the application flow and the skeleton (template) for the results that the application should return to the user. Throughout this chapter you will learn about the View methods available in Laravel and about Blade template engine. First, let’s take a look at how you can create a simple view template and show it to the user.
4.2 Creating and organizing views
Creating views in Laravel is simple. To see it in action, let’s convert the code we created in section 4.1.1 to show the login form but this time using Laravel’s views instead of mixing the HTML directly in the application’s response.
By convention, in Laravel applications all views are stored in “app/views” folder as you might remember from the application structure overview in chapter 2. Let’s create a brand new view template called “login.php” and place it there. As for the contents, we will just copy and paste the desired HTML output of the login route (listing 4.2):
Listing 4.2 Contents of the view file for the login page (app/views/login.php)
<form action="login" method="post">
  Username: <input type="text" name="username"><br>
  Password: <input type="password" name="password">
  <input type="submit" value="Login">
</form>
Now that you have created the view template, you can use Laravel’s methods to render the template from the application. The method that renders a view template stored in “app/views” folder is “View::make(‘file’)” where “file” is the filename of the template that you’d like to show.
View::make assumes that view files have extension “.php” or “.blade.php” so there is no need to specify file extension when passing a filename to it.
Let’s modify the code of the login route to return the “login.php” view template (listing 4.3) to the user:
Listing 4.3 Route that displays the login form using a View method
Route::get('login', function()
{
  // Returning a view (login.blade.php in the app/views folder) will show
  // its HTML in the browser
  return View::make('login');
});
If you go to the “login” route now, you should see the same exact login page that we expected to see in section 4.1.1 (figure 4.4):

Figure 4.4 Login form displayed using View::make method
How is this different from the method we used to show the login form in listing 4.1? By using the “View::make” method we were able to separate the presentation of the login page from the logic of the application (in the case with the login form, we removed the HTML from the route definition). This allows for great maintainability of the page if you wanted to update it or change it completely without affecting the code of the application logic.
4.2.0.1 Separating view templates in folders
As the application grows, you will end up with many view templates. An average sized application could contain between 50-80 view templates or more when it is completed. Laravel does not prohibit you from storing the view templates inside of other folders in the “app/views” folder. For example if you wanted to store all view templates relating to user registration, login and logout functionality of your application, you are free to create another folder called “auth” and put the login.php and other view templates in there, giving the folder structure like in figure 4.5:
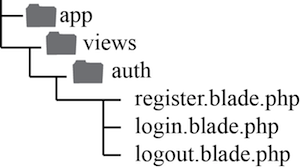
Figure 4.5 Example of separating view templates into a folder under “views” folder
In case of folder structure similar to figure 4.3, to specify that the view templates are located in “auth” folder, you would need to separate the folder name from the view template name by using a period (“.”), like in listing 4.4:
Listing 4.4 Using “.” to tell Laravel that view template is in a folder inside of app/views:
Route::get('login', function()
{
  // Display file login.blade.php from app/views/auth folder
  return View::make('auth.login');
});

Route::get('logout', function()
{
  // Display file logout.blade.php from app/views/auth folder
  return View::make('auth.logout');
});

Route::get('register', function()
{
  // Display file register.blade.php from app/views/auth folder
  return View::make('auth.register');
});
Keeping the view templates that have something in common together allows the developer to easily find the template that needs modification when the application code gets large.
While using view templates is very convenient and you can make the application respond with complete HTML documents, how would you go about outputting data from the application into the views? Laravel has you covered in that regard too. Let’s learn about passing data to the view templates.
4.3 Passing data to views
In most applications, not all pages are static. There is often a need to retrieve data from a database or other data source and embed it into the resulting HTML that will be presented to the user. Not so long ago, developers would embed SQL queries directly into the application code that would result in giant unmaintainable mess. For example a page that shows a table containing all order inquiries in a shop might look like listing 4.5:
Listing 4.5 Bad code mixing SQL queries, query parameters and HTML output
<?
$catId = (isset($_GET['catId']) && $_GET['catId'] > 0)? $_GET['catId'] : 0;
$sql = "SELECT * FROM tbl_orders, tbl_product, tbl_category
    WHERE tbl_orders.inquiry_pdid = tbl_product.pd_id AND tbl_product.cat_id = tbl_category.cat_id
    AND tbl_category.cat_parent_id = $catId
    ORDER BY tbl_orders.inquiry_date DESC, tbl_category.cat_parent_id ASC";
$result = dbQuery($sql);
?>

<table width="100%" border="0" cellpadding="5" cellspacing="0" class="text">
  <tr id="listTableHeader">
    <td>Inquiry ID </td>
    <td>Batch ID</td>
    <td>Customer</td>
    <td>Brand</td>
    <td>Product</td>
    <td>Date</td>
  </tr>
  <?php if (dbNumRows($result) > 0) {
    while($row = dbFetchAssoc($result)) {
    extract($row);
  ?>
  <tr>
    <td><?php echo $inquiry_id; ?></td>
    <td><?php echo $inquiry_odid; ?></td>
    <td><?php echo $inquiry_batchall; ?></td>
    <td>
    <?php
      $sqlname = "SELECT cat_name FROM tbl_category WHERE cat_id = $cat_parent_id";
      $resultname = dbQuery($sqlname);
      $rowname = dbFetchAssoc($resultname);
      echo $rowname['cat_name'];
    ?>
    </td>
    <td><?php echo $cat_name; ?></td>
    <td><?php echo $pd_name; ?></td>
    <td><?php echo formatDate($order_date); ?></td>
  </tr><?php } } ?>
</table>
Notice how the SQL queries, query parameters and HTML output are all inside of single PHP file making debugging and modification of this code practically impossible.
MVC frameworks like Laravel solve these problems by separating the application’s logic from the data output (visual representation). Laravel provides a few ways of passing the data retrieved inside of the application to the application’s views:
- By using the arguments of “View::make” method
- By using a method “with” appended to “View::make” method
Both of these methods lead to the same result – providing the view template with data that is passed from the application. Let’s look at these two methods in more detail.
4.3.1 Using “View::make” arguments to pass data
In section 4.1.2 you were introduced to “View::make” method that would render a view template stored in “app/views” folder. As you might remember, the first argument of “View::make” had to be the filename of the view template (without the “.blade.php” or “.php” extension). One of the methods of passing data to the view templates is to use the second argument of “View::make” method.
The second argument of “View::make” method accepts an array of data that you would like to use in the view template. The keys of the passed data array will become variables that you could then show in the view by using PHP’s echo function.
For example if you wanted to display current date and time in your login form while keeping the data separate from the view, you would first make that data available in the “View::make” method and then use PHP’s echo in the view template to display that data.
Make sure you have set your time zone in app/config/app.php configuration file before executing the following code
Let’s see this in action in listing 4.6:
Listing 4.6 Using second argument of View::make to pass data to a view
// File app/routes.php
Route::get('login', function()
{
  // Create an array of data that will be used in the view template
  $data = array('currentDateTime' => date('Y-m-d H:i:s'));
  // Pass the data array as the second argument of View::make
  return View::make('login', $data);
});

// File app/views/login.php
Current date and time: <br>

<?php
  // Display the data in the view
  echo($currentDateTime);
?>

<form action="login" method="post">
  Username: <input type="text" name="username"><br>
  Password: <input type="password" name="password">
  <input type="submit" value="Login">
</form>
Execute this code by going to “login” route and you should see a page similar to figure 4.6:
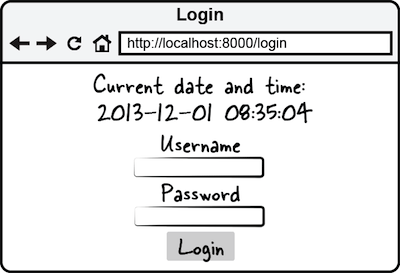
Figure 4.6 Result of passing date and time data to a view template
Using an array for data means you can pass as many variables or objects as you wish through it, as you will see in later parts of the book you could pass whole database objects from Laravel’s Eloquent ORM this way too.
Laravel has a shorthand method for passing data to the view templates that you can use to keep your code cleaner when you need to keep the name of the data variables explicit. Let’s look at using it!
4.3.2 Using method “with”
Instead of using the second argument of the “View::make” method you can append a method “with” to the end of the “View::make” method to pass any data to the view. Method “with” takes in two arguments, the name of the passed data and the data itself that will be assigned to that name in the view.
Method “with” is chainable, meaning you can put many methods one after another to pass as many variables as you want.
For example if you wanted to pass two variables to the view, let’s say the current date and current time and display them in the view, you would first assign the desired date and time values to those two variables. Then you would append method “with” to “View::make” assigning the names for the variables to the date data, and in the view template you would use the names of the variables you passed in to output them. Please see the code in listing 4.7 to see this in action:
Listing 4.7 Using method “with” to pass data to a view
// File app/routes.php
Route::get('login', function()
{
  // Store current date
  $date = date('Y-m-d');
  // Store current time
  $time = date('H:i:s');
  // Pass the date and time to the view
  return View::make('login')->with('date', $date)->with('time', $time);
});

// File app/views/login.php

// Display current date passed from the route
Current date: <?php echo($date); ?> <br>
// Display current time passed from the route
Current time <?php echo($time); ?>

<form action="login" method="post">
  Username: <input type="text" name="username"><br>
  Password: <input type="password" name="password">
  <input type="submit" value="Login">
</form>
The result of executing this code would be a screen similar to figure 4.7 telling the user current date and time on the login screen:
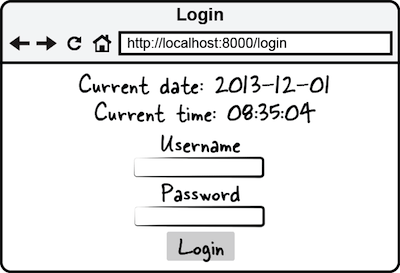
Figure 4.7 Result of passing date and time data to a view template by using method “with”
As you can see, using chainable “with” method makes it very convenient to bind data to the view when you need to keep the names of data variables easily visible in the code that passes the data to the view.
To Laravel there is no difference which method you will use to pass the data to your views, by passing data as a second argument to the “View::make” method or by using chainable method “with”. The result will be the same – data that you can easily display in the view templates. It is up to you, the developer, which method you want to use in different scenarios.
While we have seen that using view templates greatly simplifies keeping the application code separate from the presentation, the provided view templates would still end up looking like PHP code when you have something more complex than outputting strings.
Imagine having PHP’s control structures like if/else, for/foreach loops and more in the view templates. Quickly enough, the templates would look messy and become hard to maintain, defying the purpose of views altogether. To alleviate those problems, Laravel comes with a simple to use, yet powerful template engine called “Blade” that you will meet in the next section!
4.3 Blade template engine
Blade is a template engine that comes with Laravel framework. Its purpose is to simplify outputting and looping over data, nesting of views, using conditional statements and more. In this section you will learn about Blade’s methods of working with view templates.
Internally, Blade converts files written with special “Blade” syntax into PHP files that contain the desired output. Some of the goals of Blade template engine are to make the view templates readable either by the back-end or front-end developer and to shorten the amount of code that needs to be written to display application’s data.
View templates that use Blade have an extension of “.blade.php”
One of the ways in which Blade achieves the goals stated above is by attempting to minimize resemblance of the view templates to plain PHP code that was not designed for eloquence when it comes to presenting data. As you will see from the examples listed below in table 4.1, operations such as outputting data, looping through data, embedding conditional statements all could be easily done with Blade statements while keeping code a lot shorter and more readable for the developer.
Table 4.1 Comparison of using plain PHP and Blade template engine in the view templates
| Plain PHP views (.php) | Blade views (.blade.php) |
|---|---|
| Outputting data in PHP | Outputting data using Blade |
<?php echo(date('Y')); ?> |
{{ date('Y') }} |
| Looping through data with PHP | Looping through data with Blade |
<?php foreach($users as $user){ ?> |
@foreach($users as $user) |
<p> |
<p> |
<?php echo($userelname); ?><br> |
{{ $userelname }}<br> |
<?php echo($usereladdress); ?> |
{{ $usereladdress }} |
</p> |
</p> |
<?php } ?> |
@endforeach |
| Using conditional statements in PHP | Using conditional statements in Blade |
<?php if($category == 'blog') { ?> |
@if($category == 'blog') |
... |
... |
<?php } else { ?> |
@else |
... |
... |
<?php } ?> |
@endif |
Blade template engine provides the developer with many shortcuts that allow the developer to:
- Remove some of the inconsistencies of PHP
- Output and properly escape data
- Use conditional statements and loops
- Separate the view templates into layouts and sections
- Nest output throughout view templates
- Generate various HTML elements with minimum code
Let’s gradually learn about all of these benefits of using Laravel’s Blade template engine. By the end of this chapter you will be a Blade master, outputting data, looping through data and using layouts like a pro. First, let’s start with some basic functions of Blade template engine.
4.4.1 Outputting and escaping data
Blade is very good at making PHP code look a whole lot better. By using few simple conventions and shortcuts, Blade is trying to be a more readable alternative to PHP when it comes to view templates while not completely replacing PHP from the equation.
Outputting a data string in Blade is achieved by putting a variable of type “string” inside of double curly braces “{{” and “}}”. Imagine a simple example that would show “Hello, John” where “John” is a variable passed from a route. Listing 4.8 shows two ways of displaying the name variable, one using plain PHP and another one using Blade:
Listing 4.8 Displaying a string in a view using plain PHP and using Blade
// app/routes.php
Route::get('hello', function()
{
  $name = 'John';
  // Pass the name variable to the view
  return View::make('hello')->with('name', $name);
});

// app/views/hello.blade.php

// Display the name using PHP echo
Hello, <?php echo($name); ?>
<br>
// Display the name using Blade
Hello, {{ $name }}

// Same output achieved with both methods of displaying data:
Hello, John
This seems pretty easy, doesn’t it? Need to display a variable in your views – put it in double curly braces. What will happen if you try to output a whole array using double curly braces? Laravel will promptly notify you that you need to have a variable that could be cast to type “string”, Blade cannot echo an array just like it wouldn’t work in plain PHP. You would need to loop over the array and display each element in the loop. We will look at using Blade’s loops and conditional statements later in this chapter.
4.4.1.1 Escaping Data
Sometimes you need to make sure that the variables you display in the browser are HTML escaped for end-user security reasons. Imagine if your application deals with user-contributed data stored in the database and at some point you need to display that data to other users. If you display the data just like it is, without any escaping, there is a possibility that some users will try to enter malicious Javascript or HTML tags. To easily solve this problem, Laravel provides a way to escape data before it is displayed. You can escape and display the data by using triple braces “{{{” and “}}}” instead of using double braces.
Internally Laravel uses PHP’s htmlentities() function to escape HTML characters when triple curly braces are used
Let’s see it in action in listing 4.9 where the HTML entities like quotes, less than (“<”) and greater than (“>”) characters are escaped into their corresponding HTML representations:
Listing 4.9 Escaping data using triple curly braces
// app/routes.php
Route::get('hack', function()
{ // Create malicious Javascript
  $data = "<script>alert('My hack');</script>";
  return View::make('hack')->with('data', $data);
});

// app/views/hack.blade.php

// Escape the output before it is displayed
The data: {{{ $data }}}

// Result (the HTML characters are properly escaped):
The data: <script>alert('My hack');</script>
By escaping the data before it is displayed you will make sure that no malicious code can be displayed to the end-user of your application!
Now that you are able to output data with double curly braces and even escape it to protect the users of your application, let’s learn how you can control the flow of outputting the data and how you can use PHP loops in your view templates.
4.4.2 Using conditional statements and loops
Blade provides you with an easy way of using “if/else/elseif” conditional statements and PHP loops like “for”, “foreach” and “while”. Using conditional statements could be very useful when the application needs to hide or show something depending on data from the database or on the value of the user’s input. The loops could be used when the data to be displayed in the view template comes as an array of strings or as a database object.
You can use conditional statements in your view templates using plain PHP or using special Blade syntax. First let’s take a look at using conditional statements with plain PHP and then we will transform the same code using convenient methods that Laravel’s Blade provides for conditional statements.
4.4.2.1 Using conditional statements in the views with plain php
Imagine that your application needs to show a different message depending on what time of day it is. Since Blade views are still PHP friendly, you could use PHP conditional statements to control what the user will see. Let’s look at the example in listing 4.10 where the application will show “Good morning, user!” if the time on the server where the application is executing is before noon and “Good afternoon, user!” if the time is after noon:
Listing 4.10 Showing a different message depending on server time (using plain PHP)
// app/routes.php
Route::get('greet', function()
{
  //Get the current time of day, ‘am’ or ‘pm’
  $timeOfDay = date('a');
  return View::make('greet')->with('timeOfDay', $timeOfDay);
});

// app/views/greet.blade.php

//Use PHP’s conditional statement to show a different message
<?php if ($timeOfDay == 'am') { ?>
  Good morning, user!
<?php } else { ?>
  Good afternoon, user!
<?php } ?>
When you access the URL “/greet” relative to your application’s root, you will see a different greeting depending on time of day as shown in figure 4.8:
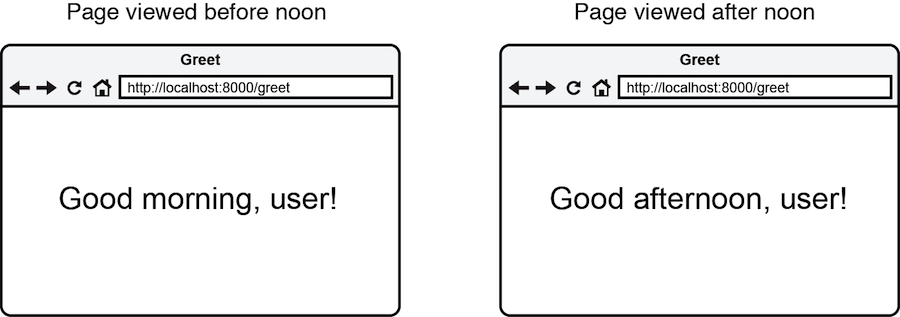
Figure 4.8 Showing different greeting message depending on time of day that the application is accessed
This is great, you can use PHP’s conditional statements like “if”, “else”, “elseif” to control the flow of what the user will see, but isn’t there a better way of doing this using Laravel’s methods? Indeed there is a better way, by using special Blade helpers.
4.4.2.2 Using conditional statements in the views with blade
Blade has equivalents of PHP’s conditional statements. Using Blade’s syntax for conditional statements will cut the amount of code you need to write for the view templates and will make it a lot more readable.
Blade’s conditional statements look almost like conditional statements in plain PHP with alternative syntax (listing 4.11). To use a conditional statement using Blade you would prepend the “if” with an “@” sign. Then, instead of using curly braces to separate the parts of the conditional statement, you would use Blade’s special statements: @else, @elseif and @endif.
There is no need to enclose Blade statements in PHP opening and closing tags.
Listing 4.11 Syntax of conditional statements in Blade
@if (expression)
  ...
@elseif (expression)
  ...
@else
  ...
@endif
To see the use of conditional statements in action, let’s convert the code that we created above in listing 4.10 and use Blade syntax instead of plain PHP. The result on the screen will be the same but the code will be cleaner (listing 4.12):
Listing 4.12 Showing a different message depending on server time (using Blade)
// app/routes.php
Route::get('greet', function()
{
  // Get the current time of day, ‘am’ or ‘pm’
  $timeOfDay = date('a');
  return View::make('greet')->with('timeOfDay', $timeOfDay);
});

// app/views/greet.blade.php
// Use Blade’s conditional statement syntax to show a different message
@if ($timeOfDay == 'am')
  Good morning, user!
@else
  Good afternoon, user!
@endif
While you would get the same output as in figure 4.6, using Blade code made it easier for you as the developer to create the view template. Using conditional statements in Blade is simple but most importantly more elegant than writing plain PHP in the view templates. Besides conditional statements Blade makes it easier to use loops within the views. Let’s learn about that next.
4.4.2.3 Using loops
Using loops in Blade is not much different from using conditional statements. The loops that are available in Blade are equivalent to PHP’s “for”, “foreach” and “while” loops and they have similar syntax to PHP’s alternative syntax for loops (listing 4.13):
Listing 4.13 Syntax of loops in Blade
// “for” loop:
// Same as PHP’s “for (expression1, expression2, expression3)  { ... }”
@for (expression1, expression2, expression3)
  ...
@endfor

// simple “foreach” loop:
// Same as PHP’s “foreach (array_or_object as $value) { ... }”
@foreach (array_or_object as $value)
  ...
@endforeach

// “foreach” loop that also assigns keys to a variable:
// Same as PHP’s “foreach (array_or_object as $key => $value) { ... }”
@foreach (array_or_object as $key => $value)
  ...
@endforeach

// “while” loop
// Same as PHP’s “while (expression) { ... }”
@while (expression)
  ...
@endwhile
You can use loops in the view templates to display attributes of an object or elements of an array. Why not take a look at an example? Let’s imagine that you have an array of users in the application and you would like to display the list of users in the browser upon going to a route “users”. We can use Blade’s “foreach” statement to iterate over the users and we can use Blade’s shortcut for “echo” by using double curly braces (listing 4.14):
Listing 4.14 Displaying a list of users using Blade’s foreach loop
// app/routes.php
Route::get('users', function()
{
  // Create an array of users
  $users = array(
    'User 1',
    'User 2',
    'User 3',
    'User 4'
  );
  // Pass the array of users to the view “users”
  return View::make('users')->with('users', $users);
});

// app/views/users.blade.php
//Iterate over the array of users passed into the view using the foreach loop
@foreach($users as $user)
  //Output the element of the “users” array into the view
  <p>{{ $user }}</p>
  //Close the foreach loop
@endforeach
When you access the route “users”, the code above will display the list of users like in figure 4.9:
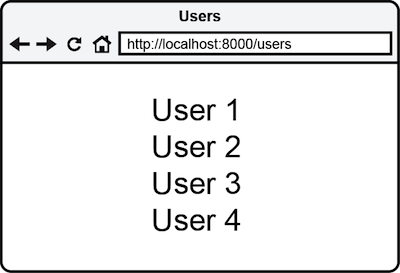
Figure 4.9 Result of using “foreach” loop to display items stored in an array
As you can see, it doesn’t take a lot to use loops when Blade has these built-in capabilities that are taken from PHP but look a bit different than PHP. Using loops in the view templates is something that almost every application incorporates to show data in table rows, lists, grids and more. Having methods of looping through data benefits the developer tremendously.
You are now able to use conditional statements and loops in the view templates which are very common throughout applications of any size. There are just a few more things left to learn about Blade template engine. Let’s move onto next topics like using layouts and sections!
4.5 Blade layouts
Blade layouts help the developer write even less code for view templates. Imagine that your application has 3 pages in total and every page has different content but the same header and footer throughout all pages (figure 4.10):

Figure 4.10 Elements that are common to all pages of the site could be combined into a layout
When you want to update either header or footer, you would need to go through all of the view templates and edit them one by one. This is doable (though not recommended) if your application is very small, but when your application grows to let’s say 50-80 different view templates, one small update to a part that is common to all pages could take you a whole day to do! Laravel’s Blade comes with a way to solve this problem by use of layouts.
Layouts are Blade views with HTML/CSS/JS elements that are common to many pages of the application and placeholders defined for the elements that change depending on the content
The concept of using layouts isn’t new to web development frameworks. Laravel simply embraces a well-tested and helpful technique of making the code for application’s views reusable and much more readable. Laravel has a few special keywords that you need to know when using View Layouts. These keywords, their placement in the views and their function is described in table 4.2 below:
Table 4.2 A list of Blade keywords and functions relevant to layouts
| Blade keyword | Placement | Description |
|---|---|---|
| @yield() | in a layout | Insert a section of content that has a name specified via the argument |
| @extends() | in a view | Apply another Blade template specified via the argument as a layout for current Blade template |
| @section() | in a view | Define a section of content that will be inserted into the layout that the current Blade template uses. Name of the section is specified as the argument to @section(). |
| … | ||
| @stop | ||
| @include() | in a view or in a layout | Insert any other Blade template specified as an argument. |
Over next few pages you will learn how to create a layout that you will use throughout the rest of this chapter. This simple layout will contain a page title, header and footer that all view templates of the application that are using this layout will inherit. Let’s start with creating an HTML page that will serve as a layout.
4.5.1 Creating and using a layout
The process of using layouts in a Laravel application consists of creating a layout template – a Blade view file that has special areas marked as placeholders for sections of content and then telling the views that need to be injected into those section areas to “extend” or apply that specific layout. If you’d like to have different templates for different parts of your application (for example administration panel and user-facing areas) Laravel allows you to define as many layouts as you want.
Creating a Blade layout is the same as creating any other Blade view. Like any Blade view, the layout is a file that ends with extension “.blade.php” and goes into the “app/views” folder. As a Blade view, a layout can use all the advantages of Blade including conditional statements and loops and more. Often a layout acts as a skeleton for application’s HTML representation and such things as page title, header and footer, references to CSS and JS files would be a part of a layout.
Layouts should be stored as “.blade.php” files anywhere in “app/views” folder
Our example layout will be saved as “layout.blade.php” in the “app/views” folder. First it will contain just HTML and an output of current year in the footer, then it will be made more dynamic by the use of Blade “@yield” keyword. Let’s start creating this layout by starting out with some HTML from Listing 4.15:
Listing 4.15 Creating an HTML template for a layout (app/views/layout.blade.php)
<!doctype html>
<html lang="en">
  <head>
    <meta charset="UTF-8">
    <title>My Laravel application</title>
    // If there is any CSS that all pages of the application need to use, put it here
    ...
  </head>
  <body>
    <header> Header </header>
    // This will be later replaced with a placeholder for application’s content
	Application content will go here
    // Using Blade to output current year in the footer using PHP’s “date” function
    <footer> Copyright, {{ date('Y') }} </footer>
    // If there is any JS that all pages of the application need to use, put it here
    ...
  </body>
</html>
This layout has enough HTML structure to be valid HTML5 and is only missing an actual placeholder for content. We will look at using placeholders a bit later but for now let’s take a look at how we can use the layout in the application’s views.
4.5.1.1 Using layouts from views
To use a layout in a view, first you need to specify the filename of the Blade layout using a special Blade function “@extends” that will go at the top of a view file. “@extends” accepts a single argument – a name of the Blade file that acts as a layout and has placeholder areas defined.
For example, if you had a Blade view “home.blade.php” in “app/views” and you wanted that view to use a layout that was defined in listing 4.15 above, you would specify the name of the layout (‘layout’, without “.blade.php” extension) in the “@extends” function as in listing 4.16:
Listing 4.16 Using Blade layout from a view (app/views/home.blade.php)
// Specify the filename of the layout (without extension)
@extends('layout')

// The rest of the code of the view template
...
Now, when the “home.blade.php” view is rendered using “View::make” method, the HTML from the “layout.blade.php” will be present in the result returned from the application.
Any Blade view can use a Blade layout
What’s special about Blade layouts is the way that the placeholders are defined for the sections of content that will be injected into the layout. Let’s meet the first method of defining placeholders for sections of content: method “@yield”.
4.5.1.2 Using method “@yield” to specify placeholders
Method “@yield” is used in a Blade layout to specify that some content from a view using the layout will be injected into the layout when the page is output in the browser. In other words, method “@yield” specifies a placeholder for a section of content. You can define a placeholder for a specific area of the Blade template by using @yield(‘nameOfSection’), where “nameOfSection” is a name that you give to an area of content.
Let’s look at this in action. We will modify the layout provided in listing 4.15 and define an area for content, let’s call it “content”. Later, this area of the layout will correspond to an area inside of a Blade view that will provide an actual content for that placeholder. Listing 4.17 shows the lines of the layout that we will need to change in order to create a content area placeholder:
Listing 4.17 Specifying a placeholder for content (app/views/layout.blade.php)
...
<header> Header </header>

// Specifying an area of layout as a placeholder for content
@yield('content')

<footer> Copyright, {{ date('Y') }} </footer>
To pass the content from a Blade view to a Blade layout, the view needs to be using the layout and it needs to have the content areas specified as “sections
4.5.2 Using sections
Blade layouts consist of a template that has “sections” specified to hold the content that will be provided by the views. Defining an area of a Blade view as a section of content consists of placing two special Blade constructs – markers that will mark the start and the end of a section. To mark the start of the section you need to place a function @section(‘nameOfSection’) where ‘nameOfSection’ is the name corresponding to @yield() statement in the layout.
The names of the sections need to correspond to the names of the placeholders in the Blade layout.
To mark an end of the section you need to place “@stop” letting Blade know that only the content between @section ... @stop will be the content that you want to inject in the template.
Let’s take a look at using sections in action. We will continue working on the view “home.blade.php” that will provide the content that we would like to inject into the Blade layout. Let’s specify the area of the view that will hold a section of content (listing 4.18):
Listing 4.18 Specifying area of a section inside a view (app/views/home.blade.php)
// Telling the view to use a layout (‘app/views/layout.blade.php’)
@extends('layout')

// Opening content section
@section('content')
  // The content that will be injected in the layout replacing “@yield(‘content’)”
  This is the home page
// Closing content section
@stop
When this view will be rendered using “View::make” method from a route, the content inside of the @section(‘content’)from the view will replace the @yield(‘content’) in the layout that the view is using. Here’s the complete listing that shows a route definition, the layout and the view template that is using the layout (listing 4.19):
Listing 4.19 Complete listing of using a layout in a view
// app/routes.php
Route::get('/', function()
{
  return View::make('home');
});

// app/views/layout.blade.php
<!doctype html>
<html lang="en">
  <head>
    <meta charset="UTF-8">
    <title>My Laravel application</title>
  </head>
  <body>
    <header> Header </header>
    @yield('content')
    <footer> Copyright, {{ date('Y') }} </footer>
  </body>
</html>

// app/views/home.blade.php
@extends('layout')

@section('content')
  This is the home page
@stop
Code in listing 4.19 will display the following page when you visit application’s index page:
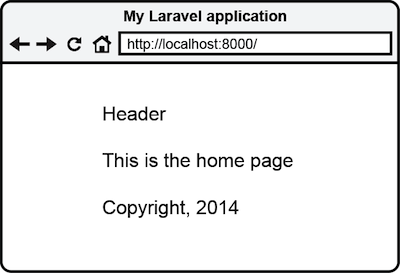
Figure 4.11 Result of using a layout in a view
Something interesting happened when the view was presented to the user. Some parts of the page like the header and footer come from the “layout.blade.php” layout and the content saying “This is the home page” come from the “home.blade.php” view. Laravel seamlessly combined these parts from two different files just like we wanted it to do, allowing us to use a layout template for displaying view’s content.
You are not limited to having a single section for content inside of the view (and corresponding placeholders in the layout). There could be as many content sections as you wish. For example if the layout had placeholders for “content”, “moreContent” and “evenMoreContent” while the view template had sections with corresponding names, the matching placeholders would be filled from the view template (listing 4.20):
Listing 4.20 Example of using more than one section for content
// app/views/layout.blade.php
...
<header> Header </header>
@yield('content')
@yield('moreContent')
@yield('evenMoreContent')
<footer> Copyright, {{ date('Y') }} </footer>
...

// app/views/home.blade.php
@extends('layout')

@section('content')
  <p>This is just Content</p>
@stop

@section('moreContent')
  <p>This is More Content</p>
@stop

@section('evenMoreContent')
  <p>This is Even More Content</p>
@stop

// Resulting HTML that will be displayed
<!doctype html>
<html lang="en">
  <head>
    <meta charset="UTF-8">
    <title>My Laravel application</title>
  </head>
  <body>
    <header> Header </header>

      <p>This is just Content</p>
      <p>This is More Content</p>
      <p>This is Even More Content</p>

    <footer> Copyright, 2014 </footer>
  </body>
</html>
Ability to have unlimited number of sections for a layout gives you incredible flexibility in defining dynamic areas of a template underlying the views. Anything that you might need to include in the layout template – additional scripts, stylesheets, content and more could be passed through the use of @section and @yield.
Laravel provides even more tools in your Blade arsenal. One very useful feature of Blade is nesting views inside of other views. Let’s learn about it in the next section!
4.5.3 Nesting views by using @include
You can easily re-use complete Blade views inside of other views to keep your Blade views cleaner and prevent code duplication. Imagine that two or more pages of the application use a chunk of HTML that is absolutely the same for these pages but not the same throughout all the pages (therefore not a good candidate to be included in a layout). To make it easy to reuse the HTML throughout the pages you could inject that HTML from a Blade view by using a special Blade method “@include”.
Blade’s @include works in a similar way to PHP’s include. It includes and evaluates a Blade view file inside of another Blade view file. To use it in a view or layout, provide a name of a Blade view that you would like to include as a parameter to @include. For example if you had a piece of navigation that you wanted to use in some views, you would first create the navigation HTML and save it as a Blade view and then @include it in another view. Let’s create a simple navigation HTML and store it in “navigation.blade.php” file inside of “app/views” folder. Then in any Blade files that we wanted to display this navigation HTML we would do @include(‘navigation’) that would include and render the “navigation.blade.php” file. Listing 4.21 demonstrates using @include in action:
Listing 4.21 Example of nesting views by using @include
// app/routes.php
Route::get('blog', function()
{
  return View::make('blog');
});

// app/views/blog.blade.php
...
  // Nesting another Blade view
@include('navigation')

My Laravel blog
...

// app/views/navigation.blade.php
<nav>
  <ul>
    <li><a href="/home">Home</a></li>
    <li><a href="/blog">Blog</a></li>
  </ul>
</nav>

// Resulting HTML
<nav>
  <ul>
    <li><a href="/home">Home</a></li>
    <li><a href="/blog">Blog</a></li>
  </ul>
</nav>
My Laravel blog
Using @include can greatly reduce the amount of HTML that you need to write for your view templates. In combination with view layouts it provides you with very powerful tools of managing the presentation layer of the application. There is a lot more tools available to you when using Blade template engine and Appendix B summarizes Blade methods and shortcuts available.
4.6 Summary
Deep knowledge of using Blade views and layouts in Laravel could save you hundreds upon hundreds hours of work and help keep the codebase of your application clean and maintainable. The shortcuts that Blade provides when outputting or escaping data are essential to applications of any size. Whether it is controlling what the user will see by using conditional statements or iterating through attributes of an object by using loops, Laravel’s Blade template engine has you covered.
Using layouts and nesting methods removes the code that otherwise would be unnecessarily repeated and gives you a way to create beautiful web applications without messy code. Now that you have mastered the presentation layer of Laravel you can go onto next chapter where you will learn about using application’s responses to get the desired format of application’s response to a request.


