Laravel: my first framework. Chapter 6 – Database Operations
The following content is the sixth chapter of my new e-book titled “Laravel: my first framework“. This writing is copyright by Maksim Surguy. Unauthorized copy and distribution of this material is prohibited.
Chapter 6. Database Operations
This chapter covers
- Configuring Laravel to use a database
- Introduction to Query Builder and Eloquent ORM
- Using Query Builder operators for managing data
- Performing Join queries
Working with data stored in a database is an essential feature of any modern web application. Saving user’s orders and preferences, storing information about the products, creating data about uploaded files, all of these are just a few examples of application’s actions that could use a database for storing data.
Managing data in the database used to be a painful process for PHP developers. Absence of built-in security, lack of common standards and consistency, messy database operations intermixed with the rest of the application’s code have plagued PHP applications for many years. All of these and more problems concerning database management and database operations have mostly been solved by modern PHP frameworks like Laravel.
With Laravel’s powerful database operators creating and managing records in a relational database like MySQL or PostgreSQL becomes much simpler and much more secure. Laravel interprets the data stored in the database into objects that you can easily manipulate like you would manipulate any other PHP object. This allows the developer to focus on other parts of the application instead of figuring out complex Structured Query Language (SQL) queries necessary to work with the data.
In this chapter you will learn how to set up Laravel to work with one of the many database engines that it supports. You will be then introduced to Laravel’s Query Builder that makes creating and managing data in the database a breeze. After that you will get an introduction to Laravel’s powerful Object Relational Mapping (ORM) called Eloquent and see how it could help manage related data. Then you will learn how you can use Laravel’s query chaining and Query Builder operators to filter, sort, group and combine retrieved data for further operations.
6.1 Introducing Database Operations in Laravel
Laravel makes connecting to a database and managing data in it extremely simple and secure. Instead of requiring the developer to write complicated SQL queries it provides a convenient way of telling the application how you want to manipulate the data and Laravel would automatically translate those commands into SQL queries behind the scenes. As you will see throughout this chapter, from simple operations like insertion and updating of records to complex filtering and sorting to working with interrelated data, Laravel has the right tool for the job.
Laravel doesn’t lock you into using a single database engine. Out of the box, it supports the following relational database systems:
- MySQL
- Postgres
- SQLite
- SQL Server
You can use any of these engines in your application after a simple configuration of one of the application’s configuration files. When the database is configured, you can immediately use it in your application by using clean and elegant syntax of either Eloquent ORM or Query Builder.
When the application’s code contains any DB operations, behind the scenes Laravel converts this code into proper SQL statements that are then executed on any of the DB engines supported by Laravel. The result of the SQL execution is then returned all the way back to the application code and the application could use the result to either show data to the user, or process the data according to application’s requirements (figure 6.1):
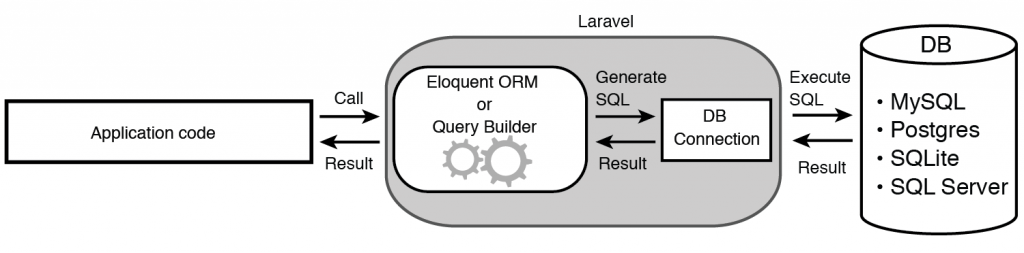
Figure 6.1 Database operations in Laravel
Laravel’s flexibility and abundance of ways to work with relational data separate it from other frameworks. What other frameworks achieve with extensions and packages, Laravel has already built-in to help you manage data stored in a database efficiently. Some of the advanced database operations that Laravel provides out of the box are:
- Managing database tables and fields through special files called “migrations”
- Populating database with sample data (also called “seeding”)
- Working with separate read/write databases
- Pagination
- Many different relationship types and advanced methods of querying relations
- Database transactions
- Query logging
When combined together, these features make Laravel one of the best PHP frameworks to work with complex databases while keeping things simple for the developer.
Also, an important feature of database operations in Laravel is that all queries are run through PDO (PHP Data Objects) extension. PDO is a powerful interface for database operations and it comes with all versions of PHP following version 5.1. Laravel makes use of PDO parameter binding that provides additional security.
You will get to experience Laravel’s powerful database operations in action as you read through this chapter. First, let’s learn what options Laravel provides for configuring the database settings.
6.1.1 Configuring database settings
Laravel makes it extremely easy to configure the settings for interacting with a database. All configuration settings of a Laravel application are located in “app/config” folder. The file that stores the configuration settings for the database is named “database.php”.
To use the database in your application you only need to open up “database.php” file and specify connection credentials for an existing database. Laravel will then use those credentials to do any further database-related operations.
Out of the box, the database configuration file has almost everything ready for you to be able to use the database. Sometimes the developer’s needs go beyond the conventions. The database configuration file provides you with the following options for database operations:
- Preferred method of object retrieval (
PDO::FETCH_CLASS,PDO::FETCH_ASSOC,PDO::FETCH_OBJor any other method available in PDO) - Which database connection the application should use by default
- Connection settings for MySQL, Postgres, SQLite or SQL Server database
- Connection settings for Redis
- Name of the table that will be used for “migrations” if migrations are used
By default, the database connection is set to use MySQL engine, PDO is set to fetch objects through “PDO::FETCH_CLASS” and most of the connection settings are already in place. Listing 6.1 shows the contents of database configuration file that Laravel comes with:
Listing 6.1 Default database configuration (app/config/database.php)
<?php

return array(
  // PDO fetch style (PDO::FETCH_CLASS, PDO::FETCH_ASSOC, PDO::FETCH_OBJ etc.)
  'fetch' => PDO::FETCH_CLASS,

  //The DB connection that will be used by the application for all DB operations
  'default' => 'mysql',

  'connections' => array(
    // SQLite connection settings
    'sqlite' => array(
      'driver'   => 'sqlite',
      'database' => __DIR__.'/../database/production.sqlite',
      'prefix'   => '',
    ),

    // MySQL connection settings
    'mysql' => array(
      'driver'    => 'mysql',
      'host'      => 'localhost',
      'database'  => 'database',
      'username'  => 'root',
      'password'  => '',
      'charset'   => 'utf8',
      'collation' => 'utf8_unicode_ci',
      'prefix'    => '',
    ),

    // Postgres connection settings
    'pgsql' => array(
      'driver'   => 'pgsql',
      'host'     => 'localhost',
      'database' => 'database',
      'username' => 'root',
      'password' => '',
      'charset'  => 'utf8',
      'prefix'   => '',
      'schema'   => 'public',
    ),

    // SQL Server connection settings
    'sqlsrv' => array(
      'driver'   => 'sqlsrv',
      'host'     => 'localhost',
      'database' => 'database',
      'username' => 'root',
      'password' => '',
      'prefix'   => '',
    ),
  ),
  'migrations' => 'migrations', // Name of the table used for migrations

  // Redis connection settings
  'redis' => array(
    'cluster' => false,
    'default' => array(
      'host'     => '127.0.0.1',
      'port'     => 6379,
      'database' => 0,
    ),
  ),
);
If you use a MySQL database on your machine, as all examples in this book are using, you will need to provide the name of an existing database. The default connection settings will most likely match your database for the exception of the username and password fields. Updating those configuration options is enough to start using a MySQL database on your local machine from Laravel!
When you have the database settings configured, you are ready to start using the database in your application. Let’s explore the two ways that you can use to work with databases in Laravel: Query Builder and Eloquent ORM.
6.1.2 Introducing Query Builder & Eloquent ORM
Laravel comes with two powerful sets of features to execute database operations, by using its own Query Builder or by using concept of “models” in Eloquent ORM. While you can use both in the same application (and as you will see later, even combine both to get the most flexibility out of DB operations) it helps to know the difference between the two. Let’s first look at the Query Builder and then you’ll meet Eloquent ORM.
6.1.2.1 Query Builder
Laravel’s Query Builder provides a clean and simple interface for executing database queries. It is a powerful tool that can be used for various database operations such as:
- Retrieving records
- Inserting new records
- Deleting records
- Updating records
- Performing “Join” queries
- Executing raw SQL queries
- Filtering, grouping and sorting of records
Database commands that use the Query Builder use Laravel’s “DB” class and look like the following (listing 6.2):
Listing 6.2 Examples of using Query Builder to create, filter, calculate & update data
// Create three new records in the "orders" table
DB::table('orders')->insert(array(
  array('price' => 400, 'product' => 'Laptop'),
  array('price' => 200, 'product' => 'Smartphone'),
  array('price' => 50,  'product' => 'Accessory'),
));

// Retrieve all records from “orders” table that have price greater than 100
$orders = DB::table('orders')
  ->where('price', '>', 100)
  ->get();

// Get the average of the “price” column from the “orders” table
$averagePrice = DB::table('orders')->avg('price');

// Find all records in “orders” table with price of 50 and update those records
// to have column “product” set as “Laptop” and column “price” set as 400
DB::table('orders')
  ->where('price', 50)
  ->update(array('product' => 'Laptop', 'price' => 400));
Query Builder is very easy to use yet powerful way to interact with the data in your database. As noted before, in this chapter we will mainly focus on using the Query Builder and you will get to see most of its methods of working with database in action. Now let’s take a look at Eloquent ORM before diving deeper into the Query Builder and other concepts.
6.1.2.2 Eloquent ORM
Since its very first version Laravel featured an intelligent ORM called “Eloquent ORM”. Eloquent is Laravel’s implementation of Active Record pattern that uses the concept of “models” to represent data and it makes working with interrelated data easy. Eloquent is very good at working with complicated data relationships while remaining efficient, easy to manage and fast.
To get started using Eloquent you only need to configure the database connection settings in “app/config/database.php” file and create “models” that correspond to tables of your database. The Eloquent syntax looks not much different from plain OOP PHP code so it is very easy to read. Eloquent provides many advanced features to manage and operate on data, the most prominent of them are:
- Working with data by the use of “models”
- Creating relationships between data
- Querying related data
- Conversion of data to JSON and arrays
- Query optimization
- Automatic timestamps
From simple data insertion to association of data between tables to complex filtering within related data, Eloquent has you covered. The clean and logical syntax is something that separates Eloquent from other existing ORMs. Listing 6.3 shows an example of Eloquent syntax in action to create a new user, new order and then associate the new order to the newly created user:
Listing 6.3 Example of using Eloquent ORM to create and associate related data
// Create a model definition for the table “users” indicating its
// relationship to the “orders” table

// app/models/User.php
class User extends Eloquent {
  public function orders()
  {
    return $this->hasMany('Order');
  }
}

// Create a model definition for the table “orders”
// app/models/Order.php
class Order extends Eloquent {}

// application code

// Create a new row in “users” table
$user = new User;
$user->name = "John Doe";
$user->save();

// Create a new row in “orders” table and link it to the user
$order = new Order;
$order->price   = 100;
$order->product = "TV";

$user->orders()->save($order);
The example above is just barely scratching the surface of Eloquent’s features. There is just so much about Eloquent that it deserves its own chapter and you will get to experience this mighty ORM at a much deeper level in the next chapter. Right now let’s take a closer look at using the Query Builder.
6.2 Using Query Builder
From inserting and managing records to sorting and filtering, Query Builder provides you with convenient operators to work with the data in an existing database. Most of these operators could be combined together to get the most out of a single query.
Application code using Query Builder uses Laravel’s “DB” class. When the application executes any command of class “DB” (a command could also be called an “operator”), Laravel’s Query Builder will build an SQL query that will be executed against a table specified as an argument to “table” method (figure 6.2). That query will be executed on a database using the database connection settings specified in the “app/config/database.php” file. The result of the query execution will then be passed all the way back to the caller changing its state: by returning retrieved records, a Boolean value or returning an empty result set.
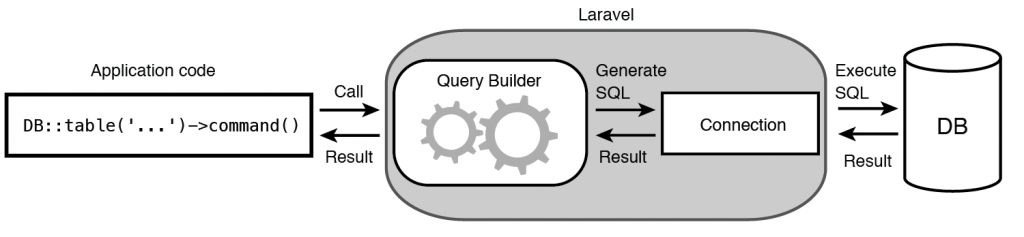
Figure 6.2 Executing database operations using Query Builder
The operators that Query Builder provides for some of the most common operations are listed in table 6.1 along with descriptions of these operators:
Table 6.1 Most commonly used operators of the Query Builder
| Operator | Description |
|---|---|
insert(array(...)) |
insert a new record using the data provided as an array of key – value pairs |
find($id) |
retrieve a record that has a primary key “id” equal to the provided argument |
update(array(...)) |
update a record using the data provide as an array of key – value pairs |
delete() |
delete a record |
get() |
retrieve the record as an object containing the column names and the data stored in the record |
take($number) |
retrieve only a limited number of records |
Throughout the next few pages you will get to see the Query Builder in action and meet a few of its powerful operators listed in the table 6.1. Let’s start with the basics, inserting new records into an existing table in a database.
6.2.1 Inserting records
The “insert” operator inserts a new row (record) into an existing table. You can specify what data to insert into the table by providing an array of data as a parameter to “insert” operator. Let’s take a look at a simple example. Imagine that you have a table called “orders” that has 3 fields (columns) in it: auto incrementing ID, price and a name of the product (table 6.2).
Table 6.2 Table structure for the “orders” table
| Key | Column | Type |
|---|---|---|
| primary | id | int (11), auto-incrementing |
| price | int (11) | |
| product | varchar(255) |
6.2.1.1 Inserting a single record
Let’s use the “insert” operator of Query Builder to insert a new record into this table. By passing an array formatted as column-value pair you can tell the Query Builder to insert a new record using the data passed as a parameter to the “insert” operator (listing 6.4):
Listing 6.4 Inserting a new record using Query Builder
// Tell the query builder to do an insertion on the “orders” table
DB::table('orders')->insert(
  array(
    'price'   => 200, // Set a value for the column “price”
    'product' => 'Console' // Set a value for the column “product”
    )
);
When this code is executed the following process will take place behind the scenes. Laravel’s Query Builder will translate the “insert” command into SQL query specific to the database that is currently in use by the application (specified in “database.php” configuration file). The data passed as an argument to the “insert” command will be placed into the SQL query in form of parameters. The SQL query will then be executed on the specified table (“orders”) and the result of query execution will be returned to the caller. Figure 6.3 illustrates this whole process:
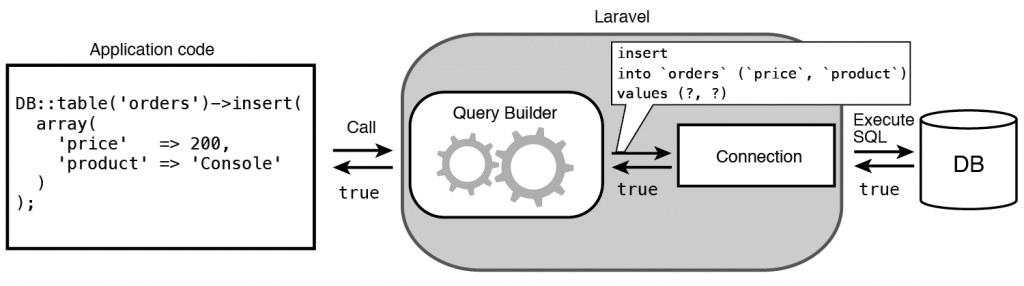
Figure 6.3 Behind the scenes process of running “insert” operator
You might have noticed the question marks instead of actual values passed to the SQL query above. As noted in the introduction section of this chapter, Laravel uses PDO to execute SQL statements. Behind the scenes PDO will attach the data (in this case “200” and “Console”) to the unnamed placeholders seen as question marks. Using a prepared statement by including placeholders for data adds protection from SQL injection and increases security of insertions and updates of data. As a developer you don’t need to enable this in any way, Laravel does this for you out of the box. Now that you know how to insert a single record, let’s also take a look at inserting many records.
6.2.1.2 Inserting multiple records
The same “insert” operator of the Query Builder could be used to insert more than one row of data. Passing an array containing arrays of data allows you to insert as many rows as you would like to, two, three or a thousand. Listing 6.5 shows the use of “insert” operator to create three new rows of data:
Listing 6.5 Inserting multiple records using Query Builder
// Create three new records in the "orders" table
DB::table('orders')->insert(array(
  array('price' => 400, 'product' => 'Laptop'),
  array('price' => 200, 'product' => 'Smartphone'),
  array('price' => 50,  'product' => 'Accessory'),
));
When executed, the “insert” statement in listing above will create three new records, and the SQL query that Laravel will build behind the scenes to do that is:
insert into `orders`(`price`,`product`) values (?, ?),(?, ?),(?, ?)
As you can see Laravel is smart enough to do the insertion of three rows of data in one query instead of running three separate queries. Now that you can easily insert data using Query Builder, let’s learn how to retrieve data.
6.2.2 Retrieving records
Query Builder provides a few convenient operators of getting the data from the database. To accommodate many different situations it is very flexible, allowing you to do the following operations:
- Retrieve a single record from a table
- Retrieve all records in the table
- Retrieve only specific columns of all records in the table
- Retrieve a limited number of records in the table
Over the course of the next few pages we will look at these operators of retrieving data. Let’s start with the basics, getting a single record from the database.
6.2.2.1 Retrieving a single record
You can retrieve a single record from the table by using operator “find”. Just provide the value of the primary key of the record that you’d like to retrieve as a parameter to operator “find” and Laravel will return that record as an object or return NULL if the record is not found. The example in listing 6.6 illustrates using “find” to retrieve a record with the primary key set to “3”:
Listing 6.6 Retrieving a single record using operator ‘find’
// Retrieve a record with primary key (id) equal to “3”
$order = DB::table('orders')->find(3);

// If there is a record with ID “3”, The $order variable will contain:
object(stdClass)#157 (3) {
  ["id"]=>
  string(1) "3"
  ["price"]=>
  string(3) "200"
  ["product"]=>
  string(10) "Smartphone"
}Running the code in listing 6.6 would execute the following SQL, binding the value passed into “find” operator as a parameter and limiting the number of returned records to a maximum of 1:
select * from `orders` where `id` = ? limit 1
As you can see, retrieving a single record is easy with the use of operator “find”. What if you wanted to retrieve all records from a table?
6.2.2.2 Retrieving all records in the table
To retrieve all records from a table you can use operator “get” without any parameters. Running “get” on a specified table without any prior operators would return all records from that table as an array of objects. Imagine that you wanted to retrieve all records from the “orders” table. Listing 6.7 below shows how you would get all data from that table as an array of objects:
Listing 6.7 Retrieving all records using ‘get’
// Using “get” without any prior operators will grab all records in the
// specified “orders” table
$orders = DB::table('orders')->get();
Running operator “get” without any parameters would run the following SQL query behind the scenes and return its result as an array of objects:
select * from `orders`
The result returned from execution of code in listing 6.7 would have an array of objects containing data of all rows in the table. Each object would have array’s keys storing the names of the columns of the table and array’s values storing the row’s values. Listing 6.8 shows the resulting array of objects:
Listing 6.8 Result of retrieving all records (contents of orders table)
array(4) {
  [0]=>
  object(stdClass)#157 (3) {
    ["id"]=>
    string(1) "1"
    ["price"]=>
    string(3) "200"
    ["product"]=>
    string(7) "Console"
  }
  /* ... 3 more rows returned as objects ... */
}
What if you wanted to retrieve just a few specific columns of all records of the table instead of all columns? Let’s take a look how you could do that with Query Builder.
6.2.2.3 Retrieving specific columns of all records in the table
To get only specific columns of all records in the table you can still use the “get” operator, but this time pass the desired column names as an array of parameters to the “get” operator. For example if you wanted to retrieve columns “id” and “price” of all records, while omitting “product” column, you would pass “id” and “price” as a parameter to the “get” operator like in listing 6.9:
Listing 6.9 Retrieving specific columns of all records in a table
// Tell the Query Builder to only retrieve “id” and “price” columns
$orders = DB::table('orders')->get(array('id','price'));
Running this statement would produce the following SQL:
select `id`, `price` from `orders`
The returned data in this case would contain an array of objects as follows in listing 6.10:
array(4) {
  [0]=>
  object(stdClass)#157 (2) {
    ["id"]=>
    string(1) "1"
    ["price"]=>
    string(3) "200"
  }
  ... 3 more rows returned as objects ...
}
Laravel’s Query Builder tries to make retrieval of data extremely simple and efficient. The flexibility of specifying which columns of the table you’d like to get simply by passing the names of the columns to “get” operator could be very useful. It could come handy when your application works with big amounts of data. Retrieving only specific columns from the table instead of the whole table cuts down the amount of RAM your application uses.
What if you wanted to limit the maximum number of records that a Query Builder statement would return? Let’s take a look at how you can tell Query Builder to only retrieve a specific number of records.
6.2.2.4 Retrieving a limited number of records
To specify a maximum number of records that you’d like to get from a table you can use operator “take” with a number of records passed as a parameter to it and appending operator “get” to the query. For example imagine if you had 1000 records in the “orders” table and you wanted to only retrieve a maximum of 50 records from it. Using the operator “take” with 50 passed as a parameter, you can. Listing 6.11 shows this in action:
Listing 6.11 Retrieving a limited number of records from a table
$orders = DB::table('orders')->take(50)->get();Executing this query would result in $orders being an array of objects with maximum of 50 objects that store the data retrieved from the table. Now that you know how to create and retrieve data in various ways, you are ready to learn how to update existing data in the database.
6.2.3 Updating records
Updating records using Query Builder is very similar to creating new records. To update the data of an existing record or a set of records you can append operator “update” to the query and pass an array of new data as a parameter to it. You can use query chaining, a concept that we will explore later in this chapter, to target specific records that would be updated.
6.2.3.1 Updating specific records
To update only specific records in the table you would need to somehow tell Laravel which records you want updated. Fortunately you can use Query Builder’s filtering operators and append the “update” operator to the end of the query targeting only specific records.
One of the filtering operators is operator “where” that allows you to choose records by specifying a column, comparison operator and a value to compare the data to. For example if you wanted to update all records in table “orders” that have price set to more than 50, you would construct the following query (listing 6.12):
Listing 6.12 Updating a column of all records in a table that match a criterion
// Tell the Query Builder to target all rows with column ‘price’ set to more than 50 in
// table “orders”
DB::table('orders')
  ->where('price','>','50')
  ->update(array('price' => 100)); // Update column ‘price’ with a new value
Executing this query would generate the following SQL query:
update `orders` set `price` = ? where `price` > ?
You are not limited to updating just one column of the records. Passing more key-value pairs in the array supplied to “update” operator as a parameter would update all specified columns. What if you wanted to update all records in the table at once?
6.2.3.2 Updating all records in the table
Even though it is a rare case to update all records in a table, you can update columns of all records in the table by appending “update” operator to the beginning of the DB query. Listing 6.13 shows an example of updating the column “product” of all records in the “orders” table:
Listing 6.13 Updating a column of all records in a table
// Tell the Query Builder to update column ‘product’ of all records to be ‘Headphones’
DB::table('orders')->update(array('product'=>'Headphones'));
Executing this query would generate the following SQL query:
update `orders` set `product` = ?
As you can see, Query Builder allows updating the records in a table in multiple ways that are easy to write. In the next section we will take a look at deleting existing records.
6.2.4 Deleting records
Deleting records from a table using Query Builder follows the same patterns as updating records. You can delete specific records that match some criteria or delete all records from the table by using operator “delete”.
6.2.5 Deleting specific records
To delete specific records in the table you can also use filtering operators like “where” to target records matching some sort of filtering criteria. For example if you wanted to delete the records that have “product” column set to “Smartphone”, you would append “delete” operator to the query specifying which records to target (listing 6.14):
Listing 6.14 Deleting records that match a criterion
// Tell the Query Builder to target all records that have column “product”
// set to “Smartphone”
DB::table('orders')
  ->where('product','=','Smartphone')
  ->delete(); // Delete records matching the criterion
Executing this query would generate the following SQL query:
delete from `orders` where `product` = ?
The query in listing 6.14 would affect only records that were targeted by the “where” operator. If you wanted to delete all records from a table, you would do it in a way similar to updating all records, by only having operator “delete” following “DB::table()” statement.
Now that you know how to insert, retrieve, update and delete records, let’s learn how to achieve precise control when executing any of these actions by filtering, sorting and grouping data.
6.3 Filtering, sorting and grouping data
When managing data in the database applications often need to have precise control over which records will be affected. This might be either getting exactly the set of data required by application’s specifications or deleting just a few records that match some criteria. Some of these operations could get very complicated if you were to use plain SQL. Laravel’s Query Builder allows you to filter, sort and group data while maintaining clean consistent syntax that is easy to understand. You can see a list of most commonly used operators to filter, sort, and group data in table 6.3 below:
Table 6.3 Query Builder operators for filtering, sorting and grouping data
| Operator | Description |
|---|---|
where('column','comparator','value') |
retrieve records that match a criterion |
orderBy('column','order') |
sort records by specified column and order (ascending or descending) |
groupBy('column') |
group records by a column |
Over the next few pages you will get deeper understanding of how to operate on very specific records from the database using the operators from table 6.3. While getting to know the various ways of operating with data you will get to meet and use the concept of “query chaining”.
6.3.1 Query Chaining
Query chaining allows you to run many database operations in a single query. Imagine that you had a table “users” and wanted to retrieve an object containing all users with first name “John”, located in California and sorted by their birthdate. How would you do that in an efficient way?
One way would be to first retrieve an object containing all users with first name “John”, then do further filtering using PHP’s “foreach” loops to get to the result that you want. While this sounds acceptable in theory, it is not efficient and could take up a lot of server’s RAM. In addition, if the requirements for the application change, there would be no way to quickly update code like that to accommodate new functionality. Of course like with many other common web development problems, Laravel provides a better option.
Instead of creating separate queries to filter and sort data, you could put many of them together, effectively “chaining” them. A query chain combines a sequence of various actions that can be performed with data one after another to get a specific result that can be operated on. Filtering data by various parameters, sorting data and more could be represented as a series of actions performed upon data in a table (figure 6.4):
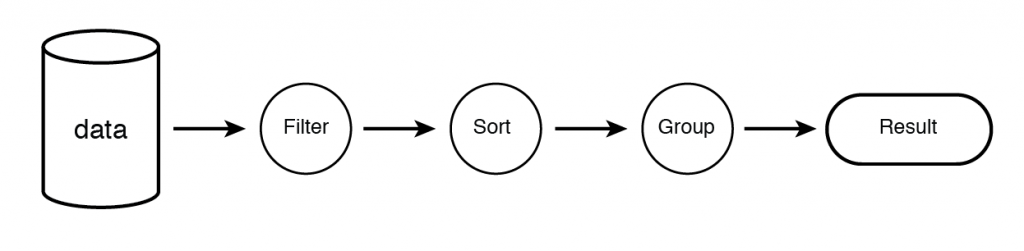
Figure 6.4 Concept of chaining actions together to get specific data from the database
Laravel allows you to put as many queries together as you want. From running two operations to ten and more, query chaining can significantly cut down on the amount of code you need to write to execute complicated database operations. For example to execute aforementioned actions on the “users” table you could put the filtering and sorting together into a single query chain like on the left side of figure 6.5:
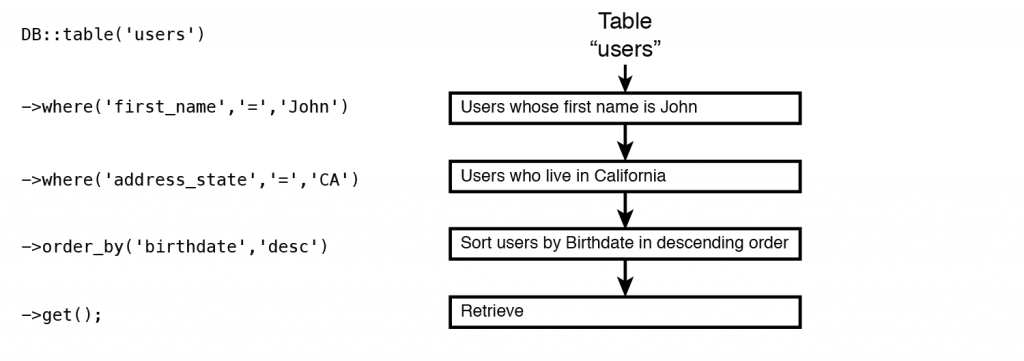
Figure 6.5 Example of query chaining in action
While query chaining is not a new concept in the world of web development frameworks, Laravel provides one of the most elegant ways to do it. Let’s look at the first operator that demonstrates the use of query chaining, operator “where”.
6.3.2 Using “where” operator to filter data
Query Builder’s operator “where” makes filtering records easy. It provides a clean interface for executing SQL “WHERE” clause and has syntax that is very similar to it. Some of the operations that you could do with this operator include:
- Selecting records that match a certain criterion
- Selecting records that match either one criterion
- Selecting records that have a column that lies in a certain range of values
- Selecting records that have a column that is out of range of values
After the records are selected using “where” you can do any of the operations discussed previously: retrieval, updating or deleting. Alternatively you could apply more “where” operators by the use of query chaining to achieve more precise matching. The flexibility that Laravel provides for filtering data is truly superb. Let’s start exploring the powerful operator “where” by looking at using it in a simple query.
6.3.2.1 Simple “where” query
A query using “where” consists of supplying three parameters that will be used to filter the data:
- The name of the column that will be used for comparison
- The operator that will be used to compare data
- The value that the columns’ contents will be compared to
The diagram in figure 6.6 shows the syntax of using operator “where”:
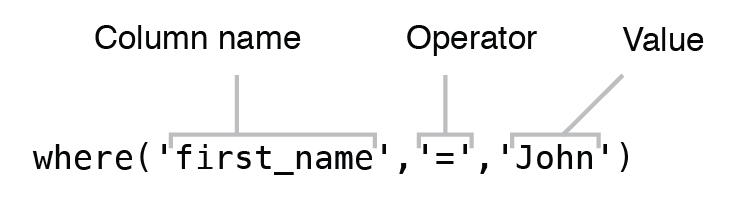
Figure 6.6 Syntax of using operator “where”
Operator “where” can be used not only for finding entries that exactly match the desired value. In fact you can use any of the operators supported by the database to specify what kind of matching you need. For numerical comparison you might want to use “>” or “<” operators to get data that has values of a certain numerical column greater or less than provided value. For string comparison you might use “like” or “not like” comparison operator.
A list of allowed comparison operators that work in all databases supported by Laravel is presented in table 6.4 below:
Table 6.4 Allowed comparison operators for “where” operator
| Operator | Description |
|---|---|
| ”=” | Equal |
| ”<” | Less than |
| ”>” | Greater than |
| ”<=” | Less than or equal |
| ”>=” | Greater than or equal |
| “<>” or “!=” | Not equal |
| “like” | Simple pattern matching (you can use the “%” sign with this operator to define wildcards both before and after the pattern) |
| “not like” | Negation of simple pattern matching |
Besides using a single “where” operator you can chain more than one “where” to filter the results even further. Under the covers Laravel will automatically put an “AND” in the SQL statement between the chained “where” operators. For example if you wanted to get all users that have last name starting with letters “Sm” and whose age is less than 50, you would create a query chain as shown in listing 6.15:
Listing 6.15 Chaining multiple “where” operators
// Use table “users”
$users = DB::table('users')
  // Match users whose last_name column starts with “Sm”
  ->where('last_name', 'like','Sm%')
  // Match users whose age is less than 50
  ->where('age','<' ,50)
  // Retrieve the records as an array of objects
  ->get();
Running this query would produce the following SQL behind the scenes:
select * from `users` where `last_name` like ? and `age` < ?
Laravel allows chaining as many “where” operators as you need to allow very precise control over which records you would like to operate with. Let’s now look at using another operator, “orWhere” that complements “where” operator nicely.
6.3.2.2 Using “orWhere” operator
To select data that matches at least one criterion out of several could be achieved by using “orWhere” operator. This operator has exactly the same syntax as “where” operator and it has to be appended to an existing “where” operator in order for it to work.
Let’s imagine that you wanted to delete all records from the “orders” table that have been either marked with “1” in “processed” column or whose “price” column is less than or equal to 250. Using “where” and “orWhere” operators together and appending “delete” operator at the end will do just that. Listing 6.16 shows using “orWhere” operator to filter records and subsequently deleting the records that match at least one criterion:
Listing 6.16 Combining “where” and “orWhere” operators
// Use table “orders”
$orders  = DB::table('orders')
  // Match orders that have been marked as processed
  ->where('processed', 1)
  // Match orders that have price lower than or equal to 250
  ->orWhere('price','<=' ,250)
  // Delete records that match either criterion
  ->delete();
This query would generate the following SQL:
delete from `orders` where `processed` = 1 or `price` <= 250
We looked at using “where” and “orWhere” operators and you now know how to use them together. Now let’s look at “whereBetwen” operator.
6.3.2.3 Using “whereBetween” operator
“whereBetween” operator comes handy when you want to match records that have a numerical column set to a value that falls within a certain range. The syntax of “whereBetween” is a bit simpler than that of “where” or “orWhere” operators (figure 6.7). This operator expects only two parameters, a column that will be used for matching and an array containing two numerical values indicating a range.
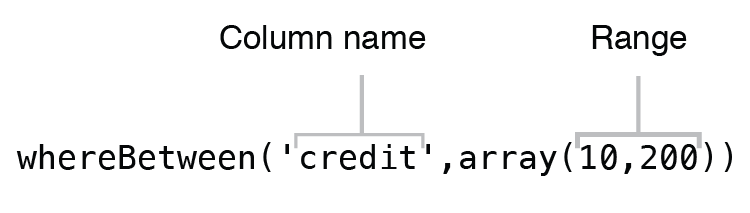
Figure 6.7 Syntax of “whereBetween” operator
Adding this operator will match the records that have the value of the specified column fall in the provided range. For example if you wanted to retrieve all records in the “users” table that have the value of the “credit” column set to anything with 100-300 range, you would use the following query:
Listing 6.17 Using “whereBetween” operator
// Use table “users”
$users  = DB::table('users')
  // Match users that have the value of “credit” column between 100 and 300
  ->whereBetween('credit', array(100,300))
  // Retrieve records as an array of objects
  ->get();
The query in the listing above would execute the following SQL:
select * from `users` where `credit` between ? and ?
You have now learned many different ways to get the desired data. As you have seen, filtering data with the operator “where” and its derivatives doesn’t involve complex SQL statements when using Query Builder. The Query Builder has a lot more features that allow more control for the way the data is retrieved. Let’s take a look at sorting and grouping data.
6.3.3 Using “orderBy” to sort data
“orderBy” operator of the Query Builder provides an easy way to sort the data that is retrieved from the database. Just like “where” operator is similar to “WHERE” clause in SQL, “orderBy” operator is very similar to the “ORDER BY” clause found in SQL. Query Builder’s syntax for this operator is practically the same as it is in SQL. To sort a set of data by some column, two parameters need to be passed to the “orderBy” operator: the column by which to sort the data and the direction of sorting (ascending or descending). Figure 6.8 shows syntax of “orderBy” operator:
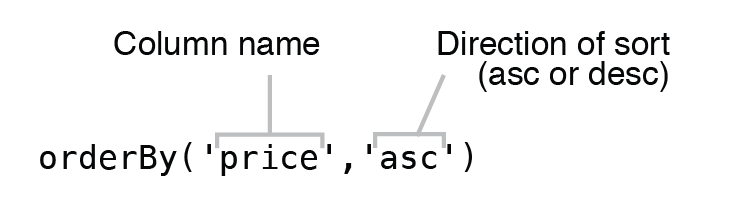
Figure 6.8 Syntax of “orderBy” operator used to sort data
Applying “orderBy” operator to a set of data retrieved by one of the operators of Query Builder will sort the data according to the column name and the direction specified through the use of parameters. For example imagine that you had a table called “products” and wanted to sort the products by their price, in ascending order. You could use the query from listing 6.18 to do that:
Listing 6.18 Using “orderBy” operator to sort products by price
// Use table “products”
$products  = DB::table('products')
  // Sort the products by their price in ascending order
  ->orderBy('price', 'asc')
  // Retrieve records as an array of objects
  ->get();
You could also use query chaining to accommodate more complex filtering and sorting scenarios. For example if you wanted to get all records from the “products” table whose “name” column contains letters “so” and whose “price” column is greater than 100 and sort the result by the “price” column in ascending order, you would construct the following query as in listing 6.19:
Listing 6.19 Using “orderBy” operator with other operators
// Use table “products”
$products  = DB::table('products')
  // Get products whose name contains letters “so”
  ->where('name','like','%so%')
  // Get products whose price is greater than 100
  ->where('price','>', 100)
  // Sort products by their price in ascending order
  ->orderBy('price', 'asc')
  // Retrieve products from the table as an array of objects
  ->get();
“orderBy” operator is chainable just like “where” operator. You can combine multiple “orderBy” operators to get a sorted result that you need to achieve. If you also want to group records together, you can use the “groupBy” operator.
6.3.4 Using “groupBy” to group data
You can group records together using “groupBy” operator that is similar to SQL “GROUP BY” clause. It accepts only one parameter – the column by which to group the records by. For example if you had a table “products” and wanted to retrieve all records from it grouped by the product name, you would create the following query (listing 6.20):
Listing 6.20 Using “groupBy” operator to group data
// Use table “products”
$products  = DB::table('products')
  // Group products by the “name” column
  ->groupBy('name')
  // Retrieve products from the table as an array of objects
  ->get();
Now that you know how to use filtering, sorting and grouping of records in various ways and are familiar with the basics of query chaining, we can go on to a bit more complicated topic and learn how to use Laravel’s advanced query operators to do “join” statements.
6.4 Using Join Statements
Laravel’s Query Builder supports all types of Join statements supported by the database you are using. Join statements are used to combine records from multiple tables that have values common to those tables. Consider two tables, “Users” and “Orders”, with contents as shown in figure 6.9:
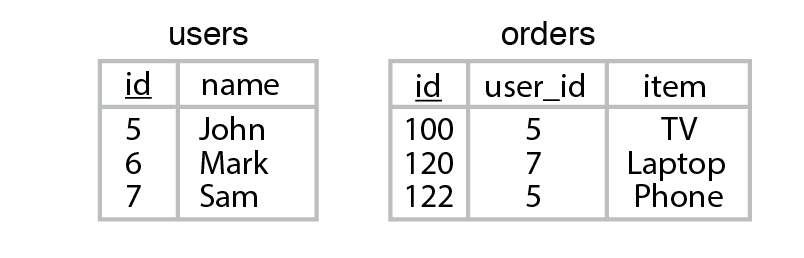
Figure 6.9 Contents of two sample tables
While you can use Join statements to combine more than two tables, we will use only the two small tables from figure 6.9 to demonstrate some of the types of Join statements that you can use in Query Builder.
6.4.1 Using Inner Join
Inner Join is a simple and most common type of Join. It is used to return all of the records in one table that have a matching record in the other table. For example if you wanted to know which users have placed an order you could use an Inner Join statement that would return a list of all users with orders in the “orders” table and data about each of their order.
Inner Join in Query Builder follows the syntax in figure 6.10 below:
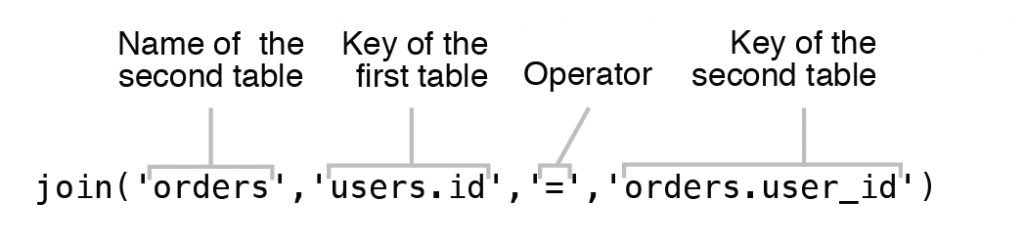
Figure 6.10 Syntax of Inner Join
Let’s apply this syntax to the “users” and “orders” tables, to see which records are matching between them. In our example tables the primary key in each table is the “id” column. Listing 6.21 shows the Join query applied using the “users” table as first table and “orders” table as the second table:
Listing 6.21 Using Inner Join
// Use table “users” as first table
$usersOrders  = DB::table('users')
  // Perform a Join with the “orders” table, checking for the presence of matching
  // “user_id” column in “orders” table and “id” column of the “user” table.
  ->join('orders', 'users.id', '=', 'orders.user_id')
  // Retrieve users from the table as an array of objects containing users and
  // products that each user has purchased
  ->get();
When we run this query, the following SQL would be executed behind the scenes:
select * from `users` inner join `orders` on `users`.`id` = `orders`.`user_id`
This query would look for values of “user_id” column in the “orders” table that have a matching value in the “id” column in the “users” table. A Venn diagram on the left side of figure 6.11 shows the result of Inner Join as the shaded area between the two sets of data. If represented as a table, the resulting array of objects assigned to $usersOrders after running the Join statement in listing 6.21 would look like the table on the right side of figure 6.11:
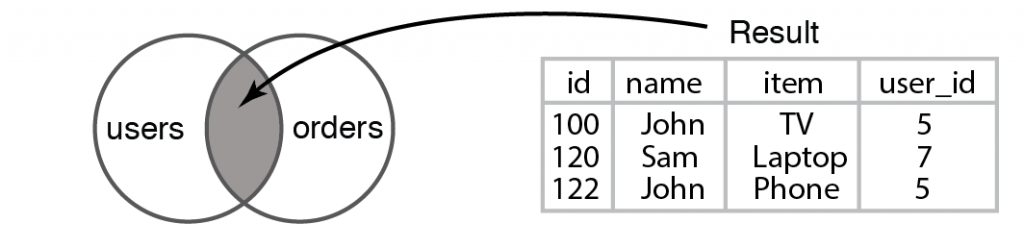
Figure 6.11 Result of running an Inner Join query between the “users” and “orders” tables
As you can see, running an inner Join could be useful and simple with the Query Builder. Now let’s explore another type of join, a Left Join.
6.4.2 Using Left Join
Left Join is a bit more inclusive than the Inner Join and has syntax similar to it. It produces a set of records that match between two tables and in addition it returns all records from the first table that don’t have a match. When creating this type of join the only difference in syntax is using “leftJoin” operator instead of “join” as shown in figure 6.12 below:
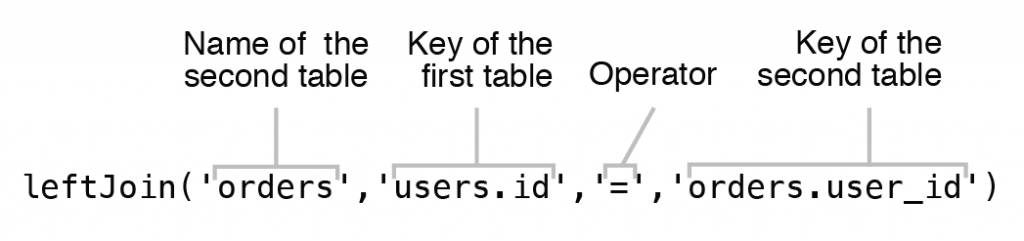
Figure 6.12 Syntax of Left Join
Let’s use this type of Join on our two sets of data, the “users” and “orders” table to see what the result would look like. Listing 6.22 shows usage of the “leftJoin” operator to join the two tables:
Listing 6.22 Using Left Join
// Use table “users” as first table
$usersOrders  = DB::table('users')
  // Perform a Left Join with the “orders” table, checking for the presence of
  // matching “user_id” column in “orders” table and “id” column of the “user” table.
  ->leftJoin('orders', 'users.id', '=', 'orders.user_id')
  // Retrieve an array of objects containing records of “users” table that have
  // a corresponding record in the “orders” table and also all records in “users”
  // table that don’t have a match in the “orders” table
  ->get();
When we run this query, the following SQL would be executed behind the scenes:
select * from `users` left join `orders` on `users`.`id` = `orders`.`user_id`
This query would contain all rows from “users” regardless of having a matching entry in the “orders” table. The values of columns of the result would consist of the same values as if you had an Inner Join but those rows from the “users” table that don’t have a match in the “order” would return NULL for “id”, “item” and “user_id” columns (figure 6.13). If represented as a table, the resulting array of objects assigned to $usersOrders after running the Left Join statement in listing 6.22 would look like the table on the right side of figure 6.13:
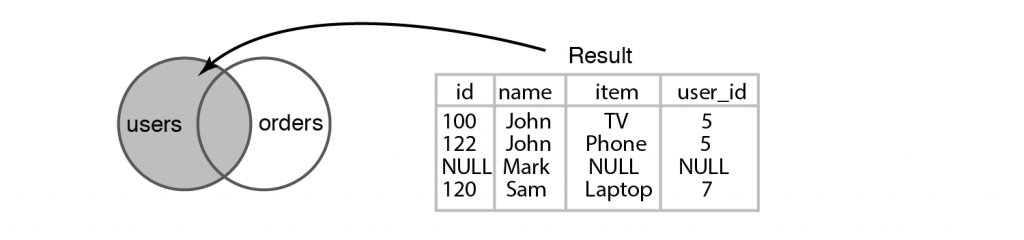
Figure 6.13 Result of running a Left Join query between the “users” and “orders” tables
Left Joins are useful in those cases when you need to get all records from the first table even if there are none matching records in the second table. There might be a need to use another type of Joins. Fortunately Laravel doesn’t limit you by just Inner Joins and Left Joins. In fact, you can use any type of join supported by your database and we will learn how to do that in the next section.
6.4.3 Using other types of Joins
Laravel’s Query Builder is so flexible that it takes into account special cases of Join queries and allows you to execute all types of Join queries supported by your database. While most SQL database engines (like MySQL and SQLite) support Inner Right and Left Joins/Outer Right and Left Joins, other SQL engines like Postgres and SQL Server support Full Joins in addition to other types of Join queries. You can execute any type of Join that your database supports by supplying a fifth argument into “join” operator specifying which type of Join query you want to execute. Figure 6.14 shows the syntax of Join operator with a custom type of the Join query:

Figure 6.14 Using fifth argument of “join” operator for custom type of Join query
From cross joins to outer joins and full joins, the flexibility of the “join” operator would fit any possible Join query scenario. Listing 6.23 shows some of the custom types of Joins that work with all database engines supported by Laravel:
Listing 6.23 Using other types of Join queries
// Right Join
join('orders', 'users.id', '=', 'orders.user_id','right')

// Right Outer Join
join('orders', 'users.id', '=', 'orders.user_id','right outer')

// Excluding Right Outer Join
join('orders', 'users.id', '=', 'orders.user_id','right outer')
     ->where('orders.user_id',NULL)

// Left Join
join('orders', 'users.id', '=', 'orders.user_id','left')

// Left Outer Join
join('orders', 'users.id', '=', 'orders.user_id','left outer')

// Excluding Left Outer Join
join('orders', 'users.id', '=', 'orders.user_id','left outer')
     ->where('orders.user_id',NULL)

// Cross join
join('orders', 'users.id', '=', 'orders.user_id','cross')
Multiple types of chainable Join queries could make almost any complex database operation possible. Great support of Join queries along with other database operators you have seen up to this point makes working with database in Laravel a pleasant process instead of being a mundane operation.
6.5 Summary
In this chapter you have looked at Laravel’s powerful methods of working with databases. From simple connection configuration to creation of complicated filtering and sorting scenarios Laravel provides convenient database operators at every step.
You have met Query Builder and have used its easy-to-follow syntax to insert, retrieve, update and delete records. You have used its “where” operators to filter records, “orderBy” to sort them and “join” to build various types of Join queries. Besides, on the way to getting a close look at the features of Query Builder you have learned an important concept of database operations in Laravel – query chaining that makes multi-stage database operations efficient and easy to work with.
The concepts you have learned so far in this chapter are fundamental to the next chapter where you will get to know one of the most elegant ORMs of modern web development frameworks, Eloquent. In the next chapter we will take a closer look at Eloquent ORM and become familiar with its smart ways to manage data and relationships between the data in Laravel-powered web applications.


This is awsome stuff!
Finally i can start my project with laravel. Other tutorials/docs are very confusing and large.
Hope you will make more tutorials! Consider your SHARED!
(sorry for my bad english)
Thanks!!! Если говоришь по русски то можешь и на Русском!
Hi Maks! Will you be updating your Laravel book for L5? It’s been a great read so far!
Thanks! Unfortunately that will take quite a bit of time and will require a complete rewrite since Laravel 5 introduces a lot of new concepts and I don’t think I will find a few months worth of time in order to update this book 🙁
where is chapter 7 ? Thnx
Great stuff! Are next chapters coming and where?
very helpful
very helpful
How to add array in database in eloquent..??
Awesome job thanks alot