Laravel in Practice – pulling user data from LinkedIn
Not so long ago I have posted a very detailed tutorial on how to use “Login with Facebook” with your Laravel application. After I published that tutorial I have found an extraordinary oAuth2 package that makes it a lot more consistent and easy to integrate social providers into any Composer-based PHP application. Since then I have contributed to that package by integrating more providers such as Microsoft, Instagram and finally, LinkedIn.
In this post I will explain how to use this library in Laravel and how you can make it work with LinkedIn to pull in an enormous amount of data about the user that authorizes the application to use their LinkedIn profile.
You can get the source for this tutorial on my Github: https://github.com/msurguy/laravel-linkedin-login
And the demo of this app is here: http://laravel-linkedin-login.gopagoda.com
The process of creating a simple app that integrates with Linkedin will follow this flow:
- Install the above mentioned oAuth2 package
- Create LinkedIn application on the LinkedIn developers site
- Configure the social providers (in this case LinkedIn)
- Use the auth to gather the data about the user
- Celebrate!
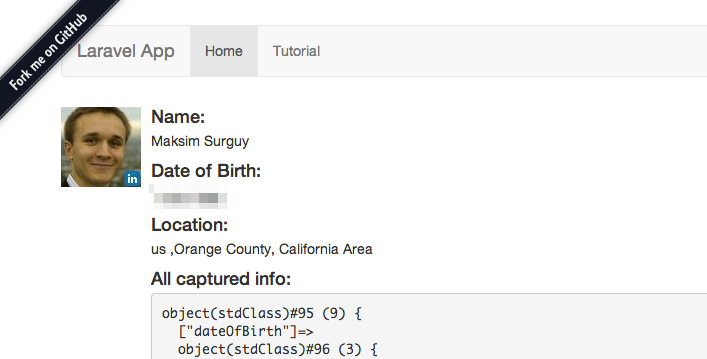
This is how the end result will look like (just a small snapshot of all the data I got from LinkedIn):
Are you ready to pull some useful info from LinkedIn user? Let’s start!
oAuth2 client package installation
Let’s assume you already have a Laravel project setup (it could even be a fresh project). First step for us to do is install the oAuth2 package, open up the terminal navigating to the root of the application’s directory, and ask Composer to install the “league/oauth2-client” package by typing:
composer require league/oauth2-clientAnd in the prompt about the version constraint provide “dev-master”, hit enter and you should have the package installed after a couple minutes. The oAuth2 client package is now installed, let’s create an alias to it in the “app/config/app.php” file so that we have easier way to use it later in the application, open up the app.php config file, scroll down to the “aliases” and add the alias to the LinkedIn class:
...
'URL'             => 'IlluminateSupportFacadesURL',
'Validator'       => 'IlluminateSupportFacadesValidator',
'View'            => 'IlluminateSupportFacadesView',

'Linkedin'        => 'LeagueOAuth2ClientProviderLinkedin',
LinkedIn app configuration
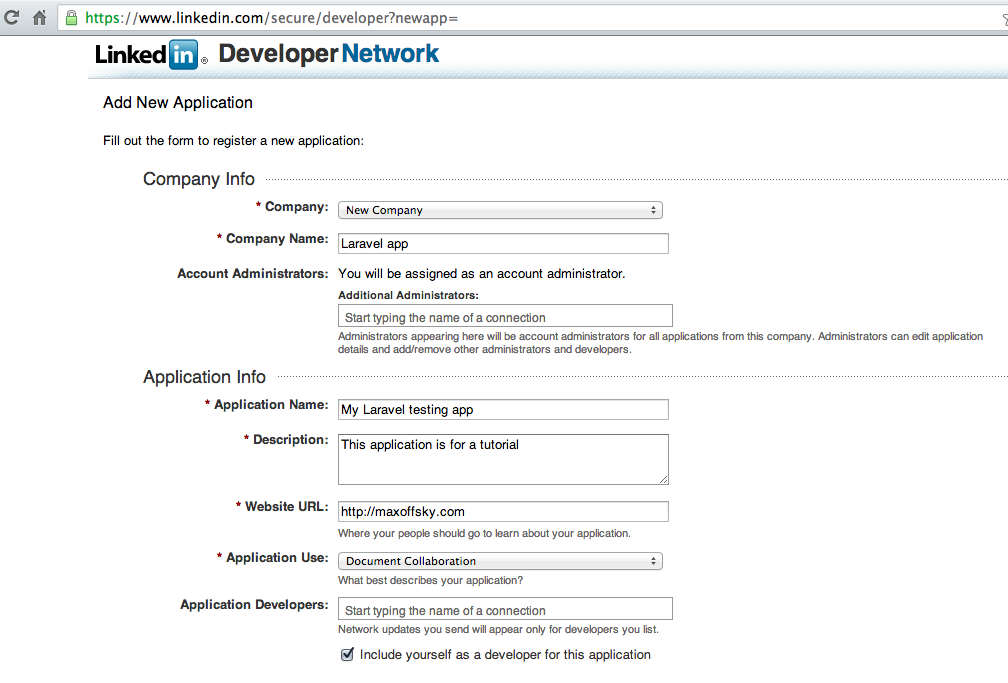
At this point we can already use the package but of course before we try to do any authorization we need to set up an application with LinkedIn. Go to this link to create a new application : https://www.linkedin.com/secure/developer.
Fill out the fields like I did in the screenshot:
Also, select the permissions that you would like to request from the users (you will need these later when we retrieve user’s data):
When you have the application created, make note of the Api key and the Secret key. Copy them somewhere as you will need them in the next step. It is time to configure our settings for LinkedIn inside the Laravel application.
Configuring social provider settings
Just like I have mentioned in the previous tutorial, it is a good idea to create a configuration file for the social providers instead of cluttering the controllers or routes with these settings. We will do the same here, let’s create a file called “social.php” and place it in the “app/config” folder, it will contain the Api key and secret key settings (that you copied from your app settings in Linkedin), the URL where to redirect after authorization and the desired scope for linkedin permissions:
<?php

// Social apps keys
return array(
    'linkedin' => array(
        'clientId'  =>  'your_app_client_id',
        'clientSecret'  =>  'your_app_client_secret',
        'redirectUri'   =>  url('login/linkedin'),
        'scope' => 'r_basicprofile r_emailaddress r_contactinfo r_fullprofile',
    ),
);
The important part here is that the ‘scopes’ should match the scopes you have requested when you were creating the LinkedIn app (see screenshot above). So now with the keys in place we can make use of LinkedIn Auth and pull user’s data easily. I will create two routes that will do the following, route “login/linkedin” first:
- Authorize Linkedin user (ask the user for permission to share data) and go back to login/linkedin with a oAuth provider code
- Get an access token Using the code provided by the oAuth provider
- With the access token received in previous step request user’s data from Linkedin, the list of user data requested is specified in the $resource variable according to LinkedIn API docs
- Receive the data from LinkedIn and pass it to the second route that will display the information
Route::get('login/linkedin', function()
{
    $provider = new Linkedin(Config::get('social.linkedin'));
    if ( !Input::has('code')) {
        // If we don't have an authorization code, get one
        $provider->authorize();
    } else {
        try {
            // Try to get an access token (using the authorization code grant)
            $t = $provider->getAccessToken('authorization_code', array('code' => Input::get('code')));
            try {
                // We got an access token, let's now get the user's details
                $userDetails = $provider->getUserDetails($t);
                $resource = '/v1/people/~:(firstName,lastName,pictureUrl,positions,educations,threeCurrentPositions,threePastPositions,dateOfBirth,location)';
                $params = array('oauth2_access_token' => $t->accessToken, 'format' => 'json');
                $url = 'https://api.linkedin.com' . $resource . '?' . http_build_query($params);
                $context = stream_context_create(array('http' => array('method' => 'GET')));
                $response = file_get_contents($url, false, $context);
                $data = json_decode($response);
                return Redirect::to('/')->with('data',$data);
            } catch (Exception $e) {
                return 'Unable to get user details';
            }

        } catch (Exception $e) {
            return 'Unable to get access token';
        }
    }
});
In my case I am just redirecting to the index page of the application to show the user’s data, but you could do all kinds of things like creating a new user or looking if a user with this LinkedIn uid already exists in the DB and log them in, in other words feel free to come up with a way to use the data!
Here is the index route for clarity (I use it only to pass the data to the view):
Route::get('/', function()
{
    $data = Session::get('data');
    return View::make('user')->with('data', $data);
});
And the view template that displays the received data (user.blade.php):
@extends('layouts/layout')

@section('content')
	@if (isset($data))
	    <div class="media">
	      <a class="pull-left" href="#">
	        <img class="media-object" src="{{ $data->pictureUrl }}" alt="Profile image">
	      </a>
	      <div class="media-body">
	        <h4 class="media-heading">Name: </h4>
	        <p>{{$data->firstName .' '.$data->lastName}}</p>
	        <h4 class="media-heading">Date of Birth: </h4>
	        <p>{{$data->dateOfBirth->day .'/'.$data->dateOfBirth->month.'/'.$data->dateOfBirth->year}}</p>
	        <h4 class="media-heading">Location: </h4>
	        <p>{{$data->location->country->code .' ,'.$data->location->name }}</p>
	        <h4 class="media-heading">All captured info: </h4>
	        <pre>{{var_dump($data)}}</pre>
	      </div>
	    </div>
	@else
	     <div class="jumbotron">
                <h1>LinkedIn login and data pull</h1>
		<p>Created by <a href="http://twitter.com/msurguy" target="_blank">Maks</a></p>
		<p class="text-center">
		<a class="btn btn-lg btn-info" href="{{url('login/linkedin')}}"><i class="icon-linkedin"></i> | Login with LinkedIn</a>
		</p>
             </div>
        @endif
@stop
And what this does is it gives us LinkedIn data in a nice object format that we can display back to the user. This is neat and useful to me, I hope you also found this useful and if you did, please consider following me on Twitter to keep up to date!


RT @msurguy: Laravel in Practice – tutorial on pulling user data from LinkedIn http://t.co/UW034ARL18 @laravelphp #laravel #php RT
I really didn’t know it would be this easy. Thanks for sharing.
Glad you found it useful! Yes, it doesn’t take much =) same with Facebook and other oAuth 2 providers! I’ll post up some more tutorials on this soon!
#Laravel in #Practice – #pulling user data from #LinkedIn – http://t.co/XBJnq4nsrC …
Nice little #Laravel / LinkedIn connect tutorial http://t.co/rx7QndwReT
RT @outofcontrol: Nice little #Laravel / LinkedIn connect tutorial http://t.co/rx7QndwReT
Hi Max, thanks for the tutorial, i always follow your blog activities. Request you to put up a post on linkedin auth…
thanks
@LaravelWeekly @DriesVints Pulling data from LinkedIn: http://t.co/Q2iNwy4jYZ =)
Laravel in Practice – pulling user data from LinkedIn http://t.co/WpCzyxwGOq
Possible to get the public profile url as well?
Hi Max, In the project folder i see files for facebook, google, linkedin etc. Can we also implement auth for google with the same project just after adding few files?
Can you explain what all changes/addition to be done?
Thank you so much for this tutorial!
You can, I don’t have a tutorial for that since for each provider it would be a little different, but you could try the code specified in the package readme : https://github.com/php-loep/oauth2-client
Thanks for sharing this great content!!! It helped me a lot.
You’re welcome 🙂 glad it’s helpful
I made a post by filling in my “details below” and posted but instead of success I received in “invalid token” message. Did you receive the message anyway?
In the comments here on the blog?
Hi, thanks for this helpful tutorial. I’ve followed it exactly, however, my request will not pull any of the r_fullprofile information. When the linked in page comes up asking for authentications, it only asks about “basic, contact info, and email address” even though i have ‘r_fullprofile’ listed in the scope as well. Any idea why?
Try changing the name of the ‘scope’ in the config/social.php to “scopes” and try pulling the profile again. Let me know if that works.
I’m running Laravel 4.2, and following the above steps, I get this error:
Class ‘LeagueOAuth2ClientProviderLinkedin’ not found
What’s odd, is that on local, it works, but when I push this up to Dev, I get that error. Any ideas as to what might be causing this?
Did you run composer require league/oauth2-client on your Dev Server?
Yeah, I did that while trying to troubleshoot this. I ended up having to change the alias in app.php to this:
‘Linkedin’ => ‘LeagueOAuth2ClientProviderLinkedIn’,
Now, it works on my dev site. So odd, because the way in your docs, works locally, just not on dev.
i got this problem when trying to connect with linkedin
i solved it by my self. Problem was with layout.blade.php file i hadn’t created a file.
So i downlaoded it from github and added to the project.
please reply to this my problem wasn’t solved yet
Problem was with my proxy settings i remove the proxy and now i can access data 🙂 greate application thank you very much
I’m glad to hear you got it sorted out. With the release of my book tomorrow I’ve been pretty swamped working on that so couldn’t get to solving people’s problems.
It’s my previous post. Now problem has solved
With laravel 4 and Ubuntu this isn’t going to work. Class LeagueOAuth2ClientProviderLinkedin not found please help me
I can’t access linkedin skills using this method please tell me the keys to get details about skills
thanks..
another problem…
Unable to get user details
when i uploaded the site to server
http://162.254.248.171/Finder/finder/public
thanks..
another problem…
Unable to get user details
when i uploaded the site to server
http://162.254.248.171/Finder/finder/public
Please help me….
Woops. I haven’t tried to deploy it. I’ll let you know if anything happen. ( scary :0 )
Hi, scopes is the correct one to use (the variable in IdentidyProvider.php is called “scopes” and is the one we automatically want to override. Otherwise it will default to the default scope.
Note that the scope index in the array isn’t supported, It will use the default scopes provided by the package.
‘scope’ => ‘r_basicprofile r_emailaddress r_contactinfo r_fullprofile’
Change it in
‘scopes’ => ‘r_basicprofile r_emailaddress r_contactinfo r_fullprofile’
This is a great tutorial Maks!!Thanks for sharing. I would like to post to a user’s feed, do you have a way I can go about that? Any help would be appreciated 🙂
This is really awesome. Helped a lot. Quick question – after successful integration, the app shows that I’m requesting basic, full, email address, and contact info. My scopes: ‘scopes’ => ‘r_emailaddress r_basicprofile r_fullprofile r_contactinfo’, However, the data dump does not include email address or profile summary. Anyone have any ideas? Thanks!
Scratch all of this – the fix was just adding the API fields into $resource, completely overlooked that we’re requesting specific fields here.
ErrorException in AliasLoader.php line 63:
Class ‘IlluminateSupportFacadesView’ not found Error showing how to rectify this error?