Tutorial: Creating a Blog in Laravel from scratch – part 6 – Create Views
Hello there, fellow Laravelians!
In the Previous Tutorial we have learned how to create models and routes for our Blog application. In this tutorial I will explain how we will make the screens that the user sees, also called “Views”.
While creating views for our blog, we will learn how to use Laravel’s Blade templating engine, Blade templates, Binding data to views and we will use Twitter Bootstrap as our CSS framework.
Let’s get started!
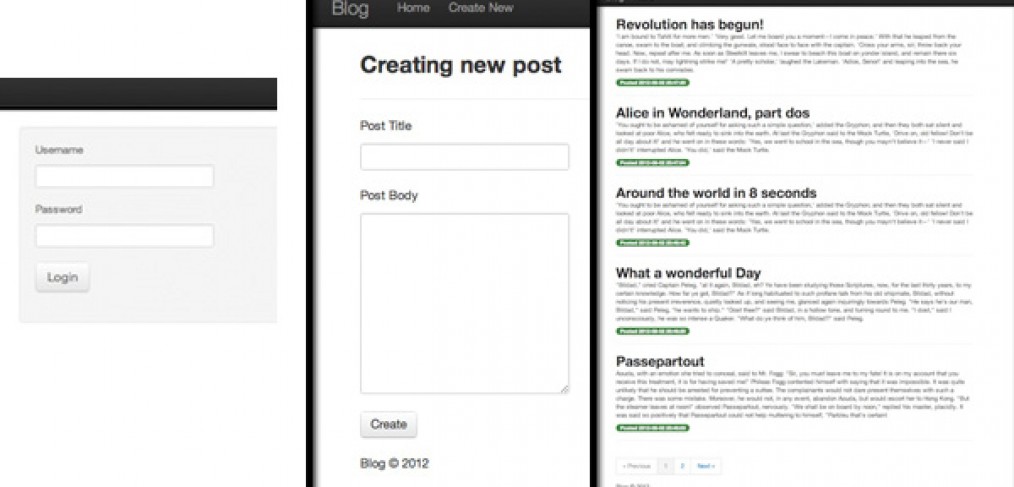
For our blog application we will need three views:
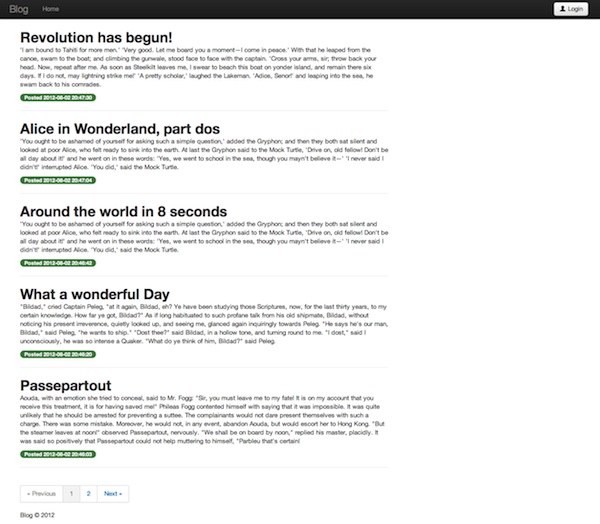
- index page that shows all posts (also if the user is logged in – show delete button for each of the posts)
- login page (shows a form to log the user in)
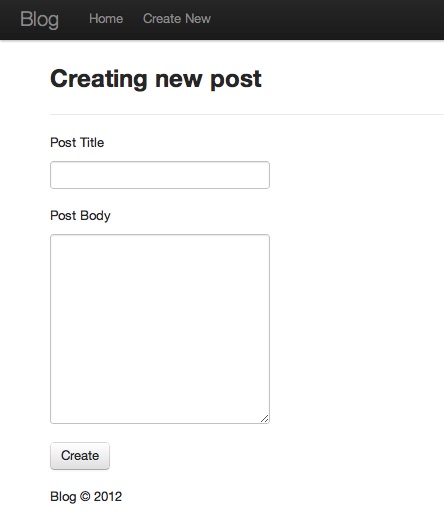
- create new post page (few text fields and a button )
In tutorial part 2 I showed how to sketch out those views on paper, then I took those sketches and built simple static HTML pages using Bootstrap framework to get the look I wanted. This is just to assist me later when I build the actual views using Laravel. How to use Twitter Bootstrap framework and use HTML is beyond the scope of this tutorial, so you need to catch up on that by yourself.
A few words about how Laravel works with the views.
In Laravel applications views are stored in application/views folder. Views that output dynamic data should end with “.blade.php ” file extension. Blade templating engine is very easy to understand, please refer to documentation to learn more about some of the basics : http://laravel.com/docs/views/templating
We will be using one Blade layout that will have our header and footer (things that don’t change throughout different pages) and three Blade views that will output the content and will be placed in between header and footer in the Blade layout – login form, index of all posts and create new post form.
First, let’s create the Blade layout.
We will be using Bootsrapper Laravel Bundle to make our application use Bootstrap. So the first step for you in creating the layout is to get Bootstrapper installed in your application.
You can either follow the instructions on http://bundles.laravel.com/bundle/bootstrapper or watch my screencast on udemy.com/develop-web-apps-with-laravel-php-framework/
When you have Bootsrapper Bundle installed into your application and publish its assets(according to the instructions), create a folder “templates” inside your “views” folder and create a file called “main.blade.php“. In that file copy and paste the content :
[sourcecode language=”html”]
<!DOCTYPE html>
<html lang="en">
<head>
<meta charset="utf-8">
<title>Blog, from you</title>
<meta name="viewport" content="width=device-width, initial-scale=1.0">
<meta name="description" content="">
<meta name="author" content="">
{{ Asset::container(‘bootstrapper’)->styles(); }}
<style>
body {
padding-top: 60px; /* 60px to make the container go all the way to the bottom of the topbar */
}
</style>
{{ Asset::container(‘bootstrapper’)->scripts(); }}
</head>
<body>
<div class="navbar navbar-fixed-top">
<div class="navbar-inner">
<div class="container-fluid">
<a class="btn btn-navbar" data-toggle="collapse" data-target=".nav-collapse">
<span class="icon-bar"></span>
<span class="icon-bar"></span>
<span class="icon-bar"></span>
</a>
<a class="brand" href="{{ URL::base() }}">Blog</a>
<div class="btn-group pull-right">
@if ( Auth::guest() )
<a class="btn" href="{{ URL::to(‘login’)}}">
<i class="icon-user"></i> Login
</a>
@else
Welcome, <strong>{{ HTML::link(‘admin’, Auth::user()->username) }} </strong> |
{{ HTML::link(‘logout’, ‘Logout’) }}
@endif
</div>
<div class="nav-collapse">
<ul class="nav">
<li><a href="{{ URL::base() }}">Home</a></li>
@if ( !Auth::guest() )
<li><a href="{{ URL::to(‘admin’) }}">Create New</a></li>
@endif
</ul>
</div><!–/.nav-collapse –>
</div>
</div>
</div>
<div class="container">
<div class="row">
@yield(‘content’)
</div>
@yield(‘pagination’)
</div><!–/container–>
<div class="container">
<footer>
<p>Blog © 2012</p>
</footer>
</div>
</body>
</html>
[/sourcecode]
Save the file now and close it.
Here is some description of what various elements do :
These two lines insert Bootstrapper’s css and javascript into our layout
[sourcecode language=”html”]
{{ Asset::container(‘bootstrapper’)->styles(); }}
{{ Asset::container(‘bootstrapper’)->scripts(); }}
[/sourcecode]
This checks if the user is logged in and outputs a different button in that case, otherwise show another button
[sourcecode language=”html”]
@if ( Auth::guest() )
…
@else
…
@endif
[/sourcecode]
And this is where the content is actually outputted and pagination links created below the content
[sourcecode language=”html”]
<div class="container">
<div class="row">
@yield(‘content’)
</div>
@yield(‘pagination’)
</div><!–/container–>
[/sourcecode]
More information on Layouts is in Laravel’s documentation: http://laravel.com/docs/views/templating#blade-layouts
Does it make sense to you? If not, please let me know in the comments.
Login view
For the login view, you need to create a file in “views” directory and call it “login.blade.php”
Copy and paste this code into login.blade.php file you just created:
[sourcecode language=”html”]
@layout(‘templates.main’)
@section(‘content’)
<div class="span4 offset4 well">
{{ Form::open(‘login’) }}
<!– check for login errors flash var –>
@if (Session::has(‘login_errors’))
{{ Alert::error("Username or password incorrect.") }}
@endif
<!– username field –>
<p>{{ Form::label(‘username’, ‘Username’) }}</p>
<p>{{ Form::text(‘username’) }}</p>
<!– password field –>
<p>{{ Form::label(‘password’, ‘Password’) }}</p>
<p>{{ Form::password(‘password’) }}</p>
<!– submit button –>
<p>{{ Form::submit(‘Login’, array(‘class’ => ‘btn-large’)) }}</p>
{{ Form::close() }}
</div>
@endsection
[/sourcecode]
Here we are using templates.main layout and into the content section of the layout we insert a simple form. We also output errors if there are any login errors.
Index view
For the index view you need to create a file in “views” folder and call it “home.blade.php“.
To display all blog entries we will use @foreach blade loop and pagination on the bottom of the page.
Copy and paste the following sourcecode into your home.blade.php” file:
[sourcecode language=”html”]
@layout(‘templates.main’)
@section(‘content’)
@if (Session::has(‘success_message’))
<div class="span8">
{{ Alert::success("Success! Post deleted!") }}
</div>
@endif
@foreach ($posts -> results as $post)
<div class="span8">
<h1>{{ $post->post_title }}</h1>
<p>{{ $post->post_body }}</p>
<span class="badge badge-success">Posted {{$post->updated_at}}</span>
@if ( !Auth::guest() )
{{ Form::open(‘post/’.$post->id, ‘DELETE’)}}
<p>{{ Form::submit(‘Delete’, array(‘class’ => ‘btn-small’)) }}</p>
{{ Form::close() }}
@endif
<hr />
</div>
@endforeach
@endsection
@section(‘pagination’)
<div class="row">
<div class="span8">
{{ $posts -> links(); }}
</div>
</div>
@endsection
[/sourcecode]
Great ! One last view and we are all done with our views and will be able to see our blog coming alive!
Create New Post view.
For the “create new post” view we will create a file in “views” folder and call it “new.blade.php“. This view contains three things in a form, hidden post_author field, post_title text field and post_body textarea where the author will type up the title and the body of the blog post.
Copy and paste the following source code into your new.blade.php file in the “views” folder:
[sourcecode language=”html”]
@layout(‘templates.main’)
@section(‘content’)
<div class="span8">
<h2>Creating new post</h2>
<hr />
{{ Form::open(‘admin’) }}
{{ Form::hidden(‘post_author’, $user->id) }}
<!– title field –>
<p>{{ Form::label(‘post_title’, ‘Post Title’) }}</p>
{{ $errors->first(‘post_title’, Alert::error(":message")) }}
<p>{{ Form::text(‘post_title’, Input::old(‘post_title’)) }}</p>
<!– body field –>
<p>{{ Form::label(‘post_body’, ‘Post Body’) }}</p>
{{ $errors->first(‘post_body’, Alert::error(":message")) }}
<p>{{ Form::textarea(‘post_body’, Input::old(‘post_body’)) }}</p>
<!– submit button –>
<p>{{ Form::submit(‘Create’) }}</p>
{{ Form::close() }}
</div>
@endsection
[/sourcecode]
The three views
Index page :
Login page :

Create New Post page:
Congratulations!
That should be it! We are done with the views, and at this point our application should be fully functional. If you are using a local MAMP or WAMP server, point it to the name of your application /public folder and see if it works. It should look like this:
laravel-blog-private.pagodabox.com
If you see any errors please let me know in the comments and I will try to figure things out for you so that you can enjoy your simple Laravel-powered blog!
Until next time!
Oh and one more thing, if you want more Laravel goodness,


It’s a great start your tutorials 🙂
When i write
Asset::container(‘bootstrapper’)->styles();
nothing happens i have installed Bootstraper V. 3.6.8 build 1 with Laravel 3.2.1
What can i do?
Did you do “php artisan bundle:publish” first?
Hi Maks,
This is a great tutorial, but I’m running into a login problem using the code snippets you’ve posted.
When I attempt to log in, I get an Unhandled Exception:
/**
SQLSTATE[42S22]: Column not found: 1054 Unknown column ’email’ in ‘where clause’
SQL: SELECT * FROM `users` WHERE (`email` = ?) LIMIT 1
Bindings: array (
0 => ‘admin’,
)
**/
Yes, I’m using MySQL instead of the built-in database, but that shouldn’t matter? What’s checking for the email column instead of the username column?
Apologies…
Somewhere along the way I needed to change application/config/auth.php ans set the ‘username’ key to have a value of ‘username’ instead of ’email’.
Hi Maks… great tutorial… but i’m having an error..
In new view, i receive:
Unhandled Exception
Message:
Class ‘Alert’ not found
Location:
D:DropboxEstudos Laravelblog.laravellaravelview.php(366) : eval()’d code on line 9
This is related to the bootstrapper or laravel?
Hi!
It seems you don’t have the Bootstrapper bundle installed.
You should look here and install it as in the instructions:
http://laravelbootstrapper.phpfogapp.com/
Same error!
Chris, Dustin posted a solution below : “Somewhere along the way I needed to change application/config/auth.php ans set the ‘username’ key to have a value of ‘username’ instead of ‘email’.”
hi sir, excuse me.. i want to ask, why i can’t login into my admin page?? and when i login, the errors come up.. this is the errors -> http://paste.laravel.com/dMQ
thanks in advance.
Hey! You should edit your application/config/auth.php file and change the email to username instead! try it and let me know!
hi maks, thanks for reply.. after i changed it, i can login finally 😀 but, i still get an error.. this is the error -> http://paste.laravel.com/dQ7
thanks in advance..
You don’t have Bootstrapper Bundle installed. http://laravelbootstrapper.phpfogapp.com/install
no, i’ve installed that yesterday sir.. and the login page contain that bootstrap template.. but when login, Class ‘Alert’ not found..
Hi Maks! sorry to trouble you, after i read the bootstrap’s installation, i was wrong to update the aliases, i just put the bootstrap’s aliases to the outside of the aliases array.. haha, this is my fault.. once again, i’m sorry sir to make you confuse.. and thanks a lot of this nice tutorial!
You are welcome! =) Glad it works!
hi i have problem when install bootstrapper, php artisan bundle:install bootstrapper
the bundle API is not responding. please help me
main.blade.php has some display bug with navbar when you’re logged in.
Just use http://paste.laravel.com/eVQ instead of current one and it’s ok 🙂
Great tutorial by the way
Awesome tutorial! Well explained and I leaned a lot!
I got one last problem… I can’t run the php artisan bundle:publish for the bootstrap bundle.
Here is the output from terminal:
xxx@xxx.dk [~/xxxxx.dk]# php artisan bundle:publish
Assets published for bundle [docs].
Warning: mkdir(): Permission denied in /home/ezodk/istartside.dk/laravel/file.php on line 243
Warning: mkdir(): Permission denied in /home/ezodk/istartside.dk/laravel/file.php on line 243
Warning: copy(/bundles/bootstrapper/img/glyphicons-halflings.png): failed to open stream: No such file or directory in /home/xxxxx/xxxxxxx.dk/laravel/file.php on line 270
Assets published for bundle [bootstrapper].
I think it maybe is a CMOD problem, but where do I change it and on wich folders? 🙂
Hope you can help! Thanks!
// Michael
I think this has to deal with your Public folder permissions, are you running on Windows or Mac ?
Is this a new copy of Laravel, in other words, did you by accident replace some folders with your own ones?
Well 😛
I forgot to change the path in paths.php from public to public_html 😀
So it’s fixed now. 😛
PS. then the next Udemy save campain hits my email I’m going to buy your course. It looks awesome 😀
// Michael
I offer all my blog visitors a discount of 20+% …
Here’s the coupon, gets you my course for 25$!
http://www.udemy.com/develop-web-apps-with-laravel-php-framework/?couponCode=maxoffsky
HI Mark , i’ve got a lot of errors , Pls can u this check this one fiirst …
Method [user] is not defined on the Query class.
Location:
C:xampphtdocslaravellaraveldatabasequery.php on line 947
i’ve already published the bootstrapper …. but no sytles and javascript are appeared …
did you go through setting up auth.php in the config directory of your application?
So there is nothing in the public/bundles/ folder?
Hi, there is nothing in the public/bundles/ folder? but i followed all the steps, and i have this error Unhandled Exception
Message:
View [login] doesn’t exist. you can help me please?
I think adminify is the best bundle for editing and deleting the post !
this means your login view does not exist, make sure you have it under application/views folder
Hi Maks, great tutorial
I managed to get a few errors sorted out with one exception
when I click on the login button I get the following:-
Unhandled Exception
Message:
Error rendering view: [login]
syntax error, unexpected end of file
Location:
D:zendApache2htdocslv_blogstorageviews/140c8842ee3330043086616a1e34de28 on line 19
Any advice about this would be great
which page are you trying to go from? There must be something in the login view file, can you post that file on paste.laravel.com and give me a link?
Hi Maks, thanks for the reply, unfortunately I have had to refresh(reinstall) windows 8, so I will go through the tutorial again, when I get my dev server back up and running, and see if the same problem occurs
As it happened, I found the error, something silly as usual
on line 8 of login.blade.php instead of @endif I had @end 🙂 it’s always something very basic when you get a complete failure like that
Awesome to hear!!!
Just AWSOME! soon i get some money i will buy your course… you already think to make a course to TutsPlus? They pay like 3k more or less for each course… it will be nice to see you making a course about the “critter”… for sure i will pay to see you teaching that there… Thanks anyway! This helps me a lot to start with laravel…
Still dont get much about Controllers and Models, in my head controller just call function, dont “delete, save, update” in model i do that… but i think is because i use a lot of CakePHP and Codeigniter… ho know xD maybe is just me =D
Hi ! Thanks for the kind words! Soon I will make more tutorials on models and controllers, so stay tuned!
PS, I am making a course for Nettuts but it is mainly about integrating PhoneGap mobile apps with Laravel PHP framework, still very cool though!
Here is a coupon to get my course for $25 :
Laravel course
Enjoy!
Nice, lokking foward for this course =D I dont see any link to buy your course… Anyway… thanks!
Updated my previous comment, here is the link anyway: https://www.udemy.com/develop-web-apps-with-laravel-php-framework/?couponCode=maxoffsky
Just one more question… you pretend to update your course to Laravel 4 (when release?) or make a new course showing how create a app using L4? Thanks for the coupom will buy soon i recive some money xD
I will make new course for Laravel 4 when it is released (in May)
Please also include image with new post !
Hey there I am so happy I found your blog page, I really found you by
error, while I was looking on Bing for something else, Regardless I am
here now and would just like to say kudos for a fantastic post and a all round enjoyable blog (I also love the theme/design),
I don’t have time to go through it all at the moment but I have saved it and also included your
RSS feeds, so when I have time I will be back to read more, Please do keep up the awesome
b.
Thanks for this tuto, clear and well written.
What does ! in front of an object mean? For example, what is the difference between Auth::guest() and !Auth::guest()? Great tutorial by the way!
In PHP and many other programming languages that means “not”. In case with !Auth::guest() that means NOT guest, in other words, the if the user is logged in it will return true, otherwise it will return false.
Call to undefined method IlluminateDatabaseQueryBuilder::order_by()
Are you using Laravel 3 or Laravel 4?
Undefined variable: user, in routes line: 45 😐
I get an error for undefined ‘result’ in the home.blade.php, where is this defined at?
That was ‘results’ in the foreach loop in the home.blade.php.
I am using Laravel 4 and have this same error. Is there an easy fix or might there be many problems with using Laravel 4?
in Laravel 4 the methods are named as camelCase format, not snake_case so the order_by becomes orderBy… Got it?
I get an error for undefined ‘result’ in the home.blade.php