Laravel: my first framework. Chapter 5 – Understanding Controllers
The following content is the fifth chapter of my new e-book titled “Laravel: my first framework“. This writing is copyright by Maksim Surguy. Unauthorized copy and distribution of this material is prohibited.
Chapter 5. Understanding Controllers
This chapter covers
- Default controllers
- Creating new controllers
- Controller routing
- RESTful and Resource Controllers
When the code of the application grows, it becomes harder for the developer to plan new features and to maintain existing features. Up to this point in the book, all functional code of Laravel applications was put inside of “app/routes.php” file.
To help with separating application’s features into smaller, manageable pieces Laravel allows the use of PHP classes called “controllers”. The concept of using controllers is present in many modern frameworks. In applications built with Laravel controllers play an important part of Model-View-Controller application architecture. Working together with Laravel’s routing mechanisms, controllers make maintenance, testability and expansion of the application a lot easier.
In this chapter you will learn how controllers can help you in separating the code of the application and why they could be used when the application expands. You will take a look at two controllers that come with Laravel out of the box: BaseController and HomeController. Then you will learn about creation of your own Basic, RESTful and Resource controllers while using convenient shortcuts that they provide for managing application’s execution. After that, you will become a pro at combining Laravel’s routing with controllers. Finally, you will learn how to use routing conventions to pass parameters to the methods of the three types of controllers.
5.1 Introducing controllers, the “C” in MVC
Using controllers becomes necessary when your application has more functionality than just showing a couple web pages. As the code of the application grows, putting all application’s features in the routing file is not a wise option. Through the use of controllers – special PHP classes – developer can separate the functionality of the application into different classes and connect the functions inside of these classes to Laravel’s routing.
Let’s compare two scenarios of application structure, one that uses just routing file (routes.php) to store the application logic and the other one – using controllers to do the same. You will gradually understand the benefits of using controllers as you read through the examples.
Imagine that you have an application that shows a login page to the user. As you have learned in chapter 3, when a client’s browser makes a request to a URL in your Laravel application, the routing mechanism will match the requested URL to the routes defined in app/routes.php file. If the requested URL matches one of the defined routes, let’s say a “login” route, the function passed as the second argument of that route will be executed displaying a webpage in the client’s browser, as illustrated in figure 5.1 below:
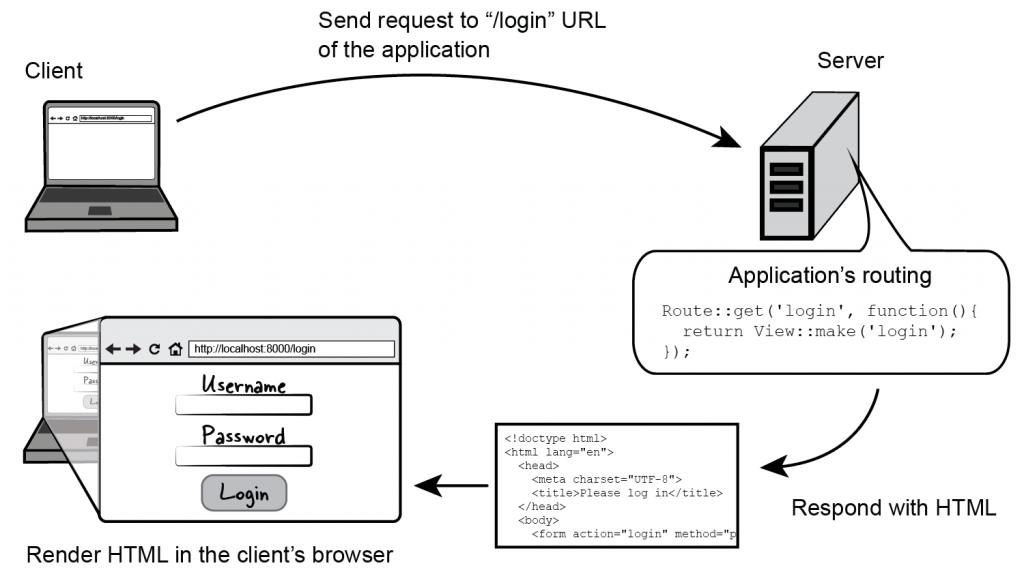
Figure 5.1 Flow of a client’s request to a Laravel application that only uses routing
As an alternative to routes-only application Laravel provides you with a way to tell the routing to execute a member function – also called an “action” – of an existing PHP class instead of executing a function passed as an argument to a routing method. The actions could contain any application logic such as working with database or file system, redirecting the user to other pages within the application or simply showing an HTML page. The PHP classes that contain application logic and whose methods or “actions” are mapped to the application’s routing definitions are called “controllers”.
By creating a separate PHP class (controller) and specifying which routes in the routing file use its member functions you are able to take full advantage of MVC pattern in your Laravel applications. How does the application flow change in this case comparing to having application logic in the routing file? Let’s take a look below.
When a request comes in to the application, the routing mechanism will match the requested URL and execute specified controller action. That controller action could contain logic for working with data (model) and displaying the result of execution by presenting an HTML document (view). In case with displaying a login page the request lifecycle using a controller to direct the flow of the application will look like the figure 5.2:

Figure 5.2 Flow of a client’s request to a Laravel application that uses routing in conjunction with controllers
Another important advantage of using controllers with routes instead of putting all code into the “route.php” file is that using separate PHP classes to build application’s functionality brings the full benefits of Object Oriented Programming (OOP) such as dependency injection, encapsulation, inheritance and more. This aspect of application architecture is incredibly important for developers who practice good design patterns in their applications.
Now that we have looked at the advantages of using controllers and have seen how they could integrate in the Laravel applications, let’s take a look at how Laravel applies this concept in action by providing two default controllers out of the box.
5.2 Default Controllers: BaseController and HomeController
By convention, all controllers in a Laravel application are located in “app/controllers” folder. A fresh Laravel installation comes with two default controllers that are not in use until they are connected to the routing mechanisms:
- BaseController
- HomeController
When used together, these two controllers provide you with a small example of controller-based application architecture. Out of the box HomeController includes simple functionality to show a page to the user, while BaseController acts as a foundation for all application’s controllers. We will build our controllers on top of the default BaseController in this book but it’s worth knowing that you can create your own controller that serves as a parent to all controllers. Let’s look at the two default controllers and understand their purpose in a Laravel application.
5.2.1 Base controller (app/controllers/BaseController.php)
BaseController acts as a base of the rest of your application controllers. Its job is to provide a common place to store all logic that other controllers extending the BaseController will be using. Out of the box, BaseController extends Laravel’s Controller class and comes with a single function that could be used to setup a view layout for all methods inside a controller. You can see the contents of the BaseController.php from a fresh Laravel installation in listing 5.1:
Listing 5.1 Contents of BaseController.php from a fresh Laravel installation
<?php

// BaseController is a child of Laravel’s “Controller” class
class BaseController extends Controller {
	// setupLayout() function could be used to set up a view layout that will be used in all controllers unless it is overwritten in the individual controllers
  protected function setupLayout()
  {
    if ( ! is_null($this->layout))
    {
      $this->layout = View::make($this->layout);
    }
  }
}A good example of a BaseController’s child controller is HomeController that also comes with a fresh Laravel installation. Let’s take a look at this controller and its purpose next.
5.2.2 Home controller (app/controllers/HomeController.php)
HomeController is a small controller that extends BaseController and demonstrates the use of controller-based architecture in a new application. By default, this controller has one and only method called “showWelcome” that, when connected to the routing (which we will explore in a later section), is responsible for showing the “hello” page that tells that Laravel is functioning properly (figure 5.3):
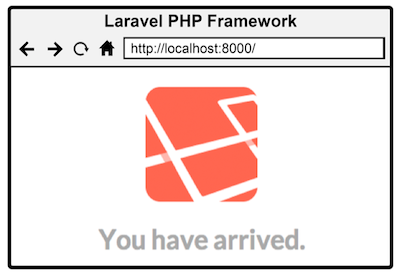
Figure 5.3 The result of executing showWelcome function of HomeController
The content of the HomeController.php that shows the page in figure 5.3 is provided in listing 5.2 below:
Listing 5.2 Contents of HomeController.php in a fresh Laravel installation
<?php

// HomeController is a child of BaseController
class HomeController extends BaseController {
  // showWelcome function displays a “hello” page when it’s called from the routing
  public function showWelcome()
  {
    return View::make('hello');
  }
}
While HomeController is a good starting point containing only one function for a demonstration of showing a simple page, it can easily be modified to contain more functions responsible for application’s homepage actions. But what if you wanted to go beyond the default controllers that come with Laravel out of the box? Let’s look at creating our own controllers in the next section.
5.3 Creating controllers
Creating a new controller in Laravel applications is as simple as creating a new PHP class that extends BaseController and placing it in the “app/controllers” folder. Let’s learn more about creation of new controllers while restructuring some of the code you have encountered previously in this book.
In the beginning of this chapter you have seen a diagram of an application flow that would display a login page when “login” URL is requested. You can see that diagram again in figure 5.4 below:
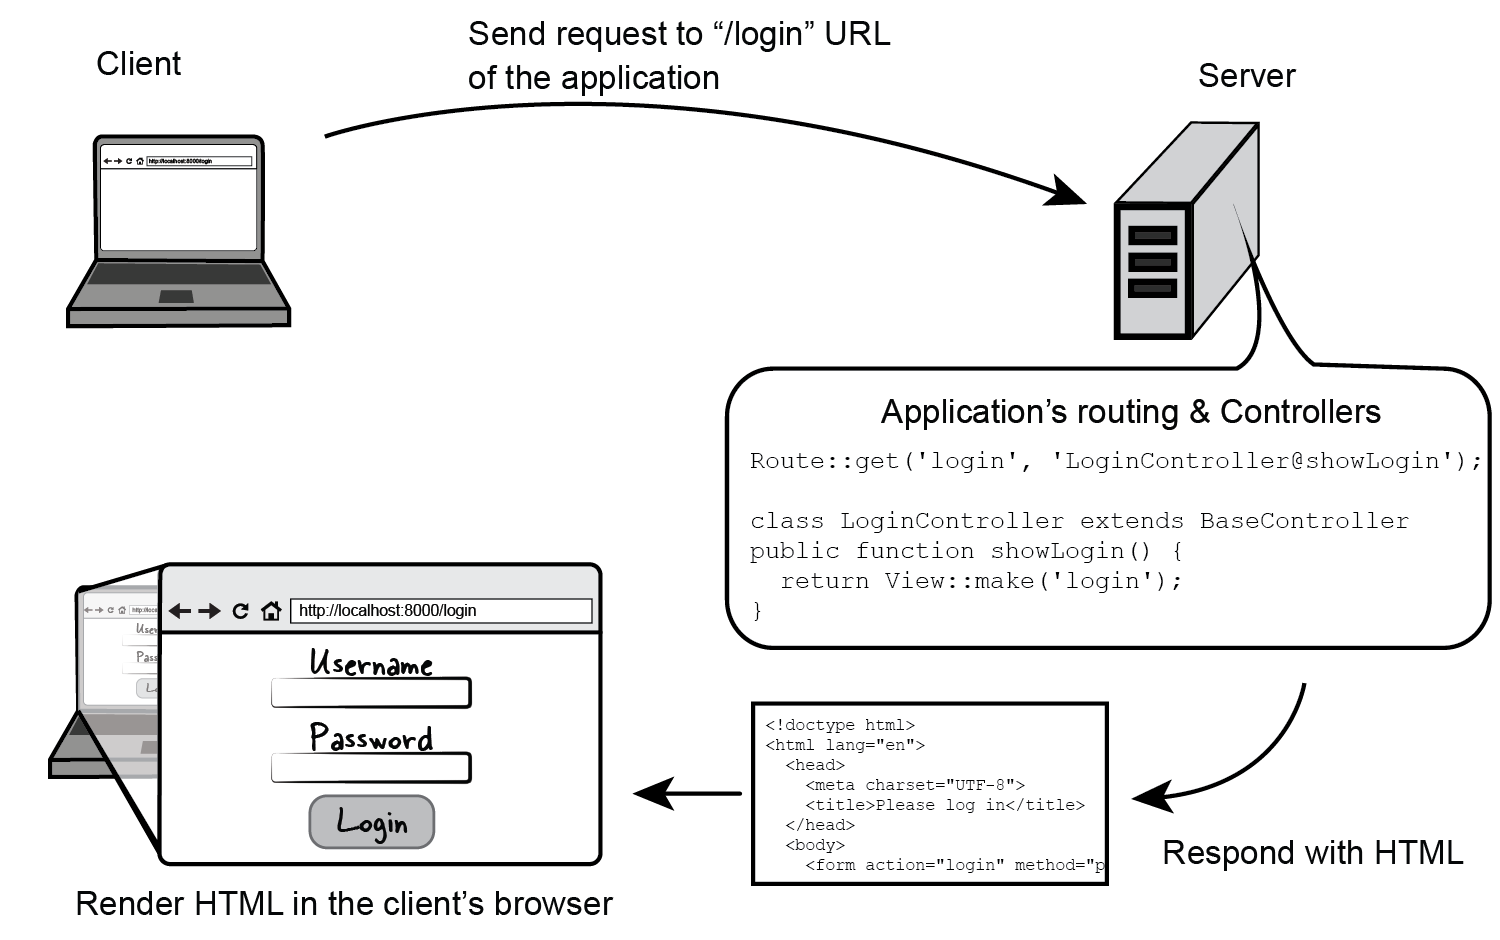
Figure 5.4 A high level view of a browser request to application’s ‘login’ route that uses a controller to show the login page
This application flow in the figure above uses a combination of routing and controller to process the request and display a view (HTML page). Because controllers are meant to contain related logic, the same controller could also be used to not only show the login page but also to process the form submission.
Over the next few pages you will implement a login page flow by creating a new controller responsible for displaying a login page and processing it upon submission of the login form.
5.3.1 Creating a new controller: LoginController
As it was mentioned above any new controllers should be extending the BaseController class by convention. To create a new controller you would need to create a new PHP class and place it in the “app/controllers” folder. Then all operations that the controller will execute should be placed in this new class’ methods.
We will create a controller that will be responsible for the logic related to the user login, so it would be helpful to have the name of the controller descriptive of its responsibility, for example “LoginController”. The new file called “LoginController.php” will be put in “app/controllers” folder, containing the class definition as is shown in listing 5.3:
Listing 5.3 Definition of LoginController (app/controllers/LoginController.php)
<?php

// The LoginController is a child of BaseController class
class LoginController extends BaseController {

}
5.3.2 Creating logic for the LoginController
Now that the new controller is created, you can place the logic that the controller will execute when it will be called from the routing. The functionality of the controller that the routing can call directly needs to be placed in controller’s class methods that are declared public. For example if you wanted to display a login page to the user, you would create a function that returns a view using Laravel’s “View::make” methods (listing 5.4):
Listing 5.4 Showing a login form from the LoginController
<?php

class LoginController extends BaseController {
  // Method that will display the login page to the user
  public function showLogin()
  {
    return View::make('login');
  }
}
For now the LoginController would only show the login form to the user. We will add the functionality to process this form a bit later. Now let’s define the routing for the single “showLogin” action of the LoginController.
5.3.3 Defining routing for LoginController
Having this simple controller functionality defined, we can connect it to application’s routing by specifying that the “showLogin” function of the “LoginController” class will be called when the user goes to the “login” URL of your application in the browser. Laravel comes with an easy way to specify which method of a controller will be called when a particular route gets called. Instead of passing a closure function to the routing methods like you have seen before, you can provide a string containing the name of controller and the name of the method that should be executed when the route gets called. This way of routing is called “explicit routing”.
We can see the concept of explicit routing in action by making the route definition for the login route in “app/routes.php” as follows (listing 5.5):
Listing 5.5 Connecting the “login” route to “showLogin” method of “LoginController”
// Specifying that the showLogin function of LoginController will be executed
// when the user executes a GET request to the “login” route
Route::get('login', 'LoginController@showLogin');
With the LoginController defined in “app/controllers” and its showLogin method specified as an argument to Route::get(‘login’, …), what exactly happens when the user requests the login page? Step by step, the application will go through the following process (illustrated in figure 5.5) ending up in showing the login page to the user:
- Laravel’s router looks for a match between the browser’s request (GET request to the “login” URL relative to the application) and a route definition.
- Because browser’s request type and URL correspond to the “login” route definition, Laravel will try to execute its second argument looking for a class “LoginController” and a “showLogin” method of that class
- The “showLogin” method responds by serving “login.blade.php” view template stored in “app/views”
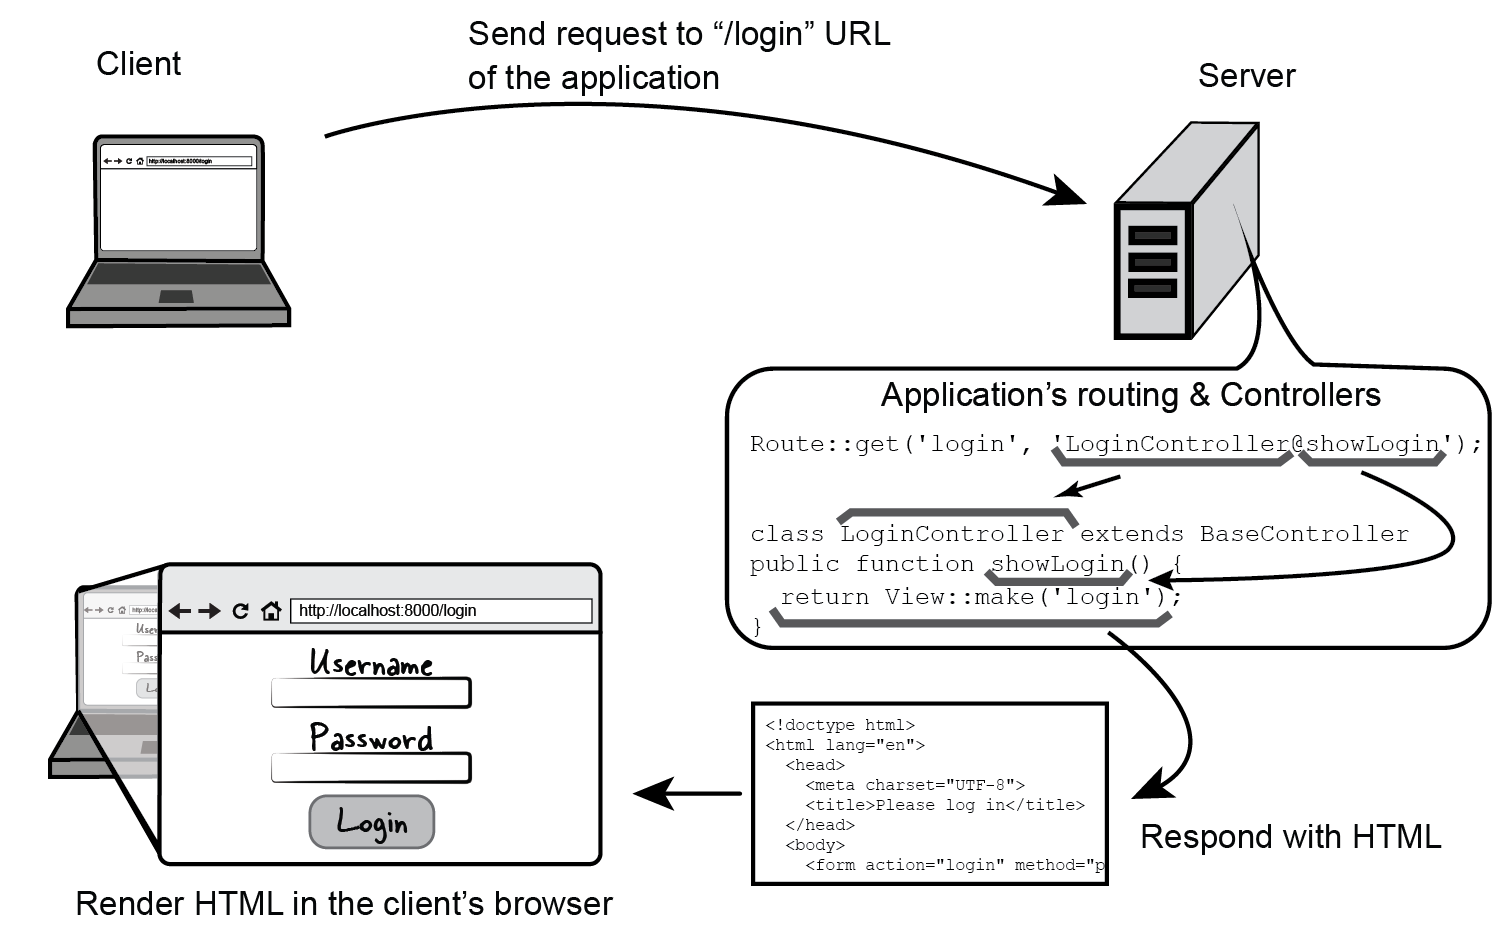
Figure 5.5 Diagram of the execution flow for the “login” route of the application. “showLogin” method of the “LoginController” responds to a GET request to “login” URL by serving a login page to the browser
This simple application now responds to “login” route by executing a method from “LoginController”, nice! As you can see from the diagram above, using controllers and controller routing keeps the functionality of the application grouped into separate classes instead of polluting the routing file. What if you wanted to add more functionality related to user login to this application?
To expand the functionality related to login you could add that functionality to LoginController and specify which route should execute it. For example to process submission of the form on the login page creating a method called “processLogin” in the “LoginController” and placing the logic that would check user’s credentials there would be a great idea. Then, this new controller method could be connected to the routing by specifying that “processLogin” should be executed when there is a POST request to the ‘login’ route. The addition of the “processLogin” method to the “LoginController” and adding it to the route definition enables the application to show the login form and respond to user’s submission so that the flow of this small application would look like figure 5.6:
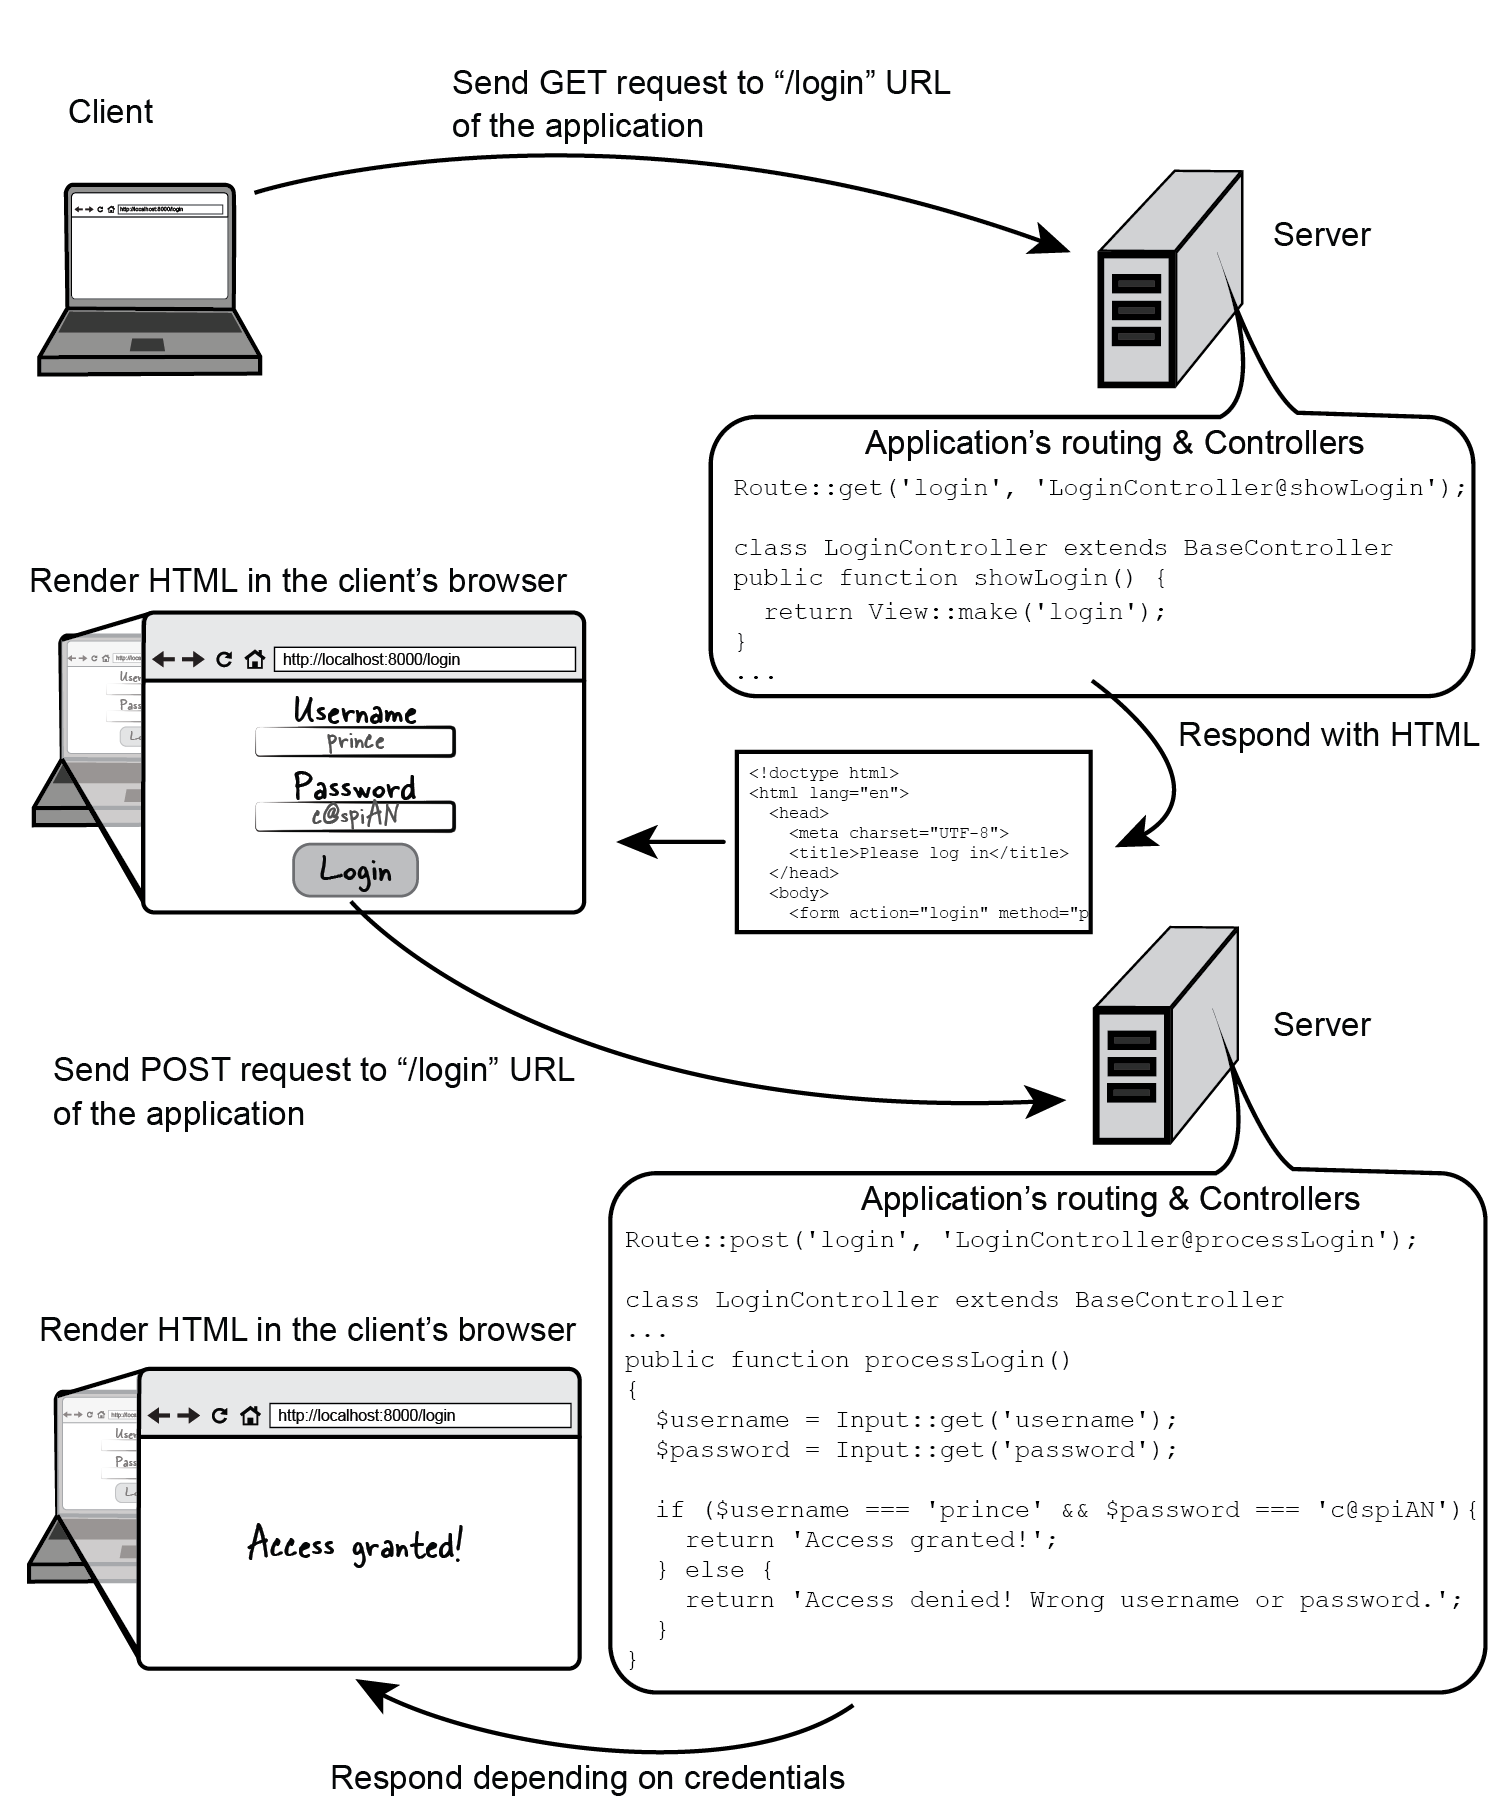
Figure 5.6 Execution flow for GET and POST requests to the route “login” that uses a controller to contain application’s functionality
The complete code listing that combines showing and processing the login form is in listing 5.6 below:
Listing 5.6 Using LoginController to show and process a login form
// The definition of routes that execute methods of LoginController (app/routes.php)
Route::get('login', 'LoginController@showLogin');
Route::post('login', 'LoginController@processLogin');

// The LoginController (app/controllers/LoginController.php)
class LoginController extends BaseController {

  // Display the login form
  public function showLogin()
  {
    return View::make('login');
  }

  // Process submission of the login form by verifying user’s credentials
  public function processLogin()
  {
    $username = Input::get('username');
    $password = Input::get('password');
    if ($username === 'prince' && $password === 'c@spiAN') {
      return 'Access granted!';
    } else {
      return 'Access denied! Wrong username or password.';
    }
  }
}

// Contents of the login form Blade template (app/views/login.blade.php)
<form action="login" method="post">
  Username:
  <input type="text" name="username"><br>
  Password:
  <input type="password" name="password">
  <input type="submit" value="Login">
</form>
A controller like LoginController demonstrates extendable application structure that benefits the developer when the application’s codebase is growing. Two methods or twenty, using controllers is a great way to group code related in its functionality together.
When the application grows to a point where there are many controllers and each controller has a few different methods, explicit controller routing would not be always effective because the routing file would become very large. To get around this potential problem and to accommodate developer preferences Laravel provides a few other methods of combining controllers and routing together. These methods allow for using some of the best practices in modern web development while reducing the amount of code that needs to be created. Let’s learn about the three types of controllers available in Laravel, their differences and how they could benefit your application.
5.4 Using Basic, RESTful and Resource controllers
There are three types of controller structure available in Laravel, each having a particular purpose depending on what functionality the controllers will contain. The need for these different types of controllers comes from the web development patterns that emerged over the years. The types of controllers that Laravel allows the developer to use are:
- Basic Controllers
- RESTful Controllers
- Resource Controllers
While the purpose of controllers remains the same – to control the execution flow of the application – there are certain cases when using one type of controller could be more appropriate than using another.
Basic controllers are great for simple functionality that might not be strongly related. RESTful controllers are very good when there is a need for making an API within the application. Resource controllers are a good fit for those cases when you want to have a consistent blueprint of managing a particular kind of data (resource). The answer to the question “which type of controller to use?” depends on the type of functionality that the controller will be executing and on the developer’s architectural decisions for the application.
The biggest structural difference between these three types of controllers is in the naming of controller’s methods and in addition, ways of routing to them. While Basic Controllers should use explicit routing, RESTful and Resource Controllers could use Laravel’s automatic routing (also called “implicit” routing) requiring less route definitions. Let’s take a look at the purpose of each of these types of controllers and the differences in their method names in table 5.1:
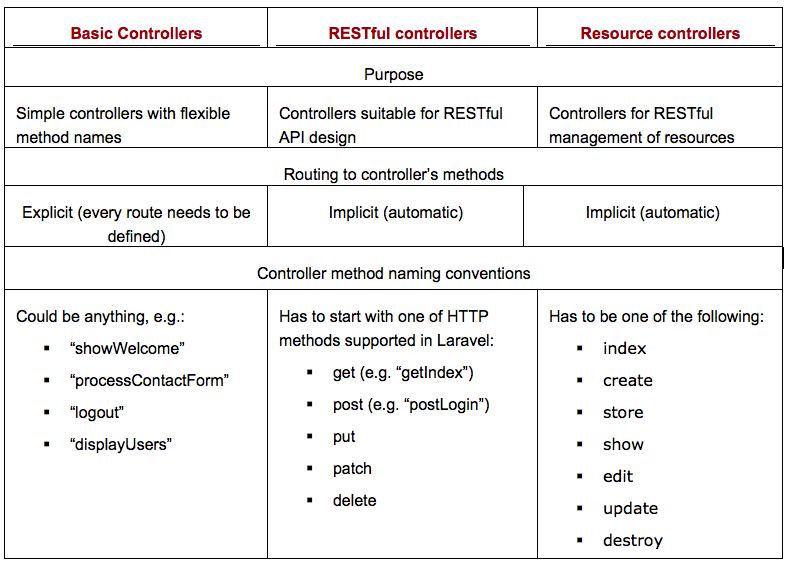
Table 5.1 Difference between Basic, RESTful and Resource controllers
These three types of controllers are enough for vast majority of modern web applications. While at first glance you could say that Basic controller is all you need, method naming conventions for RESTful and Resource controllers allow you to use special routing shortcuts that you will learn a bit later in this chapter.
In the next three sections you will get familiar with creating controllers of these different types and understand their differences in practice. Let’s start with the Basic controllers.
5.4.1 Creating and using Basic Controllers
You can create a Basic controller by making a new child class of “BaseController” and placing it in “app/controllers” folder. Basic controllers can have as many methods as necessary and these methods can have any name.
Without knowing it, you created a Basic controller in section 5.3. As you might remember, the LoginController had two methods named “showLogin” and “processLogin” (listing 5.7).
Listing 5.7 Definition of LoginController (app/controller/LoginController.php)
class LoginController extends BaseController {

  public function showLogin()
  {
    ...
  }

  public function processLogin()
  {
    ...
  }
}
The method naming of LoginController’s methods corresponds to the Basic controller naming convention from table 5.1. As you will learn later in this chapter, the routing for Basic controllers needs to be explicit. Every method of a Basic controller needs to be specified for the router to know which URL is controlled by it.
5.4.2 Creating and using RESTful Controllers
The only big difference between RESTful and Basic controllers is the method naming. Despite that difference, creating a RESTful controller follows the same process as creating a Basic controller:
- Create a child class of BaseController in “app/controllers” folder
- Define controller methods (actions)
RESTful controllers solve the problem of creating a route definition for every single method by having a simple convention for names of controller methods. This convention is as follows:
As an example that will help you understand the concept of RESTful controllers in action, imagine that you are developing an area of the site that allows a user to manage blog posts. The user should be able to do the following:
- View a list of all blog posts
- View an individual blog post
- Create a new blog post
- Edit a blog post
- Delete a specific blog post
A controller that would be responsible for this kind of post management could be called “PostsController”. At high level, this controller would contain the functionality for displaying and managing blog posts. The logic of this controller would be placed in the following methods (listing 5.8):
Listing 5.8 Example of a RESTful controller definition
class PostsController extends BaseController
{
  // View all posts
  public function getIndex(){ ... }
  // Show an individual post
  public function getView($id){ ... }
  // Show the form for the creation of a new post
  public function getNew(){ ... }
  // Process submission of a new post
  public function postNew(){ ... }
  // Show a form editing a post
  public function getEdit($id){ ... }
  // Process submission of edited post
  public function postEdit($id){ ... }
  // Delete a specific post
  public function deletePost($id){ ... }
}
Following the RESTful method naming convention allows you to use a special routing shortcut that automatically binds the controller’s actions to the routes that match the HTTP method and the URL of the request. Putting the route definition like in listing 5.9 would automatically enable the URL “posts” relative to the application URL to execute the “getIndex” method, URL “posts/new” to execute “getNew” method and so on.
Listing 5.9 Routing to a RESTful controller (app/routes.php)
// Enable automatic (implicit) routing to all methods inside of
// PostsController controller
Route::controller('posts','PostsController');That is only one line of code to route all controller’s methods! If the “PostsController” was a Basic controller, you would have to create seven route definitions, one for each method of the controller. As you can see from this example, using a RESTful controller can save a lot of lines of code in the routing file. Laravel is flexible about controllers, in fact so flexible that there is one more type of controllers that could be useful in certain situations. Let’s talk about “Resource Controllers”.
5.4.3 Creating and using Resource Controllers
Resource Controllers are named that way because they deal with “resources” – types of data that the application works with. For example if your application manages videos, these videos could be considered as a type of a resource. Or if an application manages addresses, they could also be viewed as a resource. Controllers that manage resources are called “Resource Controllers”.
Resource Controllers follow a convention that is somewhat different from RESTful controllers yet it allows for creation of RESTful application structure. With Resource Controllers each kind of operation on a resource such as creation, editing, etc. has its own designated controller method that is implicitly routed by using a simple route definition. Resource controllers can handle up to seven different actions on resource items:
- index (to show a list of the items of the resource)
- create (to show a form for creation of a new item of the resource)
- store (to save a new item of the resource)
- show (to show a specific item of the resource)
- edit (to show a form for editing a specific item of the resource)
- update (to process updating of a specific item of the resource)
- delete (to delete a specific item of the resource)
These seven actions are all methods that could be present in a Resource Controller. Creating a definition for a controller containing all these methods could take a bit of typing so Laravel comes with a tool to help you generate a blueprint for such a controller.
5.4.3.1 Creating resource controller with artisan command
Artisan, Laravel’s command line helper has a built-in command that allows you to generate a template for a Resource Controller. Run the following command in the terminal to create a new Resource Controller:
php artisan controller:make SomeController
Where “SomeController” is the name of the class that you wish to be created, e.g. “VideosController”. Running this command will create a new class in “app/controllers” folder with seven default methods already defined (listing 5.10):
Listing 5.10 Resource Controller created by Artisan command
// The class name comes from the name specified in the Artisan’s controller:make command
class SomeController extends BaseController {
  // List the items of the resource
  public function index(){}
  // Show a form for creation of a new item of the resource
  public function create(){}
  // Save a new item of the resource
  public function store(){}
  // Show a specific item of the resource
  public function show($id){}
  // Show a form for editing an item of the resource
  public function edit($id){}
  // Process updating of an item of the resource
  public function update($id){}
  // Delete a specific item of the resource
  public function destroy($id){}
}
While you can create a Resource Controller by hand, using the “controller:make” Artisan command accelerates the process by creating a skeleton for your controller. The seven actions of a Resource Controller need to contain some logic in order to be functional and what logic you put in to work with the application’s data is up to you. One of the main benefits of using Resource Controllers is that they help you create API-friendly controllers that work with application’s data.
When the controller is generated and the logic for managing data is in place, you can easily tell the application’s routing to use the Resource Controller for a specific URL prefix by using the “Route::resource” route definition:
Listing 5.11 Example route definition for a Resource Controller
Route::resource('videos', 'VideosController');This is all that is needed to route a Resource Controller to its many methods! Just like the RESTful controllers and their automatic routing using this routing shortcut will save you a lot of typing.
Great! You have learned about the three different types of controllers (Basic, RESTful and Resource controllers). You now know how to create them and in what regard they are different. When developing applications with Laravel controllers will be something you will use a lot so being a master in this domain will certainly help. While you have been introduced to controller routing on the surface, Laravel’s powerful routing techniques provide you with multiple ways to link controllers and their methods to URLs in your application. Let’s look at that in great detail in the next section.
5.5 Using controllers with routes
As mentioned before, controllers’ methods will not be executed until they are called from application’s routing methods. In order to tell the application which controller to use when a certain URL is requested, the mapping between the route and the controller need to be specified in the “app/routes.php” routing file. You have learned in section 5.2 that there are three types of controllers that you may use in your application: Basic, RESTful and Resource. Laravel provides three ways to connect controllers’ member functions to the application’s routes depending on the controller type:
- By pointing each method of a Basic controller to each individual route (explicit routing)
- By using “RESTful” controller architecture and its automatic route mapping (implicit routing)
- By using “Resource” controller architecture and its automatic route mapping (also implicit routing)
Over the next few pages we will learn about controller routing in greater detail. Besides routing to controller methods we will also review the concepts of passing parameters and using “filters” and how those important features of Laravel could be applied to controller routing. Let’s start with routing to Basic Controllers.
5.5.1 Routing to Basic Controllers
Basic Controllers require the routing to be explicitly defined for each controller method. Only the methods that are defined that way would be executed when the browser sends a request to the application. You have seen it in the previous sections of this chapter but let’s reiterate on how the Basic controller’s methods could be connected to application’s routing.
For example imagine you were making a controller responsible for showing and processing a contact page on your site, let’s call it “ContactController”. This controller would have at least two methods: one that would show the contact form (let’s call it “showForm”) and another one that would do the processing of contact form submission (let’s call it “processForm”). The controller definition would look like this (listing 5.12):
Listing 5.12 Definition of ContactController (Basic Controller)
class ContactController extends BaseController {

  public function showForm()
  {
    // Display the contact form using a Blade template stored
    // in ‘app/views/contact.blade.php’
    return View::make('contact');
  }

  public function processForm()
  {
    // Gather user’s input
    $email 	 = Input::get('email');
    $name 	 = Input::get('name');
    $message = Input::get('message');
    // Do input processing (send to email, store in DB, etc)
	  ...
    // Show a page with a thank you message stored in ‘app/views/thanks.blade.php’
    return View::make('thanks');
  }
}
To route these two methods to URLs in the application, two route definitions need to be created, one for each method. These routes will make the methods executable when the user requests the contact page by going to URL “contact” relative to the application’s URL and also when he or she submits the form at the same URL (listing 5.13):
Listing 5.13 Routing to methods of a Basic Controller (app/routes.php)
// Routing to method showForm of ContactController
Route::get('contact', 'ContactController@showForm');
// Routing to method processForm of ContactController
Route::post('contact', 'ContactController@processForm');
To build a route definition for a single method of a Basic Controller you need to specify the type of HTTP request, destination of the request and a controller method of an existing class, separated by “@” sign. That method will then be executed when the incoming request matches the URL and HTTP method defined for that route. Diagram in figure 5.7 breaks down the components of a route definition to a method of Basic Controller:

Figure 5.7 Route definition that links a single action of a controller to a specified destination
One advantage of using explicit routing is that when a developer looks at the routing file he or she can see exactly which methods will get executed depending on the type and URL of the request. As you see, routing to Basic controllers is not much different from passing a closure function as an argument to routing mechanisms like we have done in previous chapters of this book. In this case though, instead of writing out the whole function you can just point the routing definition to a method of an existing PHP class, controller.
5.5.2 Routing to RESTful Controllers
Routing to RESTful controllers is extremely simple as far as route definitions go. If you have a RESTful controller, for example called “AccountController”, you only need to put a single line to automatically assign all of its methods to a specified base destination.
Figure 5.8 shows a route definition that will route all requests to URLs that start with “accounts/” to the methods of the RESTful “AccountsController” controller:
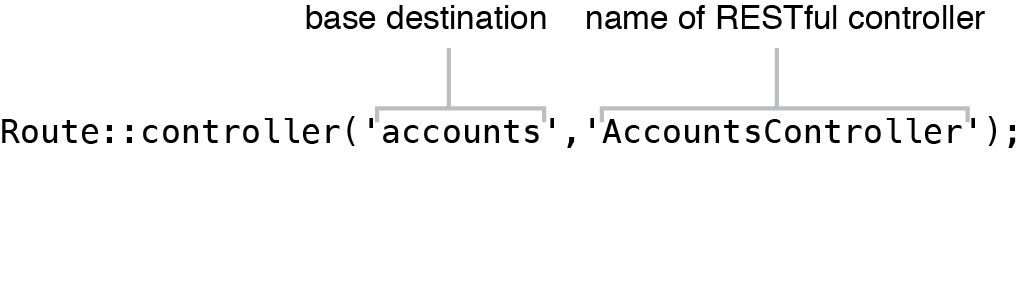
Figure 5.8 Automatic routing to all methods of RESTful controller
While defining the route to a RESTful controller is easy, understanding how the automatic resolution of it methods works could be a little challenging and maybe even confusing at first sight. When a controller is routed by the use of “Route::controller”, a method of that controller will be executed only if these two conditions are satisfied:
- The type of the incoming request (get, post, put, patch or delete) matches the first part of controller’s method’s name
- The destination of the incoming request matches both, base destination and a lowercase representation of the second part of method’s name separated by a “/” sign
There is one exception to this rule – controller’s index route. Requests to the base destination will execute methods whose names end with “Index”.
Let’s explore an example of RESTful controller routing to see when the controller’s methods get executed. Imagine that “AccountsController” has the following three methods defined (listing 5.14):
Listing 5.14 Example RESTful controller (app/controllers/AccountsController.php)
class AccountsController extends BaseController
{
  public function getIndex(){ ... }
  public function getShow($id){ ... }
  public function postEdit(){ ... }
}
The “getIndex” method will be called when the URL “accounts” gets requested by the browser because it is controller’s index route. The “getShow” method will be executed when the user goes to the URL “accounts/show” because that method’s name consists of the “get” type of request and the destination “show” which is derived from lowercase of “Show” and is appended to the base destination “accounts/”. Figure 5.9 shows how a GET request to the URL “accounts/show” would be routed to the “getShow” method of RESTful controller “AccountsController”:
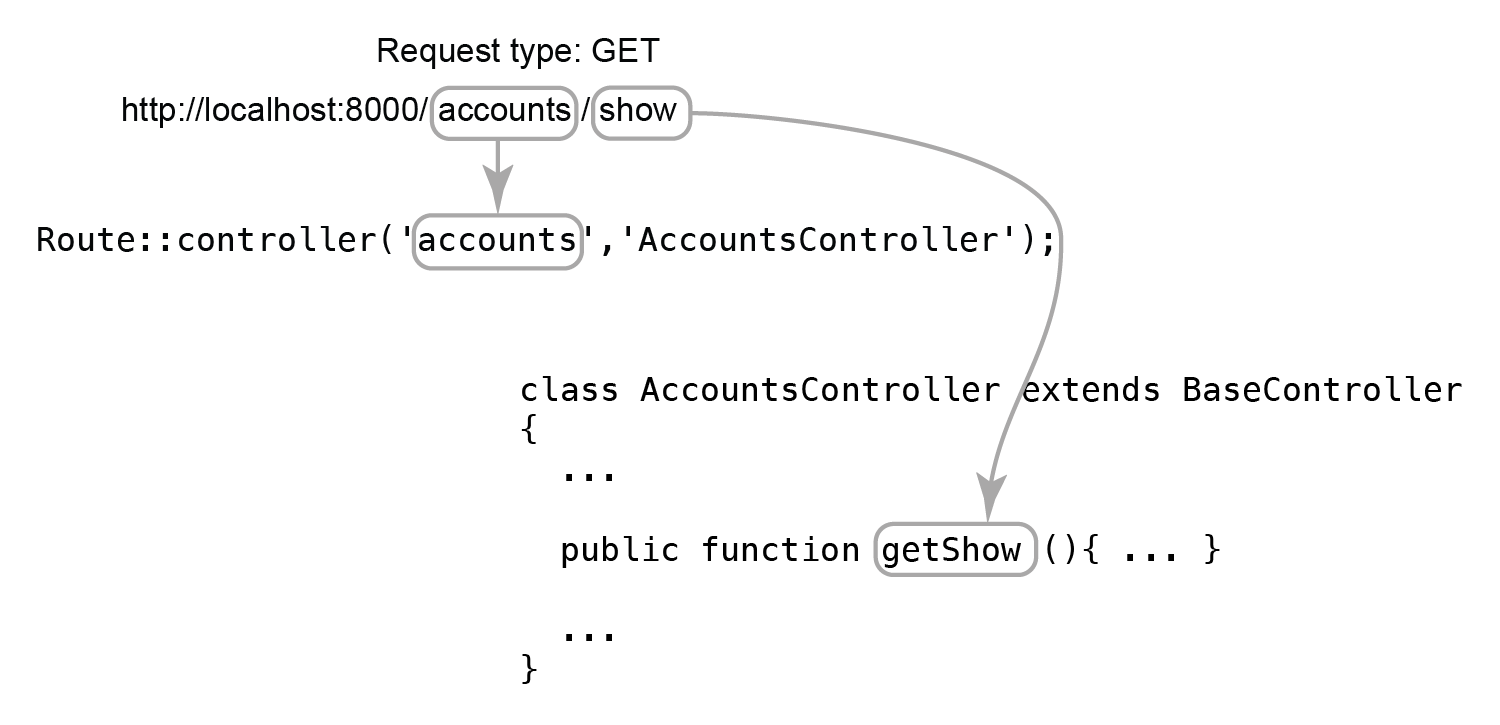
Figure 5.9 RESTful routing of “accounts/show” URL to “getShow” method of “AccountsController”
If the user makes a POST request to “accounts/edit” URL, the “postEdit” method will be executed because its name matches the “post” type of request to the URL “edit” that is appended to the “accounts/” base destination. Diagram in Figure 5.10 below shows the three cases of browser requests when those three methods will get called by the automatic routing and respond to the requests:

Figure 5.10 Browser requests that execute the methods of “AccountsController” that is automatically routed via “Route::controller” definition
As you can see, in comparison to the Basic Controllers, routing to the executable methods of a RESTful controller is tightly dependent on the names of the controller’s methods. Because of that it is very important to name the methods properly when you use RESTful controllers.
Now that we have learned the concept of routing to RESTful Controllers in Laravel let’s dive deeper into the world of controller routing. Let’s explore how routing to Resource Controllers works.
5.5.3 Routing to Resource Controllers
Routing to Resource Controllers is very similar to how the RESTful Controllers are routed to because they share a similar concept – implicit (automatic) routing to all methods of the controller. The only big difference of Resource Controllers is that they can have a maximum of seven methods that deal with management of a resource:
- index
- create
- store
- show($id)
- edit($id)
- update($id)
- delete($id)
To route a particular base URL to a controller that has these methods defined only one route definition is needed. For example if you have a Resource Controller called “ImagesController”, only this line would need to be present in “app/routes.php” file to automatically route the base URL “images” to all of this controller’s methods (figure 5.11):

Figure 5.11 Automatic routing to all methods of a Resource Controller
The way routing to a Resource Controller works is that each of the seven methods have an implied combination of type of HTTP request and a path that is added to the base destination. For example the controller method with the name “store” will be executed when a request of type POST is sent to the base destination URL of the resource. Method “show” will be executed when a request of type GET is sent to a URL that combines the base destination URL and an ID of the resource that will become method’s parameter. The “Route::resource” route definition will automatically route the methods of a Resource Controller in a way that is defined by a convention which you can see in table 5.2 below:
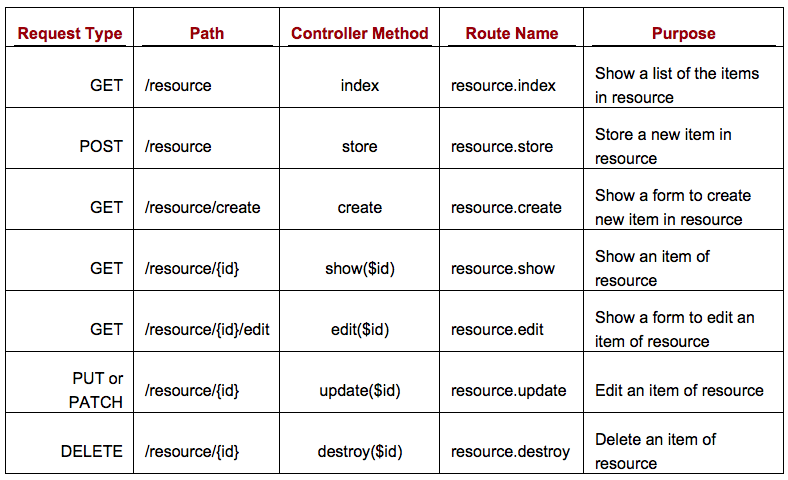
Table 5.2 Routing conventions for the Resource Controller routing
As you can see from the table 5.2, four methods of a Resource Controller require a parameter “id” to be passed in to the methods: “show”, “edit”, “update” and “destroy”. In case with routing to Resource Controllers the parameter “id” gets passed in through the URL of the request, for example the URL “images/2/edit” would execute the method “edit” of the “ImagesController” with the $id parameter equal to 2. Passing parameters to controllers is something that we will explore in the next few pages.
5.6 Passing route parameters to controllers
When using either type of controllers, you might need to make the routing to controller’s methods a bit more dynamic in order to work with specific data. Telling a controller’s method an ID of an item or a specially formatted name of a blog post are cases when routing needs to be more flexible than just responding to base destinations like “images” or “posts”. As you might remember from the chapter on Routing (chapter 3), Laravel provides a way to specify what section of a route should be dynamic by the means of route parameters. The code in listing 5.15 demonstrates the use of a route parameter in a route definition that executes a closure function:
Listing 5.15 Passing route parameter to a closure function (no controller in use)
// Anything that is in place of {kind} in the URL becomes available as $kind
// parameter to the anonymous (closure) function
Route::get('coffee/{kind}', function($kind)
{
  // Visiting URL ‘coffee/espresso’ would output “Requested kind of coffee drink: espresso”
  return 'Requested kind of coffee drink: '.$kind;
});
Route parameters allow your application to be very dynamic and thankfully passing a variable to a controller’s method is something that is very easy with Laravel’s powerful routing mechanisms. In fact, you won’t need to change any route definitions in order to pass parameters to RESTful and Resource controllers’ methods. Over the next few pages we will explore how the route parameters may be passed to each controller type available in Laravel.
5.6.1 Passing parameters to methods of a Basic Controller
As you know, in Basic Controllers each method name has to have its own corresponding route definition. What is great is that to pass a parameter to Basic Controller’s methods you only need to specify where in the URL you are expecting a dynamic parameter and Laravel will take care of passing it to controller’s method.
Imagine an example of an application that responds to requests for coffee drinks by simply telling the user what kind of coffee drink they requested, just like the small route definition in the listing 5.15 above did. Let’s create a Basic Controller that would process a request like that and let’s name this controller “CoffeeController”. It could have a few different methods, but one that we are especially interested in is method “showDrink” that would take in a parameter passed through the URL and would display to the user what kind of drink they requested. The code in listing 5.16 shows a definition of a “CoffeeController” and its “showDrink” method:
Listing 5.16 Definition of CoffeeController (app/controllers/CoffeeController.php)
class CoffeeController extends BaseController {
  ...

  public function showDrink($kind)
  {
    return 'Requested kind of coffee drink: '.$kind;
  }

  ...
}
Now, in order to let the application’s routing know about a parameter that is passed to a URL responsible for executing “showDrink” method all you need to specify is where in the URL the parameter could occur. Listing 5.17 shows a route definition that makes the “showDrink” method of the “CoffeeController” react to the “coffee/{kind}” URL dynamically:
Listing 5.17 Passing a route parameter to a method of Basic Controller
Route::get('coffee/{kind}','CoffeeController@showDrink');Having a route definition like this enables a specific method of a Basic Controller to use a variable that is passed to the method as an argument. What if you wanted to pass more than one parameter? That would not be a problem either. Just define the placeholders for the method parameters and Laravel will make them available for use in the method execution (listing 5.18):
Listing 5.18 Passing multiple route parameters to a method of Basic Controller
// app/routes.php
Route::get('coffee/{kind}/{size}','CoffeeController@showDrink');

// app/controllers/CoffeeController.php

class CoffeeController extends BaseController {

  public function showDrink($kind, $size)
  {
    return 'Kind of coffee drink: '.$kind.', size: '.$size;
  }
}
If the user went to a URL “coffee/latte/grande” relative to the application root URL, he or she would see a response like in figure 5.12:
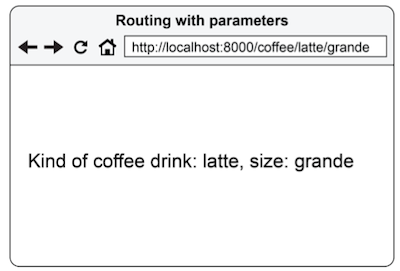
Figure 5.12 Result of method execution that has two parameters defined
This looks very similar to the way it was done using routing without controllers, doesn’t it? Laravel promotes consistency in application architecture and that shows in the similarities between routing with parameters for a Basic Controller and passing parameters to closure functions in the route definitions. By using this technique you can pass as many parameters as you wish to as many methods as your Basic Controllers have.
5.6.2 Passing parameters to methods of a RESTful Controller
The methods of a RESTful controller are automatically routed by “Route::controller” definition therefore there is no way to specify which method of the RESTful controller should accept parameters and which method should not (listing 5.19).
Listing 5.19 Routing to a RESTful controller
Route::controller('accounts','AccountsController');Laravel takes a unique approach to solve this problem by letting the developer pass parameters to controller’s methods without specifying them in the routing definition.
By using implicit routing of “Route::controller” definition all methods of the RESTful controller become eligible for passing parameters to them. Let’s explore this in action on an example of a RESTful controller called “AccountsController”. While this controller could have many methods, we will only focus on one of them, “getShow” method. To be able to accept a parameter for this method you just have to register it in the method’s definition (listing 5.20):
Listing 5.20 Registering a parameter for a method of a RESTful controller
class AccountsController extends BaseController
{
  ...
  public function getShow($id)
  {
    return 'Showing account '.$id;
  }
  ...
}
Now if the user tries to access the URL “accounts/show/100” he or she will see a response that says “Showing account 100” (screenshot in figure 5.13):
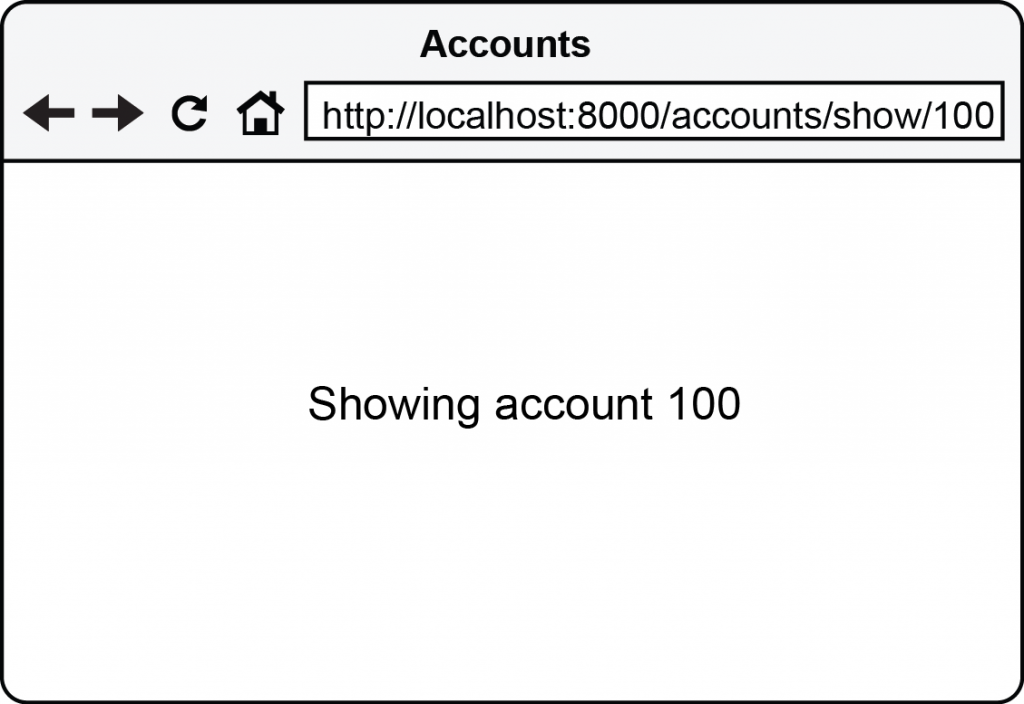
Figure 5.13 Result of passing a parameter to a method of RESTful controller
When it comes to RESTful controller routing there is one special detail about passing multiple parameters. Laravel assumes that multiple parameters in the method definition should be equal to parameters in the URL separated by a slash sign. Imagine that the “getShow” method has three parameters instead of one. Let’s change the method definition to accommodate these three parameters (listing 5.21):
Listing 5.21 Accepting multiple parameters in a method of a RESTful controller
public function getShow($id, $name, $phone)
{
  return 'Showing account with ID:'.$id.', name:' .$name.', phone:'.$phone;
}
Without doing any changes in the routing file, the “getShow” method will now accept three parameters and display them to you if you access the URL “accounts/show/12/Laravel/555-555-5555” (screenshot in figure 5.14):
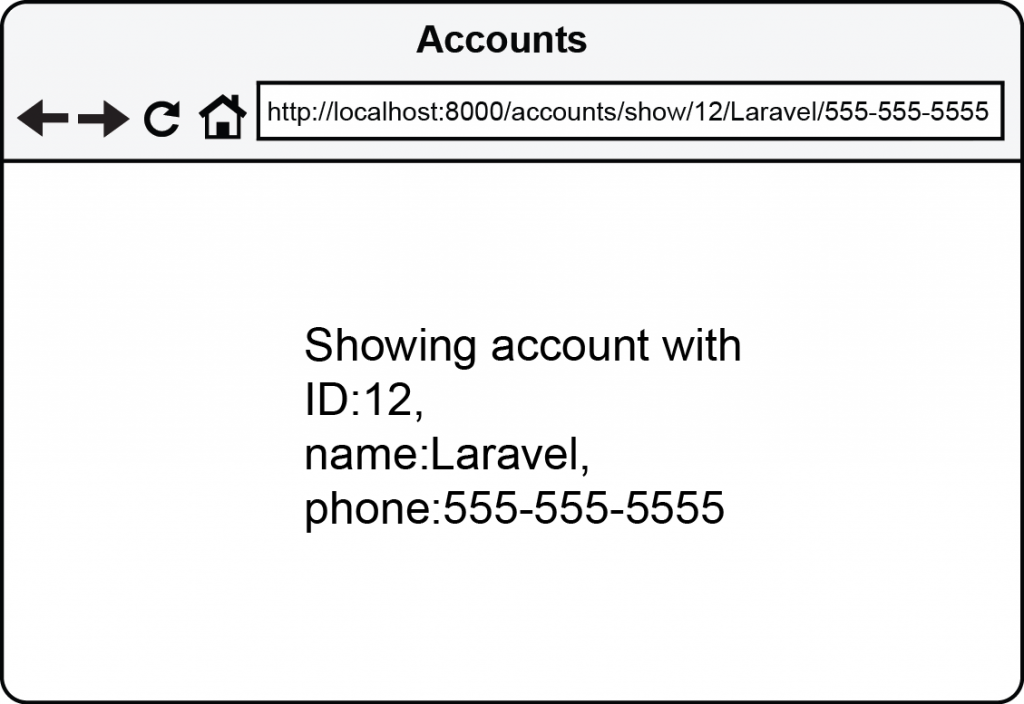
Figure 5.14 Result of executing a method with three parameters
As you can see, passing parameters to RESTful controllers is easy and logical without any modifications in the routing definition – just specify which methods will take the parameters and Laravel will do the rest for you. Let’s take a look at the last type of controller whose methods could take parameters – Resource Controllers.
5.6.3 Passing parameters to methods of a Resource Controller
Resource Controllers don’t have any flexibility when it comes to passing parameters to their methods. In fact, the only four methods of a Resource Controller that are able to take a parameter are:
- show
- edit
- update
- destroy
And these four methods are only able to take a single parameter, usually an ID of the specific resource. For example if you had a Resource Controller responsible for different books stored in the system, let’s say “BooksController”, you would use the parameter of the “show” method to retrieve a specific book from the resource (listing 5.22):
Listing 5.22 Passing the ID of an item to a method of Resource Controller
// app/routes.php
Route::resource('books','BooksController');

// app/controllers/BookController.php
class BooksController extends BaseController {
  ...
  public function show($id){
    return 'Showing a book with ID '.$id;
  }
  ...
}
Using the route and class definition from listing 5.22, if you access the URL “books/show/25” you would see the ID of the requested book, as you can see in figure 5.15:
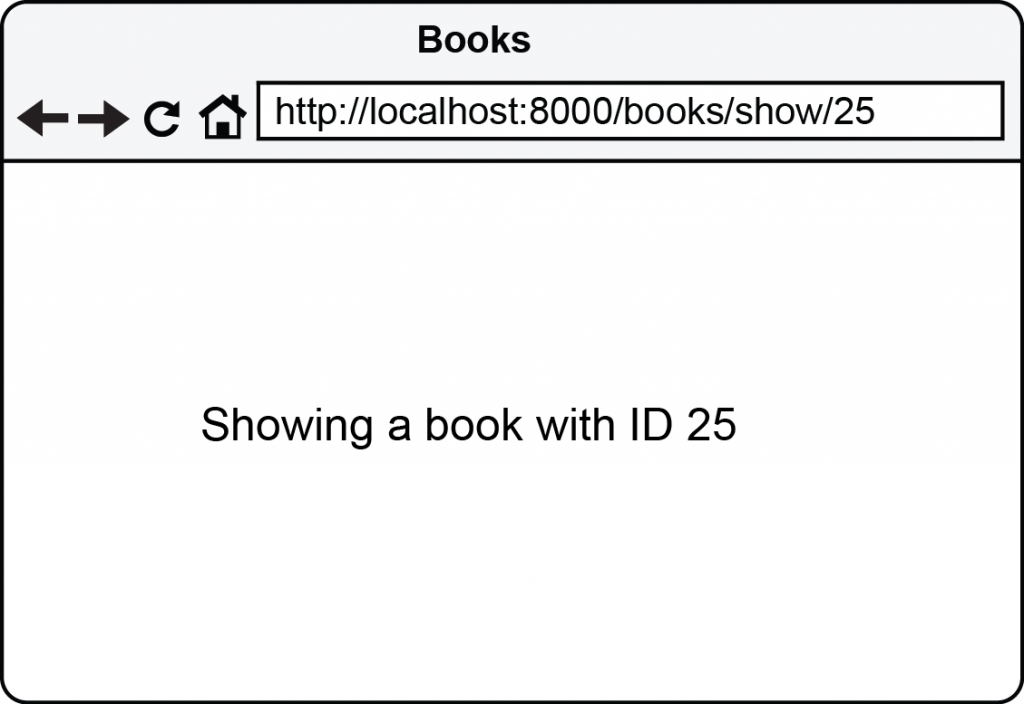
Figure 5.15 Result of passing a parameter “25” to method “show” of “BooksController” Resource Controller
Methods “edit”, “update” and “destroy” behave similarly to the “show” method and do not allow you to pass more than one parameter.
5.7 Using filters with controllers
Laravel allows attaching a custom function that would be executed before or after execution of a controller’s methods. These functions are called “filters” and you have met them before in chapter 3 in the context of routing. As you might remember, filters make it possible to put certain limits on the application flow depending on the user’s interaction with the application. For example, you could use filters for:
- Restricting certain parts of application to be accessible to logged in users only
- Protecting the application from cross-site request forgery
- Logging and reporting
While the possibilities for custom filters are practically endless, filters that come with Laravel by default are mainly for security purposes. Default filters are stored in “app/filters.php” file (listing 5.23):
Listing 5.23 Default filters in app/filters.php file
<?php
// Global filters that are executed at the beginning and at the end of every
// request to the application
App::before(function($request) {});
App::after(function($request, $response) {});
// Filter that prevents users that are not logged in from accessing the content
// of the application and redirects to "login" URL relative to site's root
Route::filter('auth', function()
{
  if (Auth::guest()) return Redirect::guest('login');
});
// Filter that enables the use of basic authentication (great for building APIs)
Route::filter('auth.basic', function()
{
  return Auth::basic();
});
// Filter that prevents not logged in users from seeing pages that are strictly
// meant for logged in users
Route::filter('guest', function()
{
  if (Auth::check()) return Redirect::to('/');
});
// Filter that compares CSRF tokens on form submission, a useful security feature
Route::filter('csrf', function()
{
  if (Session::token() != Input::get('_token'))
  {
    throw new IlluminateSessionTokenMismatchException;
  }
});
Laravel gives a lot of flexibility when it comes to applying these filters to application’s execution. Any of the filters defined in “app/filters.php” file could be attached to any methods of any controller. The process of attaching these filters consists of executing a special function on controller’s initialization. Let’s take a closer look at how filters could be applied to controller’s methods.
5.7.1 Attaching filters to a controller
You can attach a filter from the filters defined in “app/filters.php” file to the methods of a controller by specifying them in controller’s constructor. As you remember filters could be executed before or after the execution of the functionality that they are attached to.
When it comes to using controller filters this concept remains the same. The two types of filters are “before” and “after” and the difference between them is the order in which they would be executed. For example if you wanted to attach the “auth” filter that would run before certain actions of “AccountsController” and make sure that the user is logged in, you would add it to controller’s constructor in a way shown in listing 5.24. Please note that the second parameter of “beforeFilter” is omitted for now:
Listing 5.24 Attaching a “before” filter to a controller
In case with controller filters, the two types of filters that Laravel provides are:
- beforeFilter
- afterFilter
These two types of filters could be applied to controller’s methods using syntax like in figure 5.16:
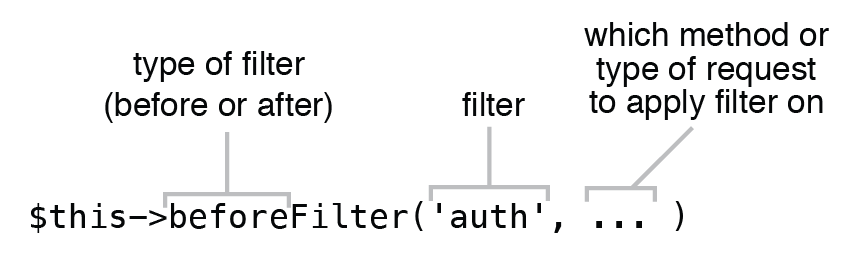
Figure 5.16 Structure of a controller filter definition
Now because the “auth” filter was provided as the first argument of “beforeFilter”, the closure function to “Route::filter(‘auth’)” in “app/filters.php” would be fired before the controller method(s) that the filter is applied to.
5.7.2 Applying filters to specific methods of a controller
Laravel allows you to fine tune when controller filters will be executed. In some cases you would want to apply a filter to only a certain controller method or a set of methods. In other cases you would want to apply a filter on a specific type of HTTP request (“get”, “post”, etc.). Laravel accommodates those situations by providing you with these three keywords:
- on
- except
- only
5.7.2.1 Using the “on” keyword
Using the “on” keyword allows you to limit execution of the filter to only specific type of the HTTP request. To use the “on” keyword provide it as a key of an array specifying what type of HTTP request you would want to apply it to. For example if you wanted to apply the “auth” filter only to requests of type “POST” you would provide an array with key/value of ‘on’ ⇒ ‘post’ as a second argument to the “beforeFilter” function (listing 5.25):
Listing 5.25 Attaching “auth” filter to all POST requests of a controller
class AccountsController extends BaseController
{
  public function __construct()
  {
    $this->beforeFilter('auth', array('on' => 'post'));
  }
  ...
}5.7.2.2 Using the “except” and “only” keywords
If you wanted to limit the execution of the filter to only specific methods of the controller you could use the keywords “except” and “only”. For example to limit execution of “auth” filter to run for all controller’s methods, except the “showLogin” method, you can provide the “except” keyword as a key of an array specifying which method the filter wouldn’t apply to. Listing 5.26 shows an example where the showLogin method of LoginController will not have the “auth” filter executed:
Listing 5.26 Attaching “auth” filter to all methods of a controller except “showLogin”
class AccountsController extends BaseController
{
  public function __construct()
  {
    $this->beforeFilter('auth', array('except' => 'showLogin'));
  }
  ...
}
Great! But what if you wanted to attach the filter to only a few specified methods instead of attaching it to all methods? The “only” keyword is to the rescue in that case! It allows you to provide an array listing which methods of the controller should have a filter applied to them. Listing 5.27 shows a simple example where the “auth” filter is applied only to “updateProfile” and “showUser” methods:
Listing 5.27 Attaching “auth” filter to only few methods of a controller
class AccountsController extends BaseController
{
  public function __construct()
  {
      $this->beforeFilter('auth', array('only' => array( 'updateProfile', 'showUser' )));
  }
  ...
}
With this filter firing before the user can run the “updateProfile” or “showUser” methods ensures that only logged in users can execute those methods.
The flexibility of attaching filters to controller actions comes in very handy when you are building a large application with fine tuned access control. It allows you to get very creative with how you want to handle the requests to your application.
5.8 Summary
Controllers play an incredibly important part of web applications. Using them to control the execution flow in your applications is irreplaceable if you want your applications to be maintainable, extendable and testable. In this chapter you have explored in detail how to create controllers of three various types that Laravel supports: Basic, RESTful and Resource.
You have seen the advantages and disadvantages of each type of controllers, examples of their practical application and shortcuts that accelerate creation of Resource Controllers. You have also learned how to tell your application to route to these types of controllers and how to pass parameters to controllers’ methods. The information you have learned here in this chapter will be essential for the next chapters of the book.
In the next chapter we will take a look at database operations in Laravel applications.


Yesss!,
Been waiting this part for long… Great Job!
Great job. The most comprehensive article about Laravel, I have read so far!
Thank you
Thank You, I installed fresh Laravel 5 but did not see BaseController.php and HomeController.php in the controllers folder. There is only Controller.php file.
Could you explain this “View::make(‘login’);”
I assugme view is a abstract class and make is a method of this class.
Am i right ? Could you explain how it works here ?
Awesome Tutorial love it. Very comprehensive thank you!!