Tutorial: Creating a Blog in Laravel from scratch – part 3 – Design Database and Relationships
In the previous tutorial we’ve learned how to think about the application’s look, now take those skills with us and build the actual model and the database for our blog!
A little side topic : If you haven’t had much experience with Databases, don’t worry, I will guide you through the process for right now. But I do highly encourage you to take a database design class or at least become a database design freak by talking a walk around where you liv, looking at objects thinking that they are entities, taking them apart in your mind. For example look at the street, what does it have? Houses, roads, cars, people, light poles, etc. Break down every object even further : House consists of windows, walls, doors, roof, paint, etc. Cars consist of shell, wheels, glass, engine, seats, dashboard, lights, exhaust, transmission, etc. I’m not going to tell you which body parts humans consist of, you know that yourself. This simple exercise makes you into a better database designer, when building an application you will have to break data up into smaller pieces to make it usable.
Let’s do that with our blog application. First ask questions, What kind of data are we operating with? What attributes does the data have? How is the data interconnected? Think about that for a minute, please.
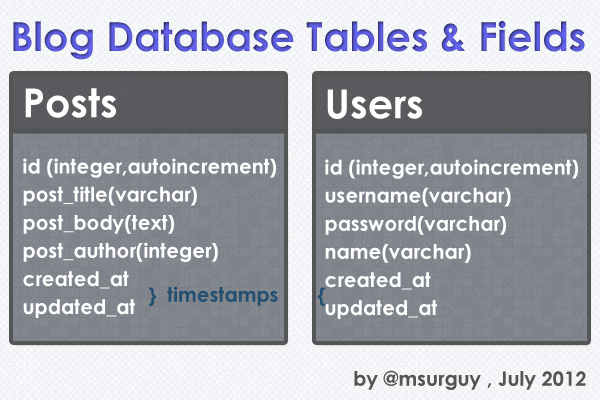
In a blog there is an author, let’s call him/her a user. The user publishes posts, right? So that means we have two kinds of data that should be somehow related: users and posts. Now let’s break down each kind further : which attributes do these kinds of data have? In most cases every kind of data has id by default, then users have these attributes: username and password for logging in the system, some kind of name or alias to be displayed (who published the post?), and timestamps – information about when the user was created or when the user was updated (in case we want to see history of our application’s growth). Let’s do the same with Posts, every post has an id, some kind of title, the body of the post (text) and some kind of way of telling by which author the post was published, let’s have that as an integer that is taken from User’s id, and timestamps that tell us when the post was published and updated.
So that structure of our data brings us to the following database design, two tables named Posts and Users with the attributes I described above. Here’s the visual representation of the blog tables:
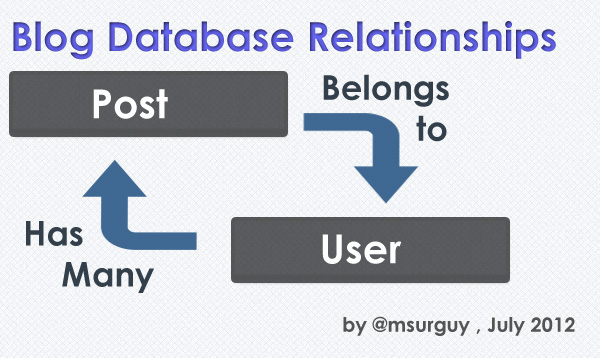
Ok, now that we have our data broken down in smaller attributes, we need to think about how the data is related to each other. We can’t just have posts without users or just users without posts, that would not be a blog. Let’s think of it this way, what does each user do? Publishes posts. How many posts will there be eventually? One or many? Many. What about the posts, how are they related to the user? Each post belongs to a user. Voila, we have our relationships! It looks like each User has many posts and each post belongs to a user. Check out a pretty picture of how that looks like:
To read more about relationships in Laravel, read the following section of Laravel’s documentation : http://laravel.com/docs/database/eloquent#relationships
Now that we have our database fields and relationships figured out, let’s create the actual database and models for the database for our blog!
On to the next tutorial where we create Database and migrations with Artisan and a little bit of code:

Creating a blog in #Laravel from scratch. Part 3: Design database and relationships. http://t.co/iHb57bi6 #HowTo #Tutorial #WebDev