
Laravel shop tutorial 3 – Implementing Smart Search
This tutorial is one more addition to my “Building a shop with Laravel” tutorial series.
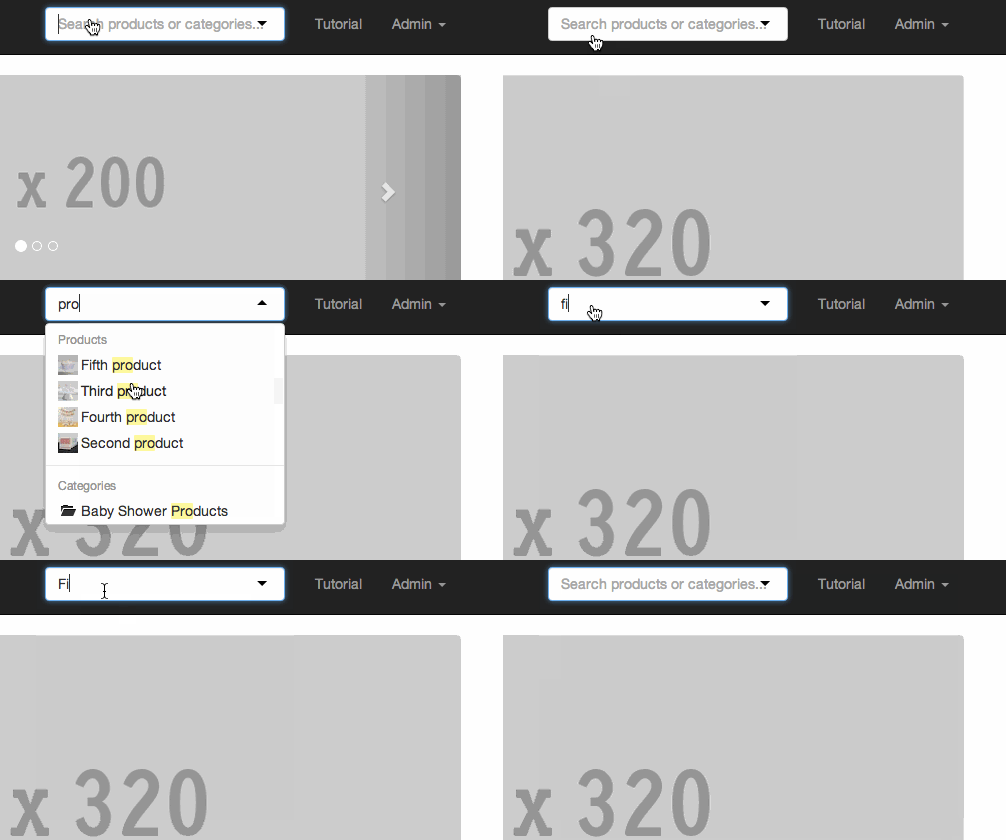
In this tutorial I will share what I have learned while building a “Smart Search” feature into a big project. What is smart search? Take a look at the GIF below to see what I mean:
The real, working demo of this type of search is also available at:
http://demos.maxoffsky.com/shop-search/
And the source for the demo is at https://github.com/msurguy/laravel-smart-search
Smart Search is a type of autocomplete search that can search through multiple types of content that your website is serving. Let’s say you have an online shop that has products and categories. The most basic example of use of smart search is to let the user search through categories and products without specifying what type of content they are looking for. The application should be able to give the user a few possible results and placing them in proper types of content that the application has.
This type of search could be incredibly useful in certain cases and increase discoverability of your content by the users. Instead of going to a separate page that shows the results the users could just start typing a part of the word they are looking for and see results immediately.
How would you go about implementing that kind of search in a Laravel application?
Choosing an autocomplete library
I don’t like reinventing the wheel so I use off the shelf tools to build my projects quickly. In order to implement a smart search you need an autocomplete plugin. There are lots of existing autocomplete libraries available out there :
- Typeahead.js plugin by Twitter – http://twitter.github.io/typeahead.js/
- Built in typeahead plugin in Bootstrap version 2.
- Selectize.js by Brian Reavis – https://github.com/brianreavis/selectize.js
- about 1000 more.
While there are so many options, I chose Selectize.js for all of my cool search/tagging/autocomplete projects. Selectize transforms any “select” element into a text input that allows tagging, selecting multiple items, smart searching, remote data loading and more. I am using it on many websites already (mainly for tagging/autocomplete):
I could write a book on using Selectize.js for many different solutions improving user interface, but for the purpose of this tutorial I will only show you how to use its ability to separate autocomplete results by different types of content using “optgroup” tags.
EDIT: I did in fact write two chapters about Selectize in my e-book, you can get it here: Integrating Front end components with web applications.
Getting and installing Selectize.js
So the first thing to proceed with this tutorial is to download Selectize.js, specifically you need the whole “dist” directory that you can then place somewhere in the “public” folder of your Laravel application. I placed the downloaded “dist” folder into “public/vendor/selectize” folder.
Now if I want to use the plugin in my application, I can place the following HTML and JS in my view file:
// add Selectize stylesheet to the document head:
<head>
  ...
  <link href="{{ url('vendor/selectize/css/selectize.bootstrap3.css') }}" rel="stylesheet">

  <script type="text/javascript" src='//code.jquery.com/jquery-1.10.2.min.js'></script>
  <script type="text/javascript" src='{{ url("vendor/selectize/js/standalone/selectize.min.js") }}'></script>

</head>

// Then add the HTML for the select element that will be "Selectized"

<select id="searchbox" name="q" placeholder="Search products or categories..." class="form-control"></select>

// Activate Selectize
<script>
	$(document).ready(function(){
	    $('#searchbox').selectize();
	});
</script>
Great! We now can use the magical powers of Selectize to beautifully present our search results using this great jQuery plugin. What’s left for us is to create a data source that Selectize would use to populate search result options that that user would choose from.
Planning the search results API
Let’s take a look at how the process of the search looks like, from start to finish, client side and server side:
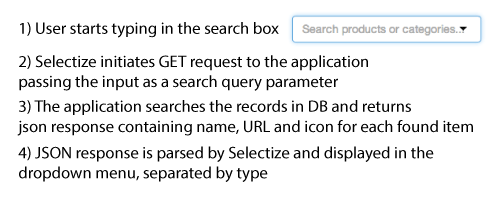
The Selectize plugin needs to retrieve data that has the same format for all items received from the API in order for us to be able to display it properly in the dropdown. Let’s come up with the common data format so that we can then use it in Selectize to show the results in categories and in products. Here is an example JSON data that we wold like to receive from the application’s API upon searching:
{
  "data":[
    {
      "slug":"5-fifth-product",
      "name":"Fifth product",
      "icon":"http://laravel-smart-search.gopagoda.com/img/icons/product-5.jpg",
      "url":"http://laravel-smart-search.gopagoda.com/products/5-fifth-product",
      "class":"product"
    },
    {
      "slug":"4-fourth-product",
      "name":"Fourth product",
      "icon":"http://laravel-smart-search.gopagoda.com/img/icons/product-4.jpg",
      "url":"http://laravel-smart-search.gopagoda.com/products/4-fourth-product",
      "class":"product"
    },
    {
      "slug":"2-second-product",
      "name":"Second product",
      "icon":"http://laravel-smart-search.gopagoda.com/img/icons/product-2.jpg",
      "url":"http://laravel-smart-search.gopagoda.com/products/2-second-product",
      "class":"product"
    },
    {
      "slug":"baby-shower-products",
      "name":"Baby Shower Products",
      "icon":"http://laravel-smart-search.gopagoda.com/img/icons/category-icon.png",
      "url":"http://laravel-smart-search.gopagoda.com/categories/baby-shower-products",
      "class":"category"
    }
  ]
}
As you can see, the value of “class” will be what separates the content by type (“category” or “product”). A bit later we will build out the API that will give us result like the JSON above. For now, let’s make Selectize work with this kind of data. I have played with Selectize.js enough to come up with a script that will parse the above JSON and provide a nice dropdown for the user to use:
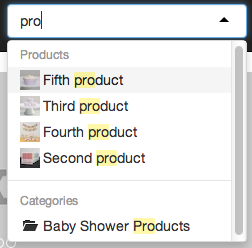
Parsing the JSON to display results with Selectize
Selectize can easily work with “optgroup” type of “select” HTML element, and by using the available options you can load the data dynamically from the server and group it by a specific value (in our case “class”).
I won’t get too much into all Selectize’s available options, but the way to make it work with a Laravel application is as follows.
Place these 3 lines in the Blade template to pass the URL of the root of your application to javascript:
<script type="text/javascript">
    var root = '{{url("/")}}';
</script>
Place this script where you want to initialize the Selectize plugin, (I have it in “public/js/main.js” which I then load into the layout.blade.php):
$(document).ready(function(){
    $('#searchbox').selectize({
        valueField: 'url',
        labelField: 'name',
        searchField: ['name'],
        maxOptions: 10,
        options: [],
        create: false,
        render: {
            option: function(item, escape) {
                return '<div><img src="'+ item.icon +'">' +escape(item.name)+'</div>';
            }
        },
        optgroups: [
            {value: 'product', label: 'Products'},
            {value: 'category', label: 'Categories'}
        ],
        optgroupField: 'class',
        optgroupOrder: ['product','category'],
        load: function(query, callback) {
            if (!query.length) return callback();
            $.ajax({
                url: root+'/api/search',
                type: 'GET',
                dataType: 'json',
                data: {
                    q: query
                },
                error: function() {
                    callback();
                },
                success: function(res) {
                    callback(res.data);
                }
            });
        },
        onChange: function(){
            window.location = this.items[0];
        }
    });
});
You can use this snippet of code to load the data from the API and display it nicely in the drop down. Whew, the last part is left – building the actual API that will provide us with consistently formatted JSON data feeding the Selectize options.
Building the API
Thankfully, Laravel makes it super easy to build APIs and Eloquent makes it a breeze searching for data that matches some parameter. Let’s get our hands dirty in some beautiful PHP code (sounds contradicting, doesn’t it?). First, let’s create an empty SearchController class, place it in “app/controllers/Api/SearchController.php“:
<?php

/**
 * Api/SearchController is used for the "smart" search throughout the site.
 * it returns and array of items (with type and icon specified) so that the selectize.js plugin
 * can render the search results properly
 **/

class ApiSearchController extends BaseController {

}
Now, let’s create a route that will use an action (for example “index”) of that controller when it receives a “GET” request to the “api/search” route, in routes.php file :
Route::get('api/search', 'ApiSearchController@index');The foundation has been laid, now we only need to populate the “index” action of the controller. Let’s think about that for a minute. The index action should do the following things:
- Receive a string of text (search query) that the data needs to be matched against.
- Go through products and categories, matching their names (or any other data) against the search query and converting the result of matched entries to an array using Eloquent’s “toArray()” method.
- Append extra parameters to each array element of the results – such as icon and type of the result item.
- Merge all arrays together to have one list of data that has the same format.
- Return the single array of data as JSON so that Selectize can process it and show it to the user.
public function index()
{
	// Retrieve the user's input and escape it
	$query = e(Input::get('q',''));

	// If the input is empty, return an error response
	if(!$query && $query == '') return Response::json(array(), 400);

	$products = ...

	$categories = ...

	// Normalize data
	// Add type of data to each item of each set of results
	// Merge all data into one array
	$data = array_merge($products, $categories);

	return Response::json(array(
		'data'=>$data
	));
}$products = Product::where('published', true)
->where('name','like','%'.$query.'%')
->orderBy('name','asc')
->take(5)
->get(array('slug','name','icon'))->toArray();$categories = Category::where('name','like','%'.$query.'%')
->has('products')
->take(5)
->get(array('slug', 'name'))
->toArray();public function appendValue($data, $type, $element)
{
// operate on the item passed by reference, adding the element and type
foreach ($data as $key => & $item) {
$item[$element] = $type;
}
return $data;
}
public function appendURL($data, $prefix)
{
// operate on the item passed by reference, adding the url based on slug
foreach ($data as $key => & $item) {
$item['url'] = url($prefix.'/'.$item['slug']);
}
return $data;
}// Data normalization
$categories = $this->appendValue($categories, url('img/icons/category-icon.png'),'icon');
$products = $this->appendURL($products, 'products');
$categories = $this->appendURL($categories, 'categories');
// Add type of data to each item of each set of results
$products = $this->appendValue($products, 'product', 'class');
$categories = $this->appendValue($categories, 'category', 'class');<?php
/**
* ApiSearchController is used for the "smart" search throughout the site.
* it returns and array of items (with type and icon specified) so that the selectize.js plugin can render the search results properly
**/
class ApiSearchController extends BaseController {
public function appendValue($data, $type, $element)
{
// operate on the item passed by reference, adding the element and type
foreach ($data as $key => & $item) {
$item[$element] = $type;
}
return $data;
}
public function appendURL($data, $prefix)
{
// operate on the item passed by reference, adding the url based on slug
foreach ($data as $key => & $item) {
$item['url'] = url($prefix.'/'.$item['slug']);
}
return $data;
}
public function index()
{
$query = e(Input::get('q',''));
if(!$query && $query == '') return Response::json(array(), 400);
$products = Product::where('published', true)
	->where('name','like','%'.$query.'%')
	->orderBy('name','asc')
	->take(5)
	->get(array('slug','name','icon'))->toArray();
$categories = Category::where('name','like','%'.$query.'%')
	->has('products')
	->take(5)
	->get(array('slug', 'name'))
	->toArray();
// Data normalization
$categories = $this->appendValue($categories, url('img/icons/category-icon.png'),'icon');

$products   = $this->appendURL($products, 'products');
$categories = $this->appendURL($categories, 'categories');

// Add type of data to each item of each set of results
$products   = $this->appendValue($products, 'product', 'class');
$categories = $this->appendValue($categories, 'category', 'class');
// Merge all data into one array
$data = array_merge($products, $categories);
return Response::json(array(
'data'=>$data
));
}
}That’s it! The smart search should now work displaying the product and category names and taking the user to the selected result. If you wanted to add any more data types to the result, you could easily do it using Eloquent and my normalization functions.
This wraps up the tutorial, I hope you enjoyed it. Let me know if you have any questions/suggestions about this implementation, I’d be happy to hear your thoughts.
Get complete source for this tutorial at this Github Repository : https://github.com/msurguy/laravel-smart-search




RT @msurguy: Implementing Smart Search in @laravelphp apps : http://t.co/pxOmU1BhFn @LearningLaravel @laravelnews @laracasts @laravelsnippe…
RT @msurguy: Implementing Smart Search in @laravelphp apps : http://t.co/pxOmU1BhFn @LearningLaravel @laravelnews @laracasts @laravelsnippe…
RT @msurguy: Implementing Smart Search in @laravelphp apps : http://t.co/pxOmU1BhFn @LearningLaravel @laravelnews @laracasts @laravelsnippe…
RT @msurguy: Implementing Smart Search in @laravelphp apps : http://t.co/pxOmU1BhFn @LearningLaravel @laravelnews @laracasts @laravelsnippe…
RT @msurguy: Implementing Smart Search in @laravelphp apps : http://t.co/pxOmU1BhFn @LearningLaravel @laravelnews @laracasts @laravelsnippe…
RT @msurguy: Implementing Smart Search in @laravelphp apps : http://t.co/pxOmU1BhFn @LearningLaravel @laravelnews @laracasts @laravelsnippe…
RT @msurguy: .@brianreavis check out what I made with Selectize.js : http://t.co/pxOmU1BhFn thanks for the great plugin!
RT @msurguy: Implementing Smart Search in @laravelphp apps : http://t.co/pxOmU1BhFn @LearningLaravel @laravelnews @laracasts @laravelsnippe…
RT @msurguy: Implementing Smart Search in @laravelphp apps : http://t.co/pxOmU1BhFn @LearningLaravel @laravelnews @laracasts @laravelsnippe…
What’s hot today? It’s the tut about implementing smart search for #laravel 4 by @msurguy. Read it now: @LaravelIO http://t.co/weVdCBtN9j
RT @LearningLaravel: What’s hot today? It’s the tut about implementing smart search for #laravel 4 by @msurguy. Read it now: @LaravelIO htt…
“Laravel shop tutorial 3 – Implementing Smart Search – Maxoffsky |” http://t.co/5HOCDTC9Yc
RT @msurguy: Implementing Smart Search in @laravelphp apps : http://t.co/pxOmU1BhFn @LearningLaravel @laravelnews @laracasts @laravelsnippe…
RT @msurguy: Tutorial #3 Building a shop with @Laravelphp + @twbootstrap, Implementing Smart Search : http://t.co/aShx4Wc0b3 #dev #laravel …
RT @msurguy: Implementing Smart Search in @laravelphp apps : http://t.co/pxOmU1BhFn @LearningLaravel @laravelnews @laracasts @laravelsnippe…
RT @LearningLaravel: What’s hot today? It’s the tut about implementing smart search for #laravel 4 by @msurguy. Read it now: @LaravelIO htt…
RT @msurguy: Tutorial #3 Building a shop with @Laravelphp + @twbootstrap, Implementing Smart Search : http://t.co/aShx4Wc0b3 #dev #laravel …
Laravel shop tutorial 3 – Implementing Smart Search – Maxoffsky | http://t.co/fXn0NSJVi4
RT @msurguy: Implementing Smart Search in @laravelphp apps : http://t.co/pxOmU1BhFn @LearningLaravel @laravelnews @laracasts @laravelsnippe…
Laravel shop tutorial 3 – Implementing Smart Search http://t.co/USQfdyP0xE
RT @rajanpsanthanam: Laravel shop tutorial 3 – Implementing Smart Search http://t.co/USQfdyP0xE
RT @msurguy: Implementing Smart Search in @laravelphp apps : http://t.co/pxOmU1BhFn @LearningLaravel @laravelnews @laracasts @laravelsnippe…
RT @msurguy: Implementing Smart Search in @laravelphp apps : http://t.co/pxOmU1BhFn @LearningLaravel @laravelnews @laracasts @laravelsnippe…
Hi Maksim,
Thank you for this excellent tutorial. I’ve been trying to adapt this to my own app, but I need to concatenate two columns (firstname and lastname).
I have tried using an accessor in the model, but it breaks when I use get(array…) in the controller.
Other than using a raw SQL concat, can you think of any neat way around it?
I think SQL concat is an OK way to go in this instance. In fact in the application this is what I used and it worked great so maybe give that a try.
Thank you for this post, very useful.
Glad to know it’s useful 🙂 Enjoy!
Great! Your post is really good, I can take from here a missing part on my project! thanks a lot!
Enjoy!
can anyone please share the database for this tutorial
It’s in the source repository: https://github.com/msurguy/laravel-smart-search/blob/master/install.sql
Thanks
Thank you for this tutorial!
Thanks a lot for the tutorial, this was really to implement on my project, and it works like a charm 🙂
I get an ajax error code 500 (internal server error). I searched online and saw I needed an csrf token is that correct?
I am trying to integrate in Laravel 4 – Options doesn’t render on browser once the json response arrives.
Do you see the correct response in the Network tab of the developer tools?
i am trying to install in laravel 5.2 i fix this for laravel 5 almost but when i see thet response in the Network tab of the developer tools i got error Call to undefined method IlluminateDatabaseQueryBuilder::products()
Here is my Controller
& $item) {
$item[$element] = $type;
}
return $data;
}
public function appendURL($data, $prefix)
{
// operate on the item passed by reference, adding the url based on slug
foreach ($data as $key => & $item) {
$item[‘url’] = url($prefix.’/’.$item[‘slug’]);
}
return $data;
}
public function index()
{
$query = e(Input::get(‘q’,”));
if(!$query && $query == ”) return Response::json(array(), 400);
$products = Product::where(‘published’, true)
->where(‘name’,’like’,’%’.$query.’%’)
->orderBy(‘name’,’asc’)
->take(5)
->get(array(‘slug’,’name’,’icon’))->toArray();
$categories = Category::where(‘name’,’like’,’%’.$query.’%’)
->has(‘products’)
->take(5)
->get(array(‘slug’, ‘name’))
->toArray();
// Data normalization
$categories = $this->appendValue($categories, url(‘img/icons/category-icon.png’),’icon’);
$products = $this->appendURL($products, ‘products’);
$categories = $this->appendURL($categories, ‘categories’);
// Add type of data to each item of each set of results
$products = $this->appendValue($products, ‘product’, ‘class’);
$categories = $this->appendValue($categories, ‘category’, ‘class’);
// Merge all data into one array
$data = array_merge($products, $categories);
return Response::json(array(
‘data’=>$data
));
}
}
my Product and Category Model is Empty i migrate your sql file to my database first i learn than implement original App
not working in Laravel 5.4.
FatalErrorException in SearchController.php line 6:
Class ‘BaseController’ not found
in SearchController.php line 6
I have the same problem. I do see the response from the server but the render function of selectize doesnt seems to trigger
good