In-place Pagination using Backbone.js and Laravel (shop tutorial #4)
This tutorial is one more addition to my “Building a shop with Laravel” tutorial series.
In the previous tutorial, I showed you how to implement very nice “Smart search” feature using Selectize.js plugin to make user experience a bit nicer: https://maxoffsky.com/code-blog/laravel-shop-tutorial-3-implementing-smart-search/
When I develop web applications, I care a lot about the user experience and how easy it is for the user to get to the desired page.
In this post I will explain the concepts behind making in-place pagination for your PHP apps that allows the user to view many pages of content without doing a page refresh, aka “In-place pagination”.
The real, working demo of this type of search is also available at:
http://demos.maxoffsky.com/ajax-pagination/
And the source for the demo is at https://github.com/msurguy/laravel-backbone-pagination
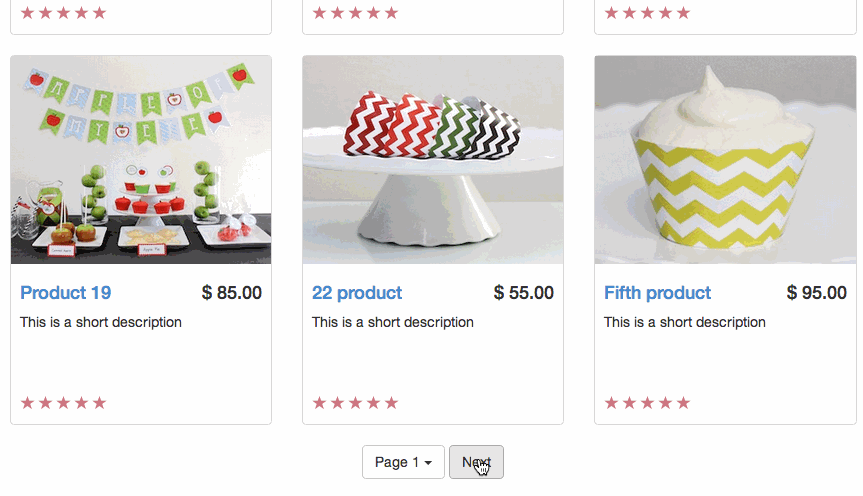
See the demo GIF below:
Let’s start with some basics:
There are many ways to achieve this kind of pagination user experience in your web applications using Javascript and AJAX calls. The underlying concept is that there is a Javascript frontend that requests a set of data, processes the result and updates the user interface with the new data. What kind of information does the frontend need to update the user interface for the pagination accordingly?
Data necessary for the pagination:
- Number of items in total
- Number of pages (this value could be calculated from the number of items/how many items to show)
- Index of the current page
- Type of sorting (in case the user wants to sort the items differently)
- Items themselves (to populate the user interface such as a grid or a list, etc)
Knowing this information, we can proceed with looking at the implementation of the concept using Backbone.Paginator.
What is Backbone.Paginator?
Backbone Paginator is a small plugin for Backbone.js JS MVC framework. If you are not familiar with Backbone or its bigger competitor – AngularJS, I highly recommend you look into the available JS MVC framework options. Backbone.js is just one of the many frameworks that allow building Single Page web Applications (SPA’s). I use Backbone in many of my projects to integrate parts of single page application snappiness(responsiveness) into my applications. Backbone Paginator allows easy integration with Backbone to provide pagination methods for the collections of data.
To integrate Backbone Paginator you need to download the minified production version from the project homepage:
http://backbone-paginator.github.io/backbone.paginator/
And of course you need Backbone itself and the Underscore library to be included in your project as well. For better user experience, I included Spin.js plugin to show the user that the page is being updated.
Here’s a code snippet that I used when all of the JS dependencies were downloaded:
<script src="{{ asset('js/vendor/underscore-min.js') }}"></script>
  <script src="{{ asset('js/vendor/backbone-min.js') }}"></script>
  <script src="{{ asset('js/vendor/backbone.paginator.min.js') }}"></script>
  <script src="{{ asset('js/vendor/spin.min.js') }}"></script>
Building the API for the paginator:
The API for the paginator is very simple. It needs to return the list of items as JSON data, along with the total count of items, depending on the index of the page that the user is requesting. Backbone.Paginator allows you to provide a parameter that will be passed to the API for sorting purposes. Other two parameters that will be passed to the API from the paginator are the index of the current page and the number of records to show per page.
Based on these three parameters and the desired output information, the API looks like this (using Laravel’s scopes to return an appropriate set of data), commented:
<?php

class ApiProductsController extends BaseController {

  public function getIndex()
  {
    // Get the number of items to show per page (defaults to 6 items)
    $perPage = e(Input::get('per_page','6'));

    // Get the index of the current page (defaults to the first page)
    $page = e(Input::get('page','1'));

    // Get the sorting parameter (defaults to popular)
    $sort = e(Input::get('sort','popular'));

    // Calculate the offset of the items
    $offset = $page*$perPage-$perPage;

    // The count of items will be updated from the query
    $count = 0;

    switch ($sort) {
      case 'date':
        $sortedProducts = Product::newest();
        break;
      case 'name':
        $sortedProducts = Product::byname();
        break;
      default:
        $sortedProducts = Product::popular();
        break;
    }

    // Get the count
    $count = $sortedProducts->count();

    // Retrieve the products using Laravel's Eloquent ORM methods
    $products = $sortedProducts->take($perPage)->offset($offset)->get(array('slug','rating_cache','name','short_description','icon','banner','pricing'));

    // Return the results as JSON data
    return Response::json(array(
      'data'=>$products->toArray(),
      'total' => $count
    ));
  }
}
That’s it for the API! Make sure you place this file as ProductsController.php in the app/controllers/Api folder and also add this line to the routes.php file to route the requests to it:
Route::get('api/products', 'ApiProductsController@getIndex');Building out the Javascript templates for the Backbone.Paginator:
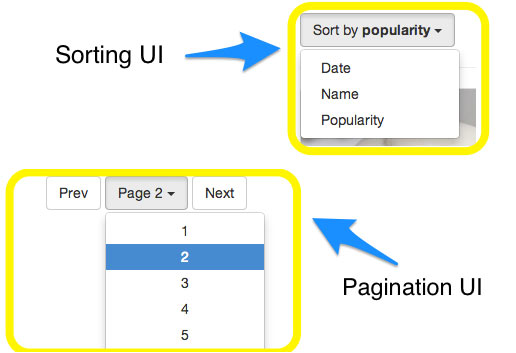
If you are familiar with Backbone, it uses Underscore.js templates to make creation of view templates very easy. Backbone.Paginator plugin uses the same kind of templates to present the pagination interface to the user. These templates will all go into the view file containing the logic for the Javascript MVC part of the application. There are two templates that the plugin is using:
- Sorting interface template – to show the user sorting options (for example a dropdown menu)
- Pagination layout template – to show the user number of pages, previous and next links and more
A small diagram showing these two templates rendered:
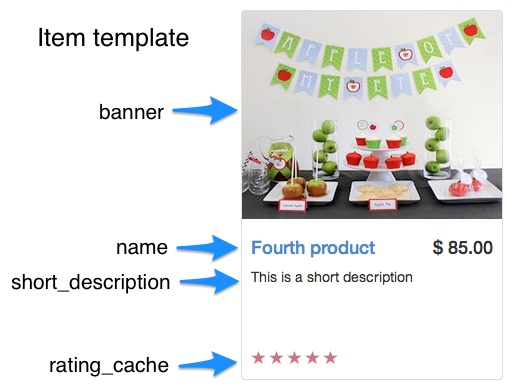
Another template in addition to these two is the item template itself (to show the item from the data). Here is how it looks like:
The two templates required for the Backbone.Paginator using Bootstrap 3 HTML/CSS framework are presented below:
<script type="text/html" id="paginationTemplate">
 <% if (currentPage != 1) { %>
   <button class="prev btn-default btn">Prev</button>
 <% } %>
 <div class="btn-group">
   <button data-toggle="dropdown" class="btn btn-default dropdown-toggle">Page <%= currentPage %> <span class="caret"></span></button>
   <ul class="dropdown-menu">
     <% for(p=1;p<=totalPages;p++){ %>
       <% if (currentPage == p) { %>
         <li class="active"><a href="#" class="page"><%= p %></a></li>
       <% } else { %>
         <li><a href="#" class="page"><%= p %></a></li>
       <% } %>
     <% }%>
   </ul>
 </div>
 <% if (lastPage != currentPage && lastPage != 0) { %>
  <button class="btn btn-default next">Next</button>
 <% } %>
</script>

<script type="text/html" id="sortingTemplate">
   <div class="btn-group">
     <button data-toggle="dropdown" class="btn btn-default dropdown-toggle">Sort by <strong><span id="sortByText">popularity</span></strong> <span class="caret"></span></button>
     <ul class="dropdown-menu" id="sortByField">
       <li><a href="date">Date</a></li>
       <li><a href="name">Name</a></li>
       <li><a href="popularity">Popularity</a></li>
     </ul>
   </div>
</script>
These templates will be used in the Backbone views and connected to the events dispatched by the views when the user interacts with the templates. Let’s build out the result item template (the template used to display a single item of the data). In this case I was building a shop so the item shows a product from the shop.
Building the result item template
<script type="text/html" id="ProductItemTemplate">
  <div class="thumbnail">
    <img src="<%= banner %>" alt="">
    <div class="caption">
        <h4 class="pull-right">$ <%= pricing %></h4>
        <h4><a href="{{url('products')}}/<%= slug %>"><%= name %></a></h4>
        <p><%= short_description %></p>
    </div>
    <div class="ratings">
        <p>
          <% for (var i = 1; i <= 5; i++) { %>
            <span class="glyphicon glyphicon-star<%= i <= rating_cache ? '' : '-empty' %>"></span>
          <% }; %>
        </p>
    </div>
  </div>
</script>
This code could be easily adapted to your own item display. It uses a mix of Blade and underscore templating. The Blade is used in only one place – to display the URL of the shop item which ideally should’ve been provided from the API call. The underscore templating replaces the <% %> and <%= %> with the output of javascript variables that will be fed into the template from the JSON data returned from the API.
Building the Backbone Application
Now that we have the view templates ready to go, let’s connect everything together by building a small Backbone application that will use the API to sort and paginate data. I am not a Javascript ninja so for most of this code I just followed the examples provided in Backbone.Paginator repository with some minor modifications. Let’s dive into the Javascript code right away.
For the initial setup, let’s create a global object to store our Backbone application:
window.app = {};
app.collections = {};
app.models = {};
app.views = {};
app.serverURL = '{{url("/")}}';
Now, let’s define an empty Backbone model for the item (product in my case):
app.models.Item = Backbone.Model.extend({});And a paginated collection according to the Backbone.Paginator documentation:
app.collections.PaginatedCollection = Backbone.Paginator.requestPager.extend({
  model: app.models.Item,
  paginator_core: {
    dataType: 'json',
    url: app.serverURL + '/api/products'
  },

  paginator_ui: {
    firstPage: 1,
    currentPage: 1,
    perPage: 6,
    totalPages: 10
  },

  server_api: {
    'per_page': function() { return this.perPage },
    'page': function() { return this.currentPage },
    'sort': function() {
      if(this.sortField === undefined)
        return 'popular';
      return this.sortField;
    }
  },

  parse: function (response) {
    $('#products-area').spin(false);
    this.totalRecords = response.total;
    this.totalPages = Math.ceil(response.total / this.perPage);

    return response.data;
  }

});
Next, let’s create a Backbone view that will render an item template when the view is initiated and passed a model into the view. This view will be the one responsible for create a DIV element and assigning classes to it so that it works nicely in Bootstrap 3 grid:
app.views.ItemView = Backbone.View.extend({
  tagName: 'div',
  className: 'col-sm-4 col-lg-4 col-md-4',
  template: _.template($('#ProductItemTemplate').html()),

  initialize: function() {
    this.model.bind('change', this.render, this);
    this.model.bind('remove', this.remove, this);
  },

  render : function () {
    this.$el.html(this.template(this.model.toJSON()));
    return this;
  }
});
Well, since our application has an option to sort the items by some criteria and Backbone.Paginator plugin has ability to work with the sorting methods, let’s also build a template for the sorting user interface. This view will listen to a click event on the sorting options and when the event is dispatched, the Backbone collection containing items will be updated by passing the sorting option to our API and retrieving the results. Here’s the code for the Backbone view for the sorting interface:
app.views.SortedView = Backbone.View.extend({

  events: {
    'click #sortByField a': 'updateSortBy'
  },

  template: _.template($('#sortingTemplate').html()),

  initialize: function () {
    this.collection.on('reset', this.render, this);
    this.collection.on('sync', this.render, this);
    this.$el.appendTo('#sorting');
  },

  render: function () {
    var html = this.template(this.collection.info());
    this.$el.html(html);

    if (this.collection.sortField == undefined){
      var sortText = this.$el.find('#sortByText').text();
    }else{
      var sortText = this.collection.sortField;
    }
    $('#sortByText').text(sortText);
  },

  updateSortBy: function (e) {
    e.preventDefault();
    var currentSort = $(e.target).attr('href');
    this.collection.updateOrder(currentSort);
    $('#products-area').spin();
  }

});
It’s coming along and we are almost finished! Just two more Backbone views to make and we are done with this nice tutorial!
Perhaps the most important Backbone view in this application is the one responsible for updating the pagination user interface and showing prev/next links. This view is tightly integrated with the methods that Backbone.Paginator provides to paginate a collection such as “requestPreviousPage()”, “requestNextPage()” and “goTo(page)”. Let’s take a look at this view, called “PaginatedView” :
app.views.PaginatedView = Backbone.View.extend({

  events: {
    'click button.prev': 'gotoPrev',
    'click button.next': 'gotoNext',
    'click a.page': 'gotoPage'
  },

  template: _.template($('#paginationTemplate').html()),

  initialize: function () {
    this.collection.on('reset', this.render, this);
    this.collection.on('sync', this.render, this);
    this.$el.appendTo('#pagination');
  },

  render: function () {
    var html = this.template(this.collection.info());
    this.$el.html(html);
  },

  gotoPrev: function (e) {
    e.preventDefault();
    $('#products-area').spin();
    this.collection.requestPreviousPage();
  },

  gotoNext: function (e) {
    e.preventDefault();
    $('#products-area').spin();
    this.collection.requestNextPage();
  },

  gotoPage: function (e) {
    e.preventDefault();
    $('#products-area').spin();
    var page = $(e.target).text();
    this.collection.goTo(page);
  }

});
And now, the last Backbone view responsible for rendering the items when the paginated collection is updated, the AppView:
app.views.AppView = Backbone.View.extend({
  el : '#paginated-content',

  initialize : function () {
    $('#products-area').spin();

    var tags = this.collection;

    tags.on('add', this.addOne, this);
    tags.on('all', this.render, this);

    tags.pager();

  },

  addOne : function ( item ) {
    var view = new app.views.ItemView({model:item});
    $('#paginated-content').append(view.render().el);
  }
});
This is it for the backbone application model/views/collection definitions! To initialize this app when the page is loaded, let’s put this code into the jQuery’s document ready function:
$(function(){
  app.collections.paginatedItems = new app.collections.PaginatedCollection();
  app.views.app = new app.views.AppView({collection: app.collections.paginatedItems});
  app.views.pagination = new app.views.PaginatedView({collection:app.collections.paginatedItems});
  app.views.sorting = new app.views.SortedView({collection:app.collections.paginatedItems});
});
This code will initialize the collection for the items, the app view, pagination view, sorting view and you should see the items appearing upon document load!
Of course if you are brand new to Backbone, this tutorial might be a little overwhelming and a lot of concepts will be new to you. In that case I highly recommend you check out Backbone.js documentation here.
If you have questions about anything here feel free to ask me in the comments!
As always, the source code for this tutorial is on Github:


RT @msurguy: In-place Pagination using @Backbone_js, @laravelphp and @twbootstrap (shop tutorial #4), #ajax #webdev #ui #ux: http://t.co/mK…
In-place Pagination using #Backbone.js and #Laravel (shop tutorial #4) http://t.co/OiRTpcYs46
RT @msurguy: In-place Pagination using @Backbone_js, @laravelphp and @twbootstrap (shop tutorial #4), #ajax #webdev #ui #ux: http://t.co/mK…
In-place Pagination using Backbone.js and Laravel (shop tutorial #4) http://t.co/ZCAlNC3sqi
RT @msurguy: In-place Pagination using @Backbone_js, @laravelphp and @twbootstrap (shop tutorial #4), #ajax #webdev #ui #ux: http://t.co/mK…
Thank You Max, GreaT Job Again!
In-place Pagination using Backbone.js and Laravel (shop tutorial #4) http://t.co/U4JIc1Oi8c
RT @LaravelRUS: In-place Pagination using Backbone.js and Laravel (shop tutorial #4) http://t.co/U4JIc1Oi8c
“In-place Pagination using Backbone.js and Laravel (shop tutorial #4) – Maxoffsky |” http://t.co/Cl7RerMbRY
Cool. great 1
Thanks! Enjoy!
Thanks! why not using a same products partial for the index and for the categorie’s single?
Could you please clarify this in more detail? 🙂
https://maxoffsky.com/maxoffsky-blog/in-place-pagination-using-backbone-js-laravel-shop-tutorial
Hi Maksim! I got everything working except for the spinner. It keeps saying that $(‘products-area’) has no method spin. I included spin.min.js after jquery, backbone, underscore, etc. So i don’t really know what could be the problem.
I think you have to include the spinner’s jquery wrapper after you include the spinner: https://github.com/fgnass/spin.js/blob/master/jquery.spin.js
Doptor CMS are going to implement online shop.
Nice article Maks, was looking form something similar and came across this article, found very useful. Thank you for sharing this.
You’re welcome! Enjoy my other articles as well!
Nice article.I want know how to upload image and download using Backbone.js code?any one send me the code?help me out
Hello! Can you show me what you have so far?
i show the code Backbone.js file upload..
Stackry
Canada
Canada
Canada
Canada
Log Out
Stackry
USA shopping, global shipping
2
Dashboard
Shipments
Invoices
Uploads
Account Settings
Notifications2
Your Uploads
Upload
<!–
Type:
USPS Form
USPS 1023 EP
Date:
8/7/2014
Delete
–>
Type:
Photo ID
Date:
8/7/2014
Delete
<!–
Type:
USPS Form
USPS 1023 EP
Date:
8/7/2014
Delete
–>
Type:
Photo ID
Date:
8/7/2014
Delete
Previous
1
2
3
….
Next
Terms of Service
About Us
Privacy Policy
Products
Blog
IN PARTNERSHIP WITH
Type:
Date:
Delete
window.jQuery || document.write(”)
// Upload Model
var Upload = Backbone.Model.extend({
defaults: {
name: ”,
date: ”,
type: ”
}
});
// A List of Uploads
var UploadCollection = Backbone.Collection.extend({
model: Upload
});
// The View for a Upload
var UploadView = Backbone.View.extend({
tagName: ‘div’,
className: “result-item”,
template: _.template($(‘#upload-item-template’).html()),
initialize: function () {
this.render();
},
render: function () {
this.$el.html(this.template(this.model.toJSON()));
}
});
// View for all uploads
var UploadListView = Backbone.View.extend({
render: function () {
this.collection.each(function (upload) {
var uploadView = new UploadView({ model: upload });
$(‘#upload-list’).append(uploadView.el);
}, this);
}
});
var uploadCollection = new UploadCollection([
{
name: ‘USPS Form 111’,
type: ‘USPS Form’,
date:’8/11/2003′
},
{
name: ‘USPS Form 111’,
type: ‘USPS Form’,
date: ‘8/11/2003’
},
{
name: ‘USPS Form 111’,
type: ‘USPS Form’,
date: ‘8/11/2003’
}
]);
var uploadListView = new UploadListView({ collection: uploadCollection });
uploadListView.render();
where is part 2 of this tutorial ?
im new to laravel so how to make relation between categories and product ?
I really like video tutorial and there are a lot of other people like me. I suggest you put an video for tutorials too. Thanks
I’m just learning laravel. While I’m going to run this project I’m getting the following error. “C:xampphtdocslaravelpaginationmaster>php artisan serve
Warning: require(C:xampphtdocslaravelpaginationmasterbootstrap/../vendor/autoload.php): failed to open stream: No such file or directory in C:xampphtdocslaravelpaginationmasterbootstrapautoload.php on line 17
Fatal error: require(): Failed opening required ‘C:xampphtdocslaravelpaginationmasterbootstrap/../vendor/autoload.php’ (include_path=’.;C:xamppphpPEAR’) in C:xampphtdocslaravelpaginationmasterbootstrapautoload.php on line 17”